1 pinctrl和gpio subsystem引入#
上一节引入gpio了子系统:
linux内核驱动-gpio子系统 - fuzidage - 博客园 (cnblogs.com)
字符设备驱动-gpio子系统 | Hexo (fuzidage.github.io)
Linux 驱动讲究驱动分离与分层,pinctrl 和 gpio 子系统就是驱动分离与分层思想下的产物。
pinctrl顾名思义就是引脚控制,用来配置比如引脚mux复用信息,引脚电器属性(比如上/下拉、速度、驱动能力等)信息。
gpio顾名思义就是控制gpio的输入输出,以及高低电平。不过,大多数的芯片并没有单独的IOMUX模块,引脚的复用、配置等,而是在GPIO模块内部实现的。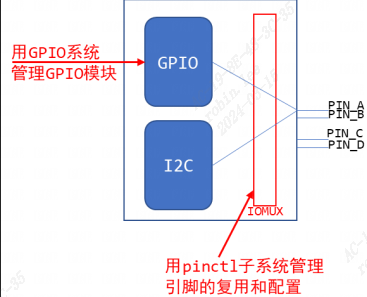
2 pinctrl子系统原理介绍#
2.1 pinctrl子系统#
2.1.1 pinctrl子系统软件架构#
pinctrl子系统源码路径是linux/drivers/pinctrl: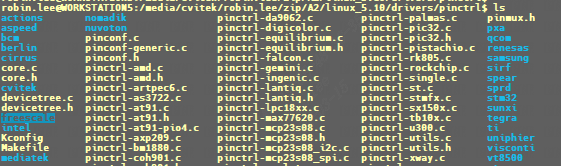
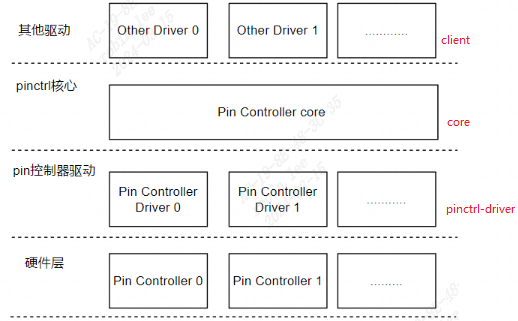
1 | 其他驱动层(client):具体到使用系统pin资源的设备驱动程序 |
pinctrl-driver主要为pinctrl-core提供pin的操作能力。把系统所有的pin以及对于pin的控制接口实例化成pinctrl_desc,并将pinctrl_desc注册到pinctrl-core中去。
2.1.2 Pinctrl重要概念#
Documentation\devicetree\bindings\pinctrl\pinctrl-bindings.txt有介绍重要相关概念:
1. pin controller:
芯片手册里你找不到 pin controller,它是一个软件上的概念。对应 IOMUX──用来复用引脚,还可以配置引脚(比如上下拉电阻等)。
2. client device:
“客户设备”,客户是指Pinctrl系统的客户,即使用Pinctrl系统的设备,使用引脚的设备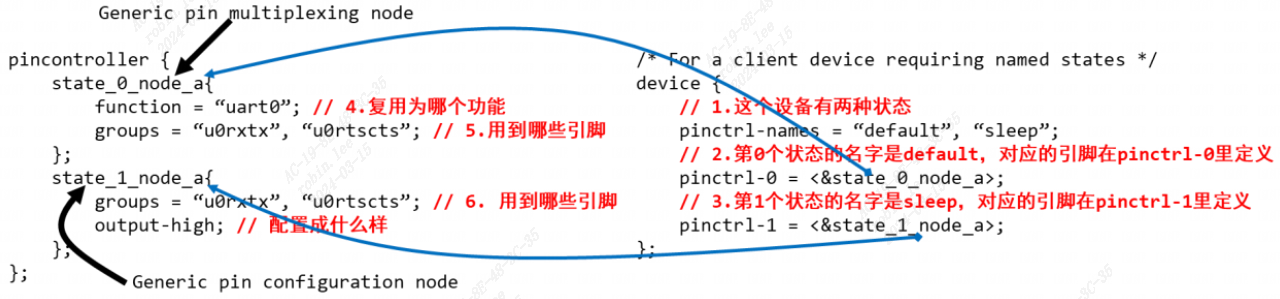
- pin state
对于一个"client device",如UART设备,它有多个“状态”:default、sleep等,那么对应的引脚也有这些状态。
比如,默认状态下,UART设备正常工作,那么所用的引脚就要复用为UART功能;
休眠状态下,为了省电,可以把这些引脚复用为GPIO功能;或者直接把它们配置输出高电平。上图
pinctrl-names定义2种状态:default,sleep。
第0种状态用到的引脚在pinctrl-0中定义,它是state_0_node_a,位于pincontroller节点中。
第1种状态用到的引脚在Pinctrl-1中定义,它是state_1_node_a,位于pincontroller节点中。当UART设备处于
default状态时,pinctrl子系统会自动根据上述信息将所用引脚复用为uart0功能。
当UART设备处于sleep状态时,pinctrl子系统会自动根据上述信息将所用引脚配置为高电平。- pin state
- groups和function
一个设备会用到一个或多个引脚,这些引脚可以归纳为一组(group);
这些引脚可以复用为某个功能:function,如I2C功能,SPI功能,GPIO功能等。当然:一个设备可以用到多组引脚,比如A1、A2两组引脚,A1组复用为F1功能,A2组复用为F2功能:
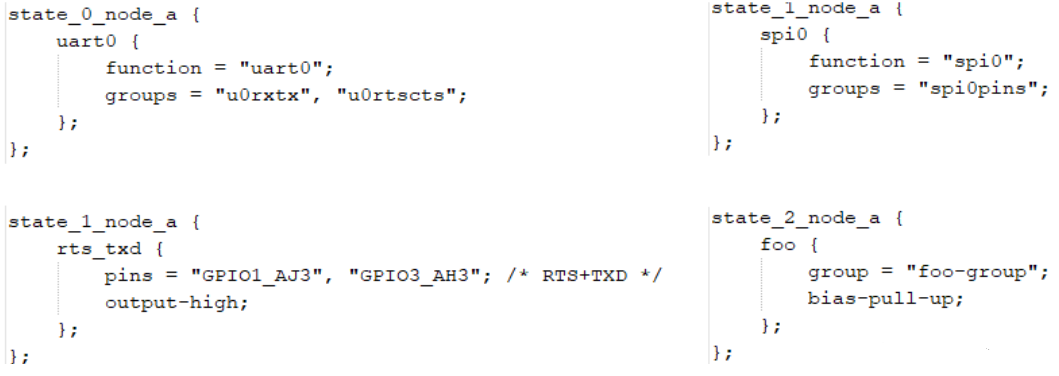
- groups和function
- Generic pin multiplexing node和Generic pin configuration node
下图左边pin controller节点中,有子节点或孙节点,它们是给client device使用的。
可用来描述复用信息:哪组(group)引脚复用为哪个功能(function);
配置信息:哪组(group)引脚配置为哪个设置功能(setting),如上拉、下拉等;
- Generic pin multiplexing node和Generic pin configuration node
2.1.3 pinctrl 子系统注册流程#
以imx6ull为例,drivers/pinctrl/freescale/pinctrl-imx6ul.c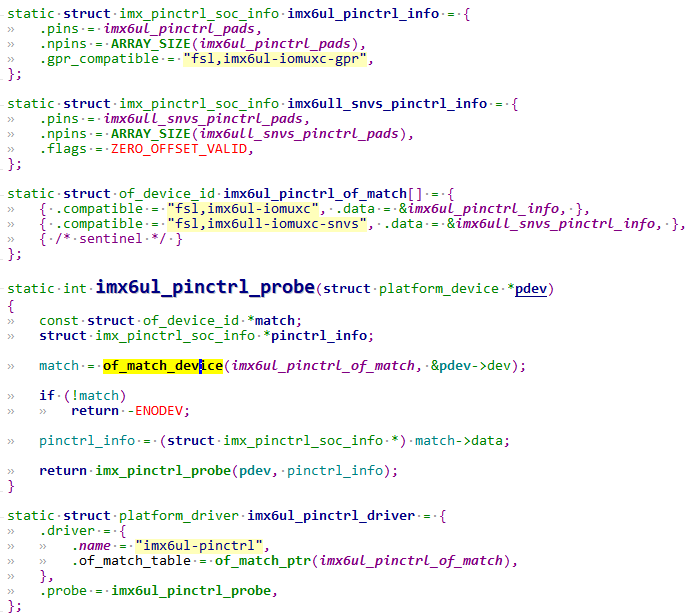
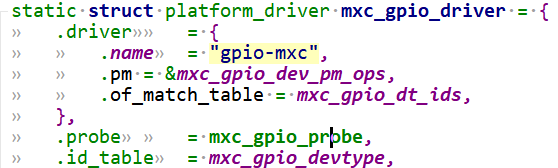
驱动的入口是 arch_initcall 中声明的函数,类似于我们经常写的 module_init是动态ko加载,arch_initcall是编译进入内核镜像。可以看到是利用platform_device框架来写的。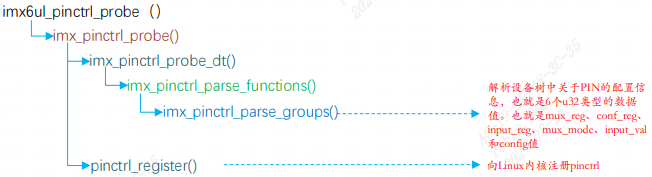
根据 compatible 和设备树的compatible 字段进行匹配,匹配成功执行 probe 函数,调用imx_pinctrl_probe_dt解析dts中的pinctrl描述信息。调用pinctrl_register或者devm_pinctrl_register注册pinctl子系统。
3 soc pinctrl主要结构体(controller)#
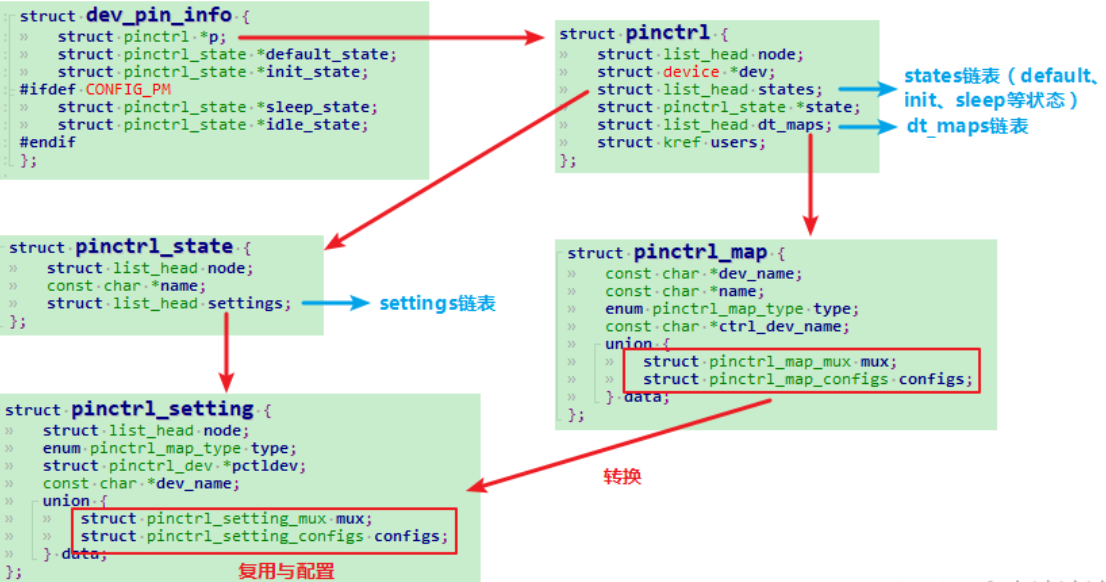
3.0 数据结构关系图#
总框图记录数据结构之间的关联。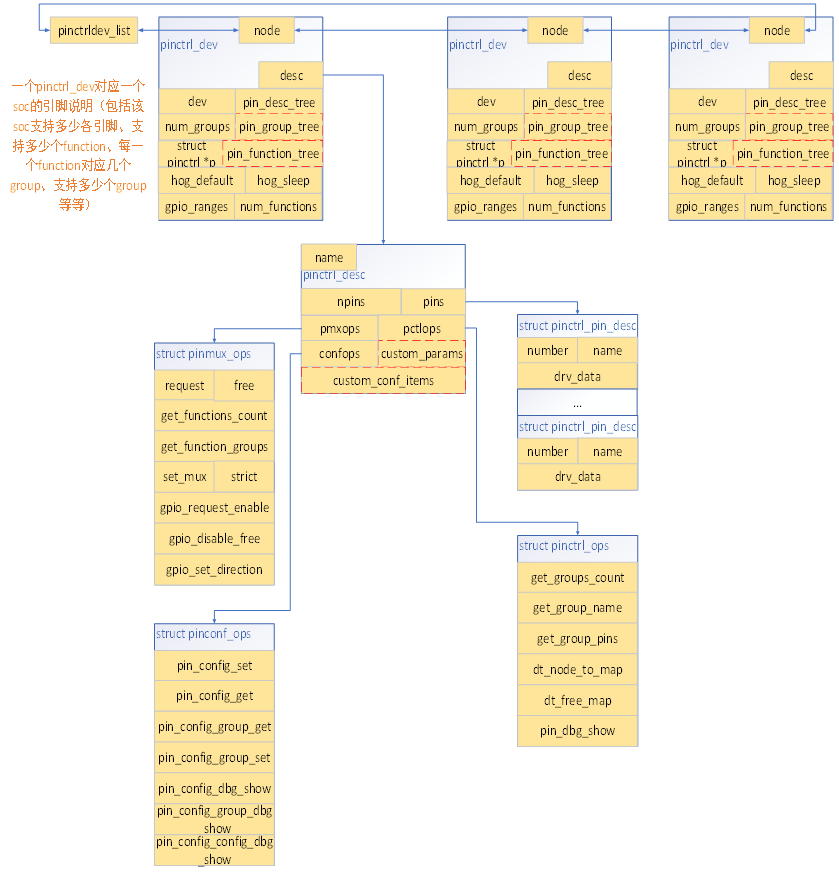
1 | //pincontroller数据结构 |
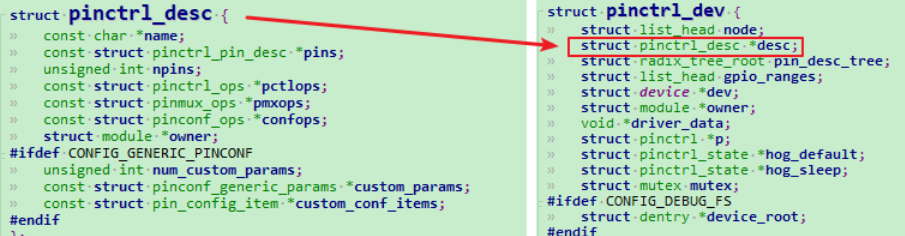
3.1 pinctrl_dev#
pinctrl_dev 是 pinctrl 子系统的根源结构体。
1 | struct pinctrl_dev { |
/driver/pinctrl/core.c中注册pinctrl时将soc中所有的pinctrl_dev挂载到pinctrl_dev_list链表中方便查询使用。
1 | struct pinctrl_dev *pinctrl_register(struct pinctrl_desc *pctldesc, |
3.2 pinctrl_desc#
1 | struct pinctrl_desc { |

三个ops:
group操作接口对应数据结构struct pinctrl_ops,包含get_groups_count、get_group_name、get_group_pins等接口;mux操作接口对应的数据结构为struct pinmux_ops,包含pin request、free、set_mux、get_functions_count、get_function_groups等;function操作接口对应的数据结构为struct pinconf_ops,包含pin_config_set、pin_config_get、pin_config_group_get、pin_config_group_set等接口;
3.2.1 pinctrl_pin_desc#
1 | struct pinctrl_pin_desc { |
pinctrl_pin_desc来描述一个引脚.
3.2.2 pin_desc#
1 | struct pin_desc { |
记录引脚的使用计数、引脚当前所属的function、group信息(该数据结构主要是pinctrl子系统用于判断一个引脚是否被多次配置不同的复用情况使用(pin_request、pin_free)
3.2.3 三个ops#
3.2.3.1 pinctrl_ops#
1 | struct pinctrl_ops { |
- 来取出某组的引脚:
get_groups_count、get_group_pins - 处理设备树中
pin controller中的某个节点创建映射:dt_node_to_map,把device_node转换为一系列的pinctrl_map
3.2.3.2 pinmux_ops#
1 | struct pinconf_ops { |
3.2.3.3 pinconf_ops#
1 | struct pinconf_ops { |
4 board pinctrl相关结构体(使用者client)#
4.0 数据结构关系#
前面Soc pin描述相关的数据结构,已经搭建了该soc所支持的pin、function、group以及相关操作接口等信息;而board pin描述相关的数据结构则描述一块board所使用到的function及相关的group: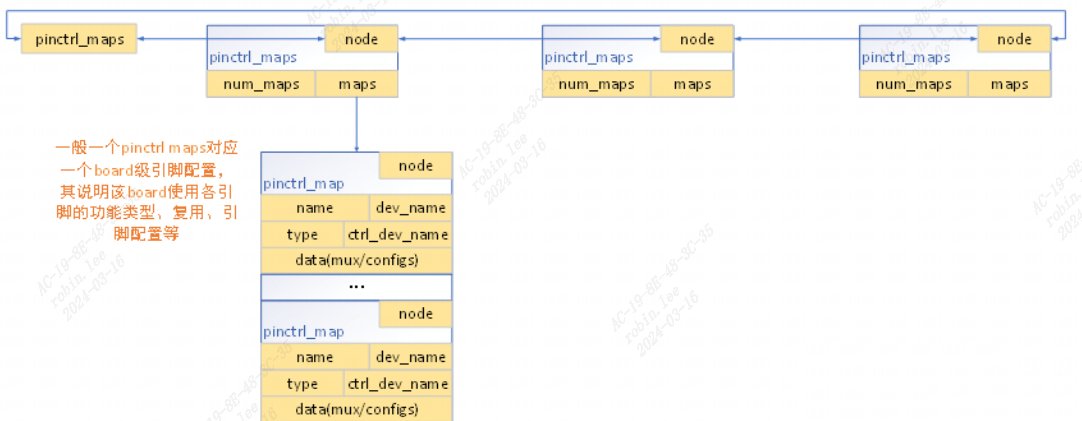
4.1 pinctrl_map#
1 | struct pinctrl_map { |
该数据结构可以理解为一个function类型:
4.2 dev_pin_info#
device结构体中有一个dev_pin_info,用来保存设备的pinctrl信息: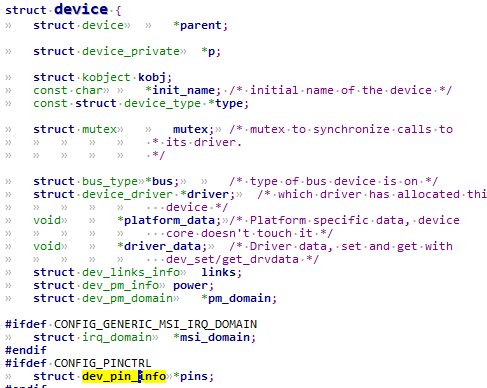
1 | struct dev_pin_info { //该device对应引脚的配置与复用信息 |
4.2.1 pinctrl#
一个设备的所有引脚配置相关的信息:
1 | struct pinctrl { |
4.2.1.1 pinctrl_state#
1 | struct pinctrl_state { |
5 pinctrl实例化示例#
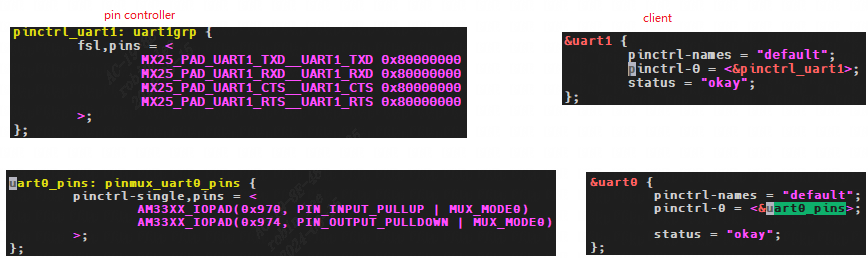
5.1 pin controller示例#
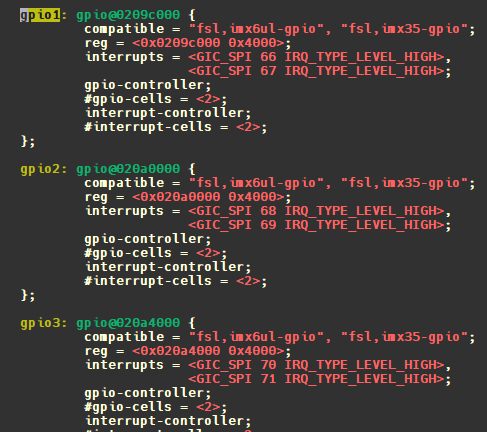
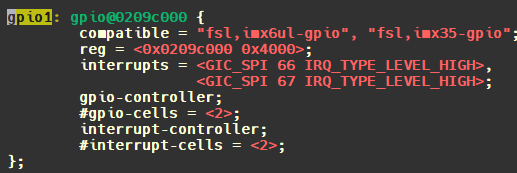
打开imx6ull的dtsi找到pin controller控制器节点,对比IMX6ULL参考手册可知:imx6ull一共3个IOMUX控制器: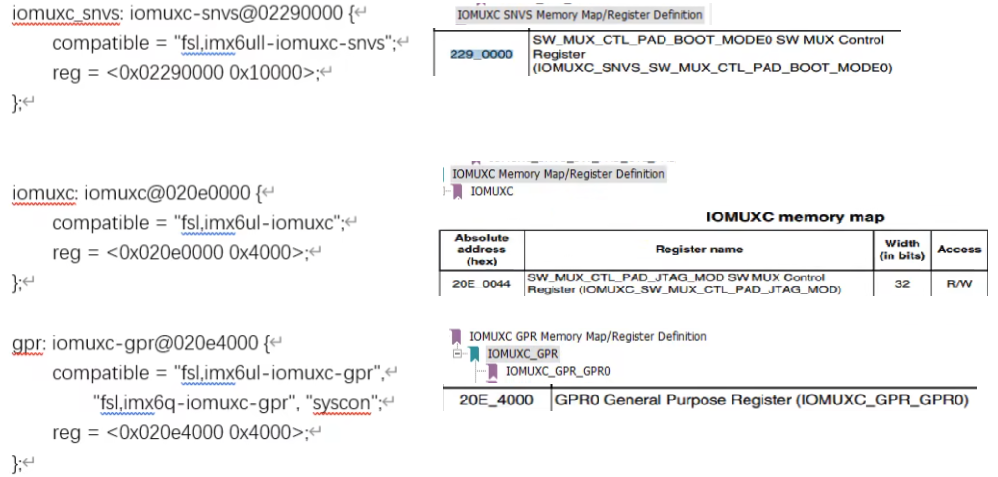
5.2 client示例#
以evk公板为例: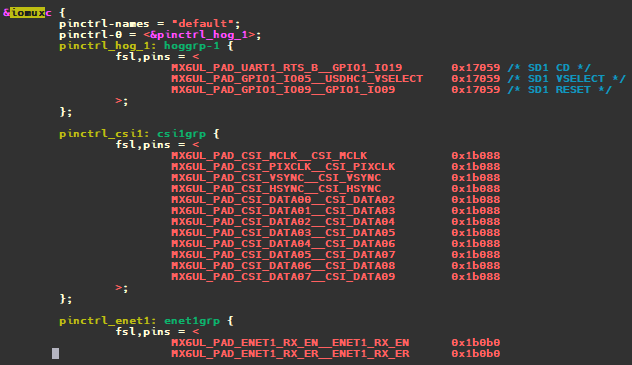
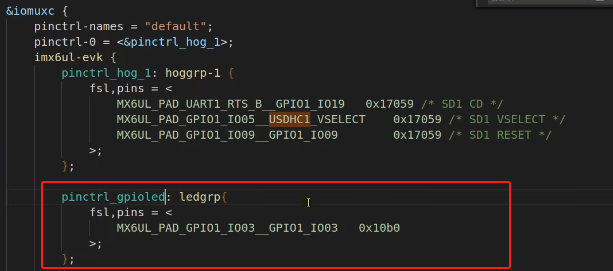
imx6ull pinmux dts配置描述:
我们看到:
1 | MX6UL_PAD_UART1_RTS_B__GPIO1_IO19 0x17059 /* SD1 CD */ |
它是表示什么意思呢?配置了哪些信息呢?
UART1_RTS_B复用成GPIO1_IO19: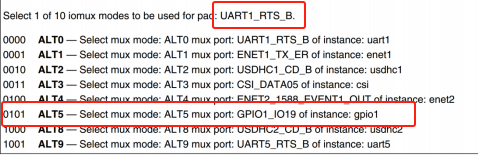
此宏定义在imx_6ull_pinfunc.h, 后面跟着 5 个数字,也就是这个宏定义的具体值,如下所示:
1 | 0x0090 0x031C 0x0000 0x5 0x0 |
这 5 个值的含义如下所示:
1 | <mux_reg conf_reg input_reg mux_mode input_val> |
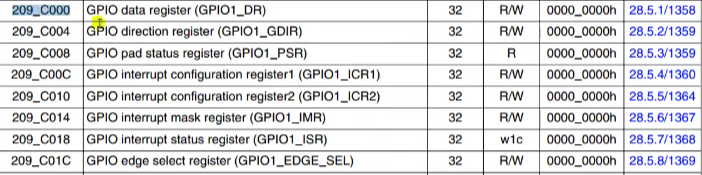
0x0090表示UART1_RTS_B的iomux寄存器
0x031C表示UART1_RTS_B的电器属性寄存器
0x0000表示input寄存器
0x5表示复用成模式5
0x0表示input寄存器设置值为0x0
注意还少了一项电器属性的值啊?别急定义在dts中,0x17059就刚好是电器属性的值。
5.2.1 client如何使用pinctrl#
前面讲过client包含device结构体,每个device结构体里都有一个dev_pin_info结构体,用来保存设备的pinctrl信息。platform_device匹配driver会执行probe,probe前会进行pinctrl处理,处理函数为pinctrl_bind_pins:
1 | platform_device_register |
5.2.1.1 pinctrl_bind_pins过程#
- 构造
pinctrl- 通过
pinctrl_ops.dt_node_to_map将设备树节点转换成一系列pinctrl_map pinctrl_map转换成pinctrl_setting,放入settings链表,记录在pinctrl_state中
- 通过
- 选择
state,遍历settings链表,进行pinctrl的mux和config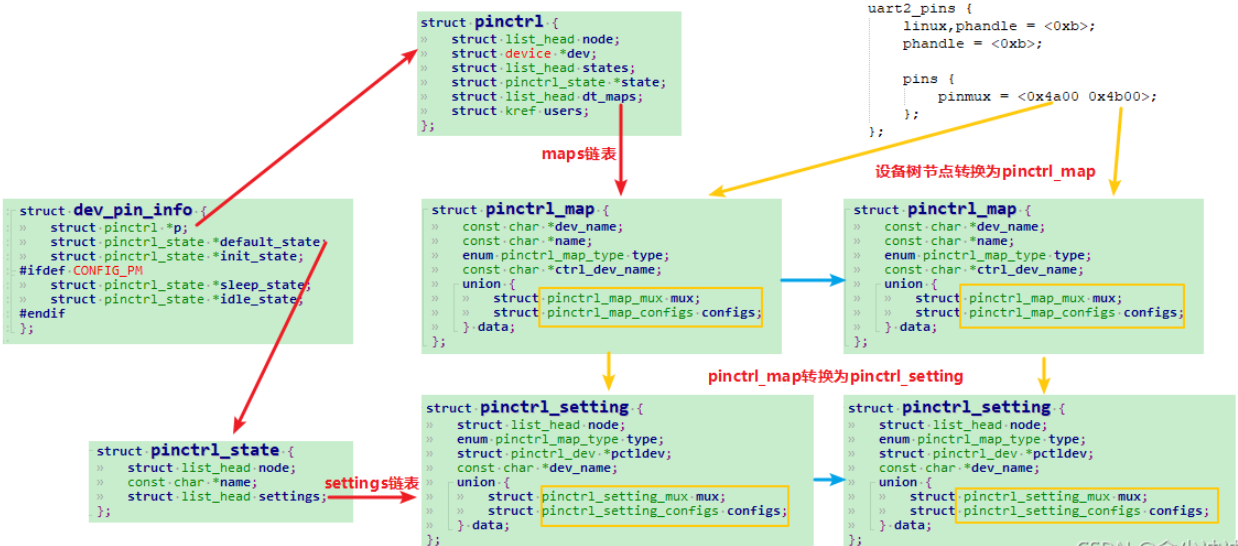
函数调用过程:
1 | pinctrl_bind_pins |
节点转换为pinctrl_map过程:
点击查看代码
1 | pinctrl_dt_to_map(p); |
pinctrl_map转换为pinctrl_setting过程:
1 | for_each_maps() { |
pin脚的复用和配置过程:
1 | pinctrl_bind_pins |


 ,展开命令成一个