1.设备树相关的头文件#
1.处理 DTB
1 | of_fdt.h // dtb 文件的相关操作函数, 我们一般用不到, |
2.处理 device_node
1 | of.h // 提供设备树的一般处理函数, |
3.处理 platform_device
1 | of_platform.h // 把 device_node 转换为 platform_device 时用到的函数, |
2.设备树相关的函数#
2.1 找res属性和platform device#
of_find_device_by_node
函数原型为:
1 | extern struct platform_device *of_find_device_by_node(struct device_node *np); |
设备树中的每一个节点,在内核里都有一个 device_node;你可以使用device_node 去找到对应的 platform_device。
platform_get_resource
这 个 函 数 跟 设 备 树 没 什 么 关 系 , 但 是 设 备 树 中 的 节 点 被 转 换 为 platform_device 后,设备树中的 reg 属性、interrupts 属性也会被转换为“resource”。 这时,你可以使用这个函数取出这些资源。
函数原型为:
1 | /** |
对于设备树节点中的 reg 属性,它对应 IORESOURCE_MEM 类型的资源; 对于设备树节点中的 interrupts 属性,它对应 IORESOURCE_IRQ 类型的资源。
2.2 找节点#

of_find_node_by_path
根据路径找到节点,比如“/”就对应根节点,“/memory”对应 memory 节点。
函数原型:
1 | static inline struct device_node *of_find_node_by_path(const char *path);c |
of_find_node_by_name
根据名字找到节点,节点如果定义了 name 属性,那我们可以根据名字找到它。
函数原型:
1 | extern struct device_node *of_find_node_by_name(struct device_node *from,const char *name); |
参数 from 表示从哪一个节点开始寻找,传入 NULL 表示从根节点开始寻找。 但是在设备树的官方规范中不建议使用“name”属性,所以这函数也不建议 使用。
of_find_node_by_type
根据类型找到节点,节点如果定义了 device_type 属性,那我们可以根据类型找到它。
函数原型:
1 | extern struct device_node *of_find_node_by_type(struct device_node *from, const char *type); |
参数 from 表示从哪一个节点开始寻找,传入 NULL 表示从根节点开始寻找。 但是在设备树的官方规范中不建议使用“device_type”属性,所以这函数也不建议使用。
of_find_compatible_node
根据 device_type和compatible 找到节点,节点如果定义了 compatible 属性,那我们可以根据 compatible 属性找到它。
函数原型:
1 | extern struct device_node *of_find_compatible_node(struct device_node *from, const char *type, const char *compat); |
- 参数
from表示从哪一个节点开始寻找,传入 NULL 表示从根节点开始寻找。 - 参数
compat是一个字符串,用来指定compatible属性的值; - 参数
type是一个字符串,用来指定device_type属性的值,可以传入 NULL。
of_find_node_by_phandle
根据 phandle 找到节点。dts 文件被编译为 dtb 文件时,每一个节点都有一个数字 ID,这些数字 ID 彼此不同。可以使用数字 ID 来找到 device_node。 这些数字 ID 就是 phandle。
函数原型:
1 | extern struct device_node *of_find_node_by_phandle(phandle handle); |
of_find_matching_node_and_match
通过 of_device_id 匹配表来查找指定的节点.
1 | //from:开始查找的节点,如果为 NULL 表示从根节点开始查找整个设备树。 |
of_get_parent
找到 device_node 的父节点。
函数原型:
1 | extern struct device_node *of_get_parent(const struct device_node *node); |
- 参数 from 表示从哪一个节点开始寻找,传入 NULL 表示从根节点开始寻找。
of_get_next_parent
这个函数名比较奇怪,怎么可能有“next parent”?
它实际上也是找到 device_node 的父节点,跟 of_get_parent 的返回结果是一样的。差别在于它多调用下列函数,把 node 节点的引用计数减少了 1。这意味着 调用 of_get_next_parent 之后,你不再需要调用 of_node_put 释放 node 节点。of_node_put(node);
函数原型:
1 | extern struct device_node *of_get_next_parent(struct device_node *node); |
- 参数 from 表示从哪一个节点开始寻找,传入 NULL 表示从根节点开始寻找。
of_get_next_child
取出下一个子节点。
函数原型:
1 | extern struct device_node *of_get_next_child(const struct device_node *node, struct device_node *prev); |
- 参数 node 表示父节点;
- prev 表示上一个子节点,设为 NULL 时表示想找到第 1 个子节点。
不断调用 of_get_next_child 时,不断更新pre参数,就可以得到所有的子节点。
of_get_next_available_child
取出下一个 “可用” 的子节点,有些节点的 status 是“disabled”,那就会跳过这些节点。
函数原型:
1 | struct device_node *of_get_next_available_child( const struct device_node *node, struct device_node *prev); |
- 参数 node 表示父节点;
- prev 表示上一个子节点,设为 NULL 时表示想找到第 1 个子节点。
of_get_child_by_name
根据名字取出子节点。
函数原型:
1 | extern struct device_node *of_get_child_by_name(const struct device_node *node, const char *name); |
- 参数 node 表示父节点;
- name 表示子节点的名字。
2.3 找到属性#
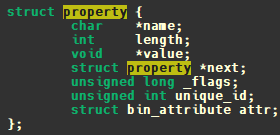
of_find_property
内核源码 incldue/linux/of.h 中声明了 device_node 的操作函数,当然也包括属性的操作函数:
函数原型:
1 | extern struct property *of_find_property(const struct device_node *np, const char *name, int *lenp); |
- 参数np表示节点,我们要在这个节点中找到名为 name 的属性。
- lenp 用来保存这个属性的长度,即它的值的长度。
2.3.1 找到属性所指向的节点#
1 | ion_heap0: heap_carveout@0 { |
1 | static inline struct device_node *of_parse_phandle(const struct device_node *np, |
2.3.2 设备节点找到资源信息#
1 | static inline int of_address_to_resource(struct device_node *dev, int index, |
2.4 获取属性的值#
of_get_property
根据名字找到节点的属性,并且返回它的值。
函数原型:
1 | /* |
- 参数 np 表示节点,我们要在这个节点中找到名为 name 的属性,然后返回它的值。
- lenp 用来保存这个属性的长度,即它的值的长度。
of_property_count_elems_of_size
根据名字找到节点的属性,确定它的值有多少个元素(elem)。
函数原型:
1 | * of_property_count_elems_of_size - Count the number of elements in a property |
参数 np 表示节点,我们要在这个节点中找到名为 propname 的属性,然后返回下列结果:
return prop->length / elem_size;
在设备树中,节点大概是这样:1
2
3xxx_node {
xxx_pp_name = <0x50000000 1024> <0x60000000 2048>;
};调用
of_property_count_elems_of_size(np, “xxx_pp_name”, 8)时,返回值是 2;调用
of_property_count_elems_of_size(np, “xxx_pp_name”, 4)时,返回值是 4。
2.5 读整数 u32/u64#
of_property_read_u32
of_property_read_u64
1 | static inline int of_property_read_u32(const struct device_node *np, const char *propname, u32 *out_value); |
在设备树中,节点大概是这样:
1 | xxx_node { |
- 调用
of_property_read_u32 (np, “name1”, &val)时,val 将得到值 0x50000000; - 调用
of_property_read_u64 (np, “name2”, &val)时,val 将得到值 0x6000000050000000。
读某个整数 u32/u64
1 | extern int of_property_read_u32_index(const struct device_node *np, const char *propname, u32 index, u32 *out_value); |
在设备树中,节点大概是这样:
1 | xxx_node { |
- 调用
of_property_read_u32 (np, “name2”, 1, &val)时,val 将得到值 0x60000000。
2.6 读数组#
1 | int of_property_read_variable_u8_array(const struct device_node *np, const char *propname, u8 *out_values, size_t sz_min, size_t sz_max); |
在设备树中,节点大概是这样:
1 | xxx_node { |
上述例子中属性 name2 的值,长度为 8。
- 调用
of_property_read_variable_u8_array (np, “name2”, out_values, 1, 10)时, out_values 中将会保存这 8 个字节:0x12,0x00,0x00,0x50,0x34,0x00,0x00,0x60。 - 调用
of_property_read_variable_u16_array (np, “name2”, out_values, 1, 10)时, out_values 中将会保存这 4 个 16 位数值:0x0012, 0x5000,0x0034,0x6000。
总之,这些函数要么能取到全部的数值,要么一个数值都取不到; - 如果值的长度在
sz_min和sz_max之间,就返回全部的数值; - 否则一个数值都不返回。
2.7 读字符串#
1 | int of_property_read_string(const struct device_node *np, const char *propname, const char **out_string); |
- 返回节点 np 的属性(名为
propname)的值; (*out_string)指向这个值,把它当作字符串
2.8 其他of函数#
of_device_is_compatible
1 | int of_device_is_compatible(const struct |
检查设备节点的兼容性, 用于查看节点的 compatible属性是否有包含 compat指定的字符。
of_translate_address
函数负责将从设备树读取到的地址转换为物理地址,函数原型如下:
1 | u64 of_translate_address(struct device_node *np, const __be32 *addr); |
of_address_to_resource
根据设备节点转成资源信息。
1 | int of_address_to_resource(struct device_node *dev, int index, struct resource *r); |
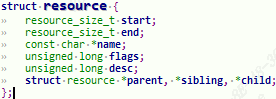
IIC、 SPI、 GPIO等这些外设都有对应的寄存器,这些寄存器其实就是一组内存 空间, Linux内核使用 resource结构体来描述一段内存空间。
对于 32位的 SOC来说, resource_size_t是 u32类型的。其中 start表示开始地址, end表示结束地址, name是这个资源的名字, flags是资源标志位,一般表示资源类型,可选的资源标志定义在文件 include/linux/ioport.h
1 |
|
常 见 的 资 源 标 志 就 是 IORESOURCE_MEM 、 IORESOURCE_REG 和IORESOURCE_IRQ。
of_iomap
以前我们会通过ioremap函数来完成物理地址到虚拟地址的映射,采用设备树以后就可以直接通过 of_iomap 函数来获取内存地址所对应的虚拟地址,不需要使用 ioremap 函数。of_iomap 函数本质上也是将 reg 属性中地址信息转换为虚拟地址,如果 reg 属性有多段的话,可以通过 index 参数指定要完成内存映射的是哪一段:
1 | void __iomem *of_iomap(struct device_node *np, int index); |
3 使用设备树示例#
3.1 led灯驱动设备树方式实现#
led灯dts定义在根节点下,作为根节点子节点:
1 | alphaled { |
3.2 驱动程序#
点击查看代码
1 |
|
4 根设备树扫描流程#
4.1 解析root dts总览#
1 | void __init setup_arch(char **cmdline_p) |
setup_machine_fdt() 根据传入的设备树dtb的首地址完成一些初始化操作。arm_memblock_init() 主要是内存相关,为设备树保留相应的内存空间,保证设备树dtb本身存在于内存中而不被覆盖。unflatten_device_tree()对设备树具体的解析,将设备树各节点转换成相应的struct device_node结构体.

4.1.1 setup_machine_fdt#
参数__atags_pointer就是 r2 的寄存器值,是设备树在内存中的起始地址。
1 | const struct machine_desc * __init setup_machine_fdt(unsigned int dt_phys) |
第一部分先将设备树在内存中的物理地址转换为虚拟地址,uboot 传递给内核的设备树地址为物理地址,因为设备树被放置在内存的线性映射区,因此可以简单地通过偏移计算得出其对应的虚拟地址,然后再
early_init_dt_verify检查该地址上是否有设备树的魔数(magic)。检查设备树是否匹配成功。最后将设备树地址赋值给全局变量initial_boot_params。of_flat_dt_match_machine(mdesc_best, arch_get_next_mach),逐一读取dts根目录下的 compatible 属性, 返回machine_desc结构体。第三部分就是扫描设备树中的各节点:
1
2
3
4
5
6
7void __init early_init_dt_scan_nodes(void) {
of_scan_flat_dt(early_init_dt_scan_chosen, boot_command_line);
//boot_command_line是一个静态数组,存放着启动参数,
//而of_scan_flat_dt()函数的作用就是扫描设备树中的节点,然后对各节点分别调用传入的回调函数。
of_scan_flat_dt(early_init_dt_scan_root, NULL);
of_scan_flat_dt(early_init_dt_scan_memory, NULL);
}这3个函数分别是处理
chosen节点、root节点中除子节点外的属性信息、memory节点。1
2
3
4
5
6
7int __init early_init_dt_scan_chosen(unsigned long node, const char *uname,int depth, void *data){
...
p = of_get_flat_dt_prop(node, "bootargs", &l);
if (p != NULL && l > 0)
strlcpy(data, p, min((int)l, COMMAND_LINE_SIZE));
...
}
获取 bootargs,然后将bootargs放入boot_command_line中,作为启动参数,而并非处理整个chosen节点。
再看第二个函数调用:
1 | int __init early_init_dt_scan_root(unsigned long node, const char *uname,int depth, void *data) |
将 root 节点中的#size-cells和 #address-cells属性提取出来,并非获取root节点中所有的属性,放到全局变量dt_root_size_cells和dt_root_addr_cells中。
接下来看第三个函数调用:
1 | int __init early_init_dt_scan_memory(unsigned long node, const char *uname,int depth, void *data){ |
函数先判断节点的uname是memory@0,如果不是,则返回。然后将所有memory相关的reg属性取出来,根据address-cell和size-cell的值进行解析,然后调用early_init_dt_add_memory_arch()来申请相应的内存空间。
到这里,setup_machine_fdt()函数对于设备树的第一次扫描解析就完成了,主要是获取了一些设备树提供的总览信息。
4.1.2 arm_memblock_init#
1 | void __init arm_memblock_init(const struct machine_desc *mdesc) { |
扫描设备树节点中的"reserved-memory"节点,为其分配保留空间。
4.1.3 unflatten_device_tree#

第一步是__unflatten_device_tree函数:

unflatten_dt_nodes被调用两次,第一次是扫描得出设备树转换成device node需要的空间,然后系统申请内存空间,第二次就进行真正的解析工作。
4.1.3.1 unflatten_dt_nodes遍历子节点#
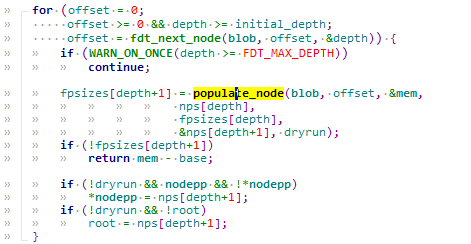
从根节点开始,对子节点依次调用populate_node(),从函数命名上来看,这个函数就是填充节点,为节点分配内存。
4.1.3.1.1 populate_node#

为当前节点申请内存空间,使用of_node_init() 函数对node进行初始化,populate_properties设置node属性。populate_properties设置节点的属性。
4.1.3.2 of_alias_scan#
/* Get pointer to "/chosen" and "/aliases" nodes for use everywhere */。
这句就能看出它是用来处理aliases,chosen等特殊节点的。处理带有别名的节点,函数实现细节如下:

1.先处理chosen节点中的"stdout-path"或者"stdout"属性(两者最多存在其一),然后将stdout指定的path赋值给全局变量of_stdout_options,并将返回的全局struct device_node类型数据赋值给of_stdout,指定系统启动时的log输出。
2.接下来为aliases节点申请内存空间,如果一个节点中同时没有 name/phandle/linux,phandle,则被定义为特殊节点,对于这些特殊节点将不会申请内存空间。
3.of_alias_add添加到alias链表。
5 device_node转换成platform_device#
5.0 转换过程总览#
1 | of_platform_default_populate_init() |
5.1 device_node转换到platform_device的条件#
- 一般情况下,只对设备树中根的一级子节点进行转换,也就是子节点的子节点并不处理。但是存在一种特殊情况,就是当某个根子节点的
compatible属性为"simple-bus"、"simple-mfd"、"isa"、"arm,amba-bus"时,当前节点中的子节点将会被转换成platform_device节点。 - 节点中必须有
compatible属性。
设备树节点的reg和 interrupts 资源将会被转换成 platform_device 内的 struct resources 资源。
5.2 转换过程解析#
展开of_platform_device_create_pdata:

调用of_device_alloc,可以看到为设备树节点分配了一个dev(struct platform_device),展开of_device_alloc函数:

可以看到把设备树节点的属性转成platform_device的io,irq等资源信息。同时将device_node *np指针记录到dev->dev.of_node。这样就建立了设备树节点到platform_device的转换关系。
然后调用of_device_add注册到系统device中去。
最后调用of_platform_bus_create在用户空间创建相应的访问节点。