1 APP 读取按键方式
查询方式
休眠-唤醒方式
poll 方式
异步通知方式
第2、3、4种方法,都涉及中断服务程序。
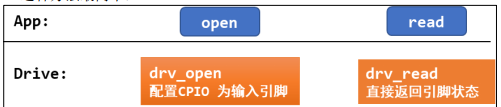
1.1 查询方式
APP 调用 open 时,导致驱动中对应的 open 函数被调用,在里面配置 GPIO 为输入引脚。 APP 调用 read 时,导致驱动中对应的 read 函数被调用,它读取寄存器,把引脚状态直接返回给 APP,APP需要反复read查询引脚电平状态。
很明显,查询方式用的非阻塞IO(O_NONBLOCK)。
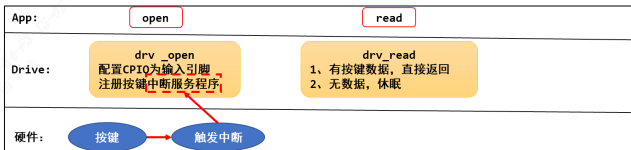
1.2 休眠-唤醒方式
APP 调用 open 时,导致驱动中对应的 open 函数被调用,在里面配置GPIO 为输入引脚;并且注册 GPIO 的中断处理函数。
APP 调用 read 时,导致驱动中对应的 read 函数被调用,如果有按键数据则直接返回给 APP;否则 APP 在内核态read函数中休眠。
当用户按下按键时, GPIO 中断被触发,导致驱动程序之前注册的中断服务程序被执行。它会记录按键数据,read函数被唤醒,执行驱动代码,把按键数据返回给APP(用户空间)。
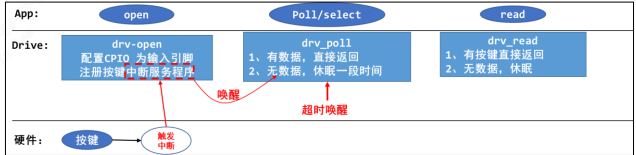
1.3 poll 方式 上面的休眠-唤醒方式有个缺点:如果一直没操作按键,那么 APP 就会永远休眠。
APP 调用 open 时,导致驱动中对应的 open 函数被调用,在里面配置GPIO 为输入引脚;并且注册 GPIO 的中断处理函数。
APP 调用 poll 或 select 函数,意图是“查询”是否有数据,这 2 个函数都可以指定一个超时时间,即在这段时间内没有数据的话就返回错误。这会导致驱动中对应的 drv_poll 函数被调用,如果有按键数据则直接返回给 APP;否则 APP 在内核态休眠一段时间。
当按下按键时, GPIO 中断被触发,导致驱动程序之前注册的中断服务程序被执行。它会记录按键数据,并唤醒休眠中的 APP。如果用户没按下按键,但是超时时间到了,内核也会唤醒 APP。
所以 APP 被唤醒有 2 种原因:用户操作了按键或者超时。被唤醒的 APP 在内核态继续运行,即继续执行驱动代码,把 “状态” 返回给 APP(用户空间)。APP 得到 poll/select 函数的返回结果后,如果确认是有数据的,则再调用 read 函数,这会导致驱动中的 read 函数被调用,这时驱动程序中含有数据,会直接返回数据。
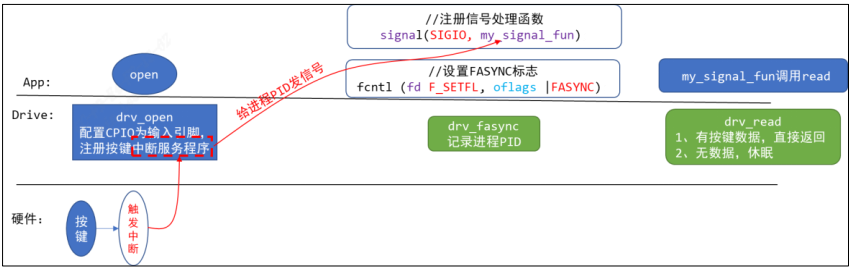
1.4 异步通知方式 file_operations 结构体,里面提供有对应的open,read,fasync 函数。
APP 调用 open 时,导致驱动中对应的 open 函数被调用,在里面配置GPIO 为输入引脚;并且注册 GPIO 的中断处理函数。
APP 给信号 SIGIO 注册自己的处理函数: my_signal_fun。
APP 调用fcntl函数,把驱动程序的 flag 改为 FASYNC,这会导致驱动程序的fasync函数被调用,它只是简单记录进程 PID。
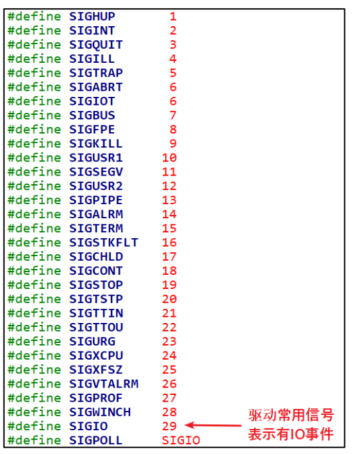
当用户按下按键时, GPIO 中断被触发,导致驱动程序之前注册的中断服务程序被执行。它会记录按键数据,然后给进程 PID 发送 SIGIO 信号。
APP 收到信号后会被打断,先执行信号处理函数:在信号处理函数中可以去调用 read 函数读取按键值。
信号处理函数返回后, APP 会继续执行原先被打断的代码
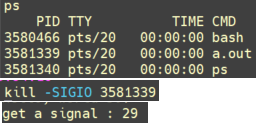
1 2 3 4 5 6 7 8 9 10 11 12 13 14 15 #include <stdio.h> #include <unistd.h> #include <signal.h> void my_sig_func (int signo) { printf ("get a signal : %d\n" , signo); } int main (int argc, char **argv) { int i = 0 ; signal(SIGIO, my_sig_func); while (1 ) { printf ("Hello, world %d!\n" , i++); sleep(2 ); } return 0 ; }
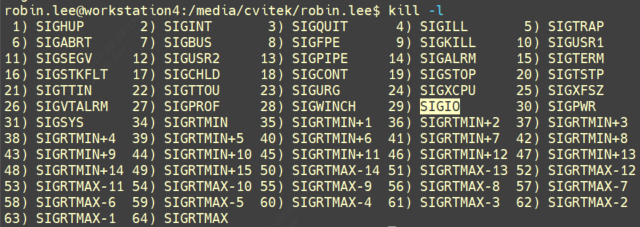
3581339 my_sig_func函数,可以看到打印”get a signal 29“,即为SIGIO信号。
1.5 总结4种读按键方式 关于这几种方式的具体原理和示例后面会进行深度剖析:
[字符设备驱动-6.POLL底层驱动机制 - fuzidage - 博客园 (cnblogs.com)
字符设备驱动-7.异步通知 - fuzidage - 博客园 (cnblogs.com)
字符设备驱动-8.休眠唤醒机制 - fuzidage - 博客园 (cnblogs.com)
字符设备驱动-9.内核定时器 - fuzidage - 博客园 (cnblogs.com)
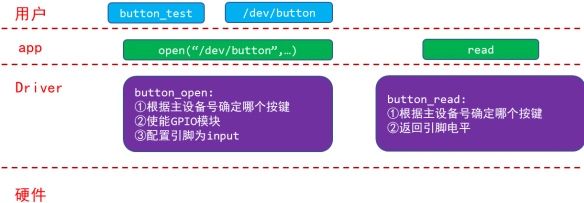
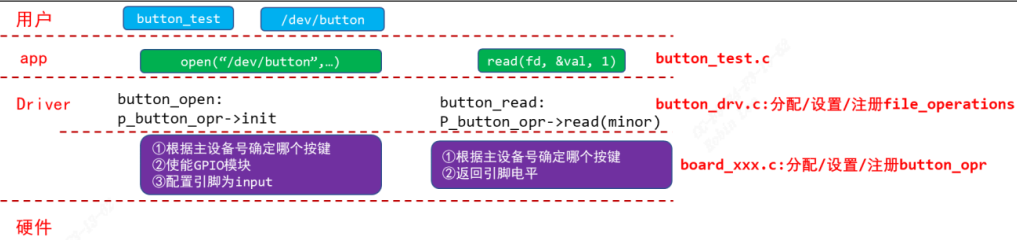
2 GPIO按键驱动 2.1 按键驱动框架 按键驱动程序最简单的方法:
我们的目的写出一个容易扩展到各种芯片、各种板子的按键驱动程序,所以驱动程序分为上下两层 :
button_drv.c 分配/设置/注册 file_operations 结构体起承上启下的作用,向上提供 button_open,button_read 供 APP 调用。而这 2 个函数又会调用底层硬件提供的 p_button_opr 中的 init、 read 函数操作硬件。board_xxx.c 实现 p_button_opr结构体,这个结构体是我们自己抽象出来的,里面定义单板 xxx 的按键操作函数。这样的结构易于扩展,对于不同的单板,只需要替换board_xxx.c提供自己的 button_operations 结构体即可。
2.1.1 button_operations 结构体
button_drv.h
1 2 3 4 5 6 7 8 9 10 #ifndef _BUTTON_DRV_H #define _BUTTON_DRV_H struct button_operations { int count; void (*init) (int which); int (*read) (int which); }; void register_button_operations (struct button_operations *opr) ;void unregister_button_operations (void ) ;#endif
board_xxx.c
1 2 3 4 5 6 7 8 9 10 11 12 13 14 15 16 17 18 19 20 21 22 23 24 25 26 27 28 29 30 31 32 33 34 35 36 37 38 39 40 41 42 43 44 #include <linux/module.h> #include <linux/errno.h> #include <linux/kernel.h> #include <linux/major.h> #include <linux/sched.h> #include <linux/slab.h> #include <linux/fcntl.h> #include <linux/fs.h> #include <linux/signal.h> #include <linux/mutex.h> #include <linux/mm.h> #include <linux/timer.h> #include <linux/wait.h> #include <linux/skbuff.h> #include <linux/proc_fs.h> #include <linux/poll.h> #include <linux/capi.h> #include <linux/kernelcapi.h> #include <linux/init.h> #include <linux/device.h> #include <linux/moduleparam.h> #include "button_drv.h" static void board_xxx_button_init_gpio (int which) { printk("%s %s %d, init gpio for button %d\n" , __FILE__, __FUNCTION__, __LINE__, which); } static int board_xxx_button_read_gpio (int which) { printk("%s %s %d, read gpio for button %d\n" , __FILE__, __FUNCTION__, __LINE__, which); return 1 ; } static struct button_operations my_buttons_ops = .count = 2 , .init = board_xxx_button_init_gpio, .read = board_xxx_button_read_gpio, }; int board_xxx_button_init (void ) { register_button_operations(&my_buttons_ops); return 0 ; } void board_xxx_button_exit (void ) { unregister_button_operations(); } module_init(board_xxx_button_init); module_exit(board_xxx_button_exit); MODULE_LICENSE("GPL" );
board_xxx.c里面实现了具体单板的button_operations,当insmod这个驱动时,调用 register_button_operations 函数,把my_buttons_ops这个结构体注册到上层驱动中,这里.init .read函数先不去实现。
2.1.2 file_operations 结构体
button_drv.c
1 2 3 4 5 6 7 8 9 10 11 12 13 14 15 16 17 18 19 20 21 22 23 24 25 26 27 28 29 30 31 32 33 34 35 36 37 38 39 40 41 42 43 44 45 46 47 48 49 50 51 52 53 54 55 56 57 58 59 60 61 62 63 64 65 66 67 68 69 70 71 72 73 74 75 76 77 78 79 80 81 82 #include <linux/module.h> #include <linux/errno.h> #include <linux/kernel.h> #include <linux/major.h> #include <linux/sched.h> #include <linux/slab.h> #include <linux/fcntl.h> #include <linux/fs.h> #include <linux/signal.h> #include <linux/mutex.h> #include <linux/mm.h> #include <linux/timer.h> #include <linux/wait.h> #include <linux/skbuff.h> #include <linux/proc_fs.h> #include <linux/poll.h> #include <linux/capi.h> #include <linux/kernelcapi.h> #include <linux/init.h> #include <linux/device.h> #include <linux/moduleparam.h> #include "button_drv.h" static int major = 0 ;static struct button_operations *p_button_opr ;static struct class *button_class ;static int button_open (struct inode *inode, struct file *file) { int minor = iminor(inode); p_button_opr->init(minor); return 0 ; } static ssize_t button_read (struct file *file, char __user *buf, size_t size, loff_t *off) { unsigned int minor = iminor(file_inode(file)); char level; int err; level = p_button_opr->read(minor); err = copy_to_user(buf, &level, 1 ); return 1 ; } static struct file_operations button_fops = .open = button_open, .read = button_read, }; void register_button_operations (struct button_operations *opr) { int i; p_button_opr = opr; for (i = 0 ; i < opr->count; i++) { device_create(button_class, NULL , MKDEV(major, i), NULL , "100ask_button%d" , i); } } void unregister_button_operations (void ) { int i; for (i = 0 ; i < p_button_opr->count; i++) { device_destroy(button_class, MKDEV(major, i)); } } EXPORT_SYMBOL(register_button_operations); EXPORT_SYMBOL(unregister_button_operations); int button_init (void ) { major = register_chrdev(0 , "100ask_button" , &button_fops); button_class = class_create(THIS_MODULE, "100ask_button" ); if (IS_ERR(button_class)) return -1 ; return 0 ; } void button_exit (void ) { class_destroy(button_class); unregister_chrdev(major, "100ask_button" ); } module_init(button_init); module_exit(button_exit); MODULE_LICENSE("GPL" );
上层是 `button_drv.c`,按照字符设备驱动标准框架编写,`register_button_operations`实现了将底层具体的`button_operations`对象注册进来,调用`open/read`时便可操作具体的单板,`device_create`为单板的具体按键创建设备节点。注意`insmod`顺序要先安装`button_drv.ko`, 具体单板驱动要后安装,否则`register_button_operations`函数是未定义的。
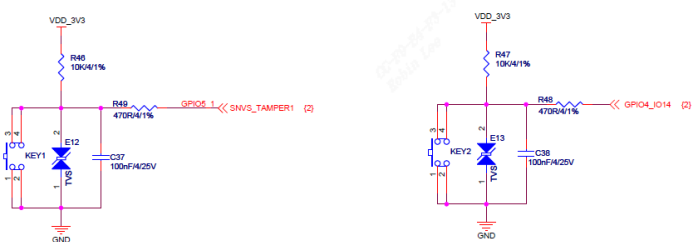
2.2 具体单板按键驱动 以imx6ull单板为例,按键引脚为 GPIO5_IO01、 GPIO4_IO14,平时按键电平为高,按下按键后电平为低,如下图:
使能电源/时钟控制器
配置引脚模式成gpio
配置引脚方向为输入
读取电平
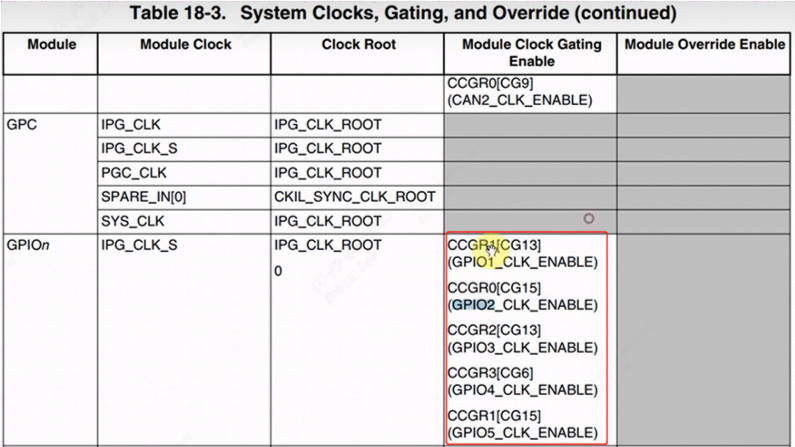
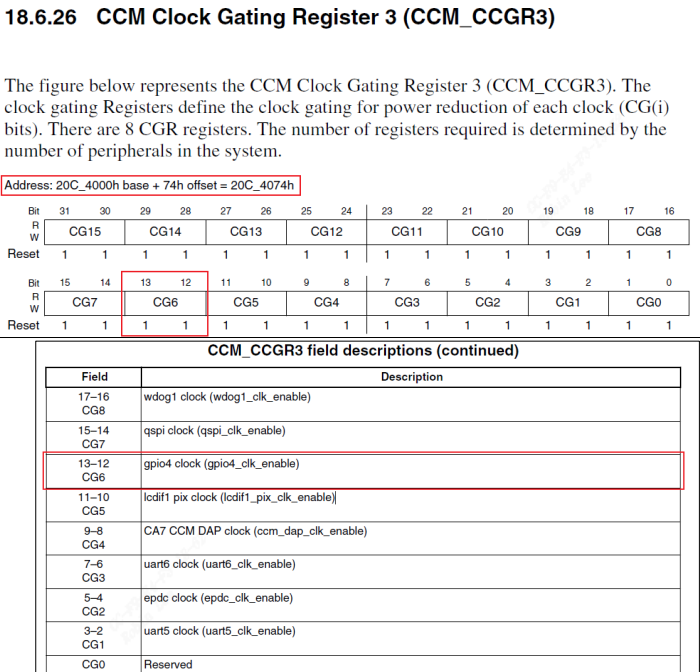
2.2.1 CCM时钟使能 CCM_CCGR1[31:30]、 CCM_CCGR3[13:12]就可以使能 GPIO5、GPIO4,设置为什么值呢?
1
2
3
4
00 :该 GPIO 模块全程被关闭01 :该 GPIO 模块在 CPU run mode 情况下是使能的;在 WAIT 或 STOP 模式下,关闭10 :保留11 :该 GPIO 模块全程使能
那么将CCM_CCGR1[31:30]、 CCM_CCGR3[13:12]设置成0b11即可。
2.2.2 配成GPIO 模式
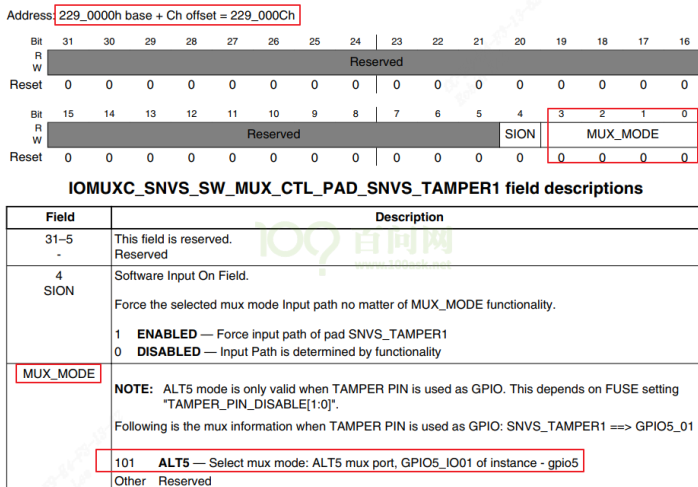
GPIO5_IO01 pinmux 成 GPIO:
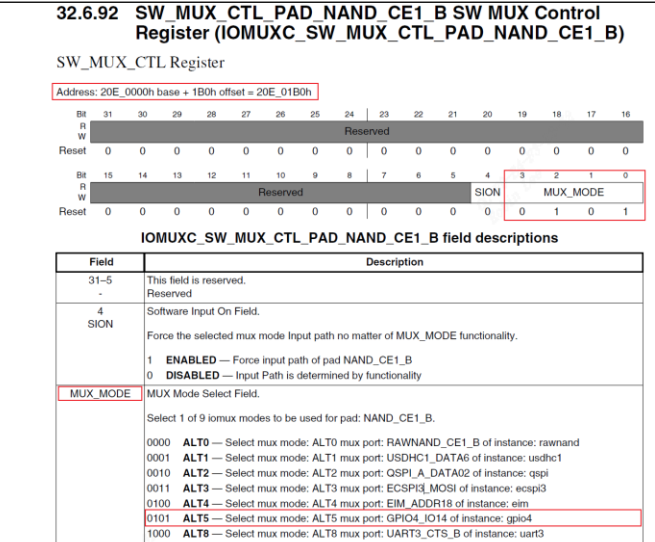
GPIO4_IO14 pinmux 成 GPIO:
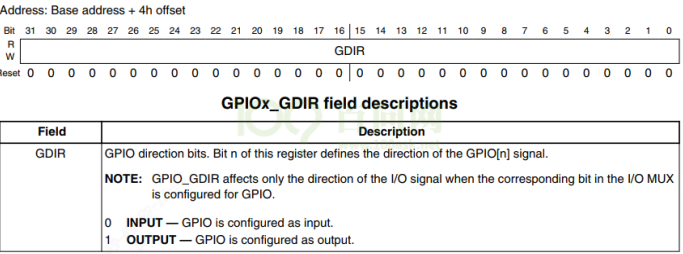
2.2.3 GPIO配成输入 GPIO4,GPIO5寄存器地址:offset 04)
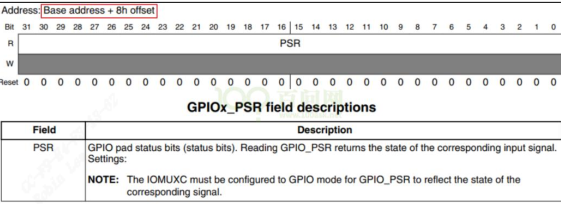
2.2.4 读取gpio电平 注意输入模式下,gpio电平状态得从GPIOx_PSR得到(offset 08)
button_board_imx6ull.c
1 2 3 4 5 6 7 8 9 10 11 12 13 14 15 16 17 18 19 20 21 22 23 24 25 26 27 28 29 30 31 32 33 34 35 36 37 38 39 40 41 42 43 44 45 46 47 48 49 50 51 52 53 54 55 56 57 58 59 60 61 62 63 64 65 66 67 68 69 70 71 72 73 74 75 76 77 78 79 80 81 82 83 84 85 86 87 88 89 90 91 92 93 94 95 96 97 98 #include <linux/module.h> #include <linux/fs.h> #include <linux/io.h> #include <linux/errno.h> #include <linux/miscdevice.h> #include <linux/kernel.h> #include <linux/major.h> #include <linux/mutex.h> #include <linux/proc_fs.h> #include <linux/seq_file.h> #include <linux/stat.h> #include <linux/init.h> #include <linux/device.h> #include <linux/tty.h> #include <linux/kmod.h> #include <linux/gfp.h> #include <asm/io.h> #include "button_drv.h" struct imx6ull_gpio { volatile unsigned int dr; volatile unsigned int gdir; volatile unsigned int psr; volatile unsigned int icr1; volatile unsigned int icr2; volatile unsigned int imr; volatile unsigned int isr; volatile unsigned int edge_sel; }; static volatile unsigned int *CCM_CCGR3; static volatile unsigned int *CCM_CCGR1;static volatile unsigned int *IOMUXC_SNVS_SW_MUX_CTL_PAD_SNVS_TAMPER1;static volatile unsigned int *IOMUXC_SW_MUX_CTL_PAD_NAND_CE1_B;static struct imx6ull_gpio *gpio4 ;static struct imx6ull_gpio *gpio5 ;static void board_imx6ull_button_init (int which) { if (!CCM_CCGR1){ CCM_CCGR1 = ioremap(0x20C406C , 4 ); CCM_CCGR3 = ioremap(0x20C4074 , 4 ); IOMUXC_SNVS_SW_MUX_CTL_PAD_SNVS_TAMPER1 = ioremap(0x229000C , 4 ); IOMUXC_SW_MUX_CTL_PAD_NAND_CE1_B = ioremap(0x20E01B0 , 4 ); gpio4 = ioremap(0x020A8000 , sizeof (struct imx6ull_gpio)); gpio5 = ioremap(0x20AC000 , sizeof (struct imx6ull_gpio)); } if (which == 0 ){ *CCM_CCGR1 |= (3 <<30 ); *IOMUXC_SNVS_SW_MUX_CTL_PAD_SNVS_TAMPER1 = 5 ; gpio5->gdir &= ~(1 <<1 ); } else if (which == 1 ){ *CCM_CCGR3 |= (3 <<12 ); *IOMUXC_SW_MUX_CTL_PAD_NAND_CE1_B = 5 ; gpio4->gdir &= ~(1 <<14 ); } } static int board_imx6ull_button_read (int which) { if (which == 0 ) return (gpio5->psr & (1 <<1 )) ? 1 : 0 ; else return (gpio4->psr & (1 <<14 )) ? 1 : 0 ; } static struct button_operations my_buttons_ops = .count = 2 , .init = board_imx6ull_button_init, .read = board_imx6ull_button_read, }; int board_imx6ull_button_drv_init (void ) { register_button_operations(&my_buttons_ops); return 0 ; } void board_imx6ull_button_drv_exit (void ) { unregister_button_operations(); } module_init(board_imx6ull_button_drv_init); module_exit(board_imx6ull_button_drv_exit); MODULE_LICENSE("GPL" );
具体单板驱动insmod会调用 register_button_operations把具体的my_buttons_ops注册进去。当用户open,就会进行board_imx6ull_button_init进行按键寄存器配置。当用户read的时候调用board_imx6ull_button_read读取按键值。
3 测试
Makefile
1 2 3 4 5 6 7 8 9 10 11 12 13 14 15 16 17 18 19 20 21 KERN_DIR = /home/book/100ask_roc-rk3399-pc/linux-4.4 all: make -C $(KERN_DIR) M=`pwd` modules $(CROSS_COMPILE) gcc -o button_test button_test.c clean: make -C $(KERN_DIR) M=`pwd` modules clean rm -rf modules.order rm -f ledtest obj-m += button_drv.o obj-m += board_xxx.o
测试代码
1 2 3 4 5 6 7 8 9 10 11 12 13 14 15 16 17 18 19 20 21 22 23 24 25 26 27 28 29 30 31 #include <sys/types.h> #include <sys/stat.h> #include <fcntl.h> #include <unistd.h> #include <stdio.h> #include <string.h> int main (int argc, char **argv) { int fd; char val; if (argc != 2 ) { printf ("Usage: %s <dev>\n" , argv[0 ]); return -1 ; } fd = open(argv[1 ], O_RDWR); if (fd == -1 ) { printf ("can not open file %s\n" , argv[1 ]); return -1 ; } read(fd, &val, 1 ); printf ("get button : %d\n" , val); close(fd); return 0 ; }