1 总线设备驱动模型
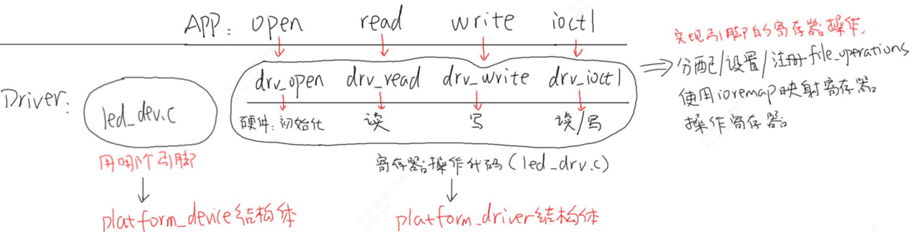
设备定义资源,platform_device结构体
驱动定义platform_driver结构体,实现probe, file_operations
总线驱动模型优点:
驱动只是一套控制驱动框架,基本不用修改,和单板硬件相关的都在设备代码里面,硬件修改只需要修改设备资源相关的代码,不用关心具体的函数实现和寄存器控制。
1.1 总线/平台设备/平台驱动描述
1.1.1 struct bus_type
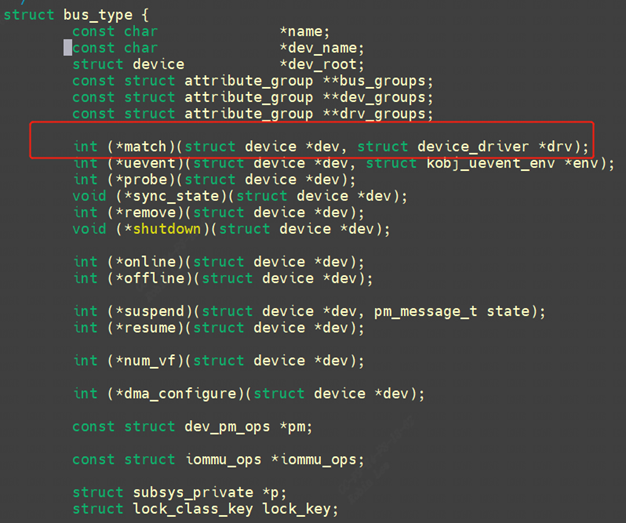
有一个很关键的函数,match函数。当设备与设备枚举过程中match函数会按照规则进行匹配,规则见1.3.1。
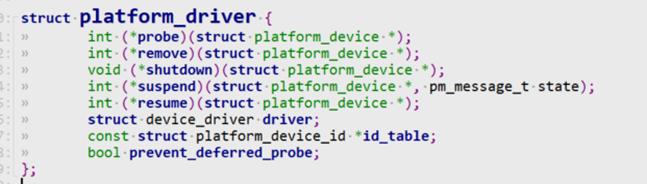
1.1.2 struct platform_driver
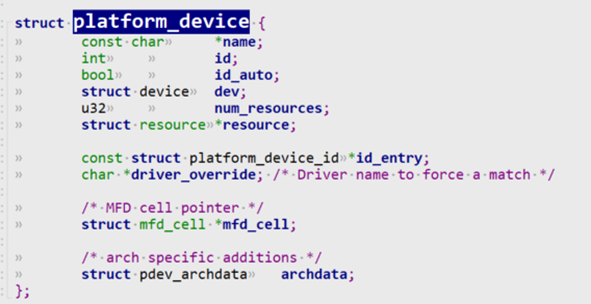
1.1.3 struct platform_device
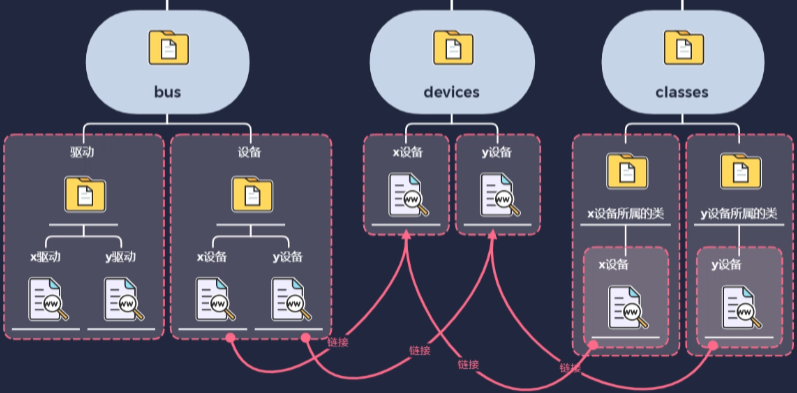
1.1.4 总线/设备/驱动三者关系
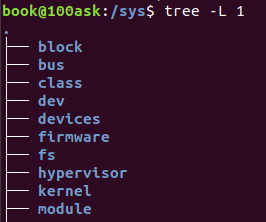
系统启动后,会调用buses_init()函数创建/sys/bus文件目录。
接下来就是通过总线注册函数bus_register()进行总线注册,注册完成后,在/sys/bus目录下生成device文件夹和driver文件夹。
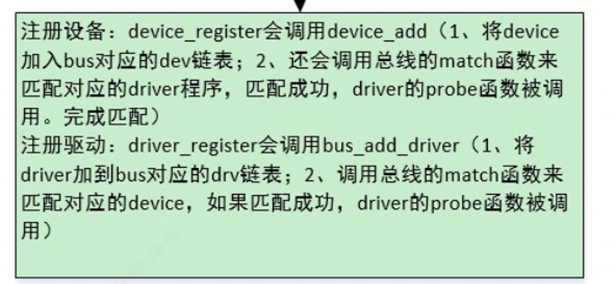
最后分别通过device_register()和driver_register()函数注册对应的设备和驱动。

1.2 platform_device的注册过程
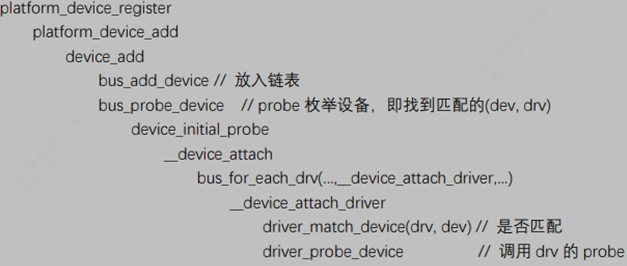
- 系统初始化时,调用
platform_add_devices函数,把所有放置在板级platform_device数组中的platform_device注册到系统中去。
platform_device全部注册到系统之后,便可以通过platform的操作接口,来获取platform_device中的resource资源。
2.1 比如地址、中断号等,以进行request_mem_region、ioremap(将resource分配的物理地址映射到kernel的虚拟空间来)和request_irq操作。
2.2 platform的操作接口包括platform_get_irq、platform_get_irq_byname、platform_get_resource、platform_get_resource_byname等。这个后面设备树专题会专门介绍字符设备驱动-5.设备树函数 - fuzidage - 博客园 (cnblogs.com)。
1.3 platform_driver的注册过程
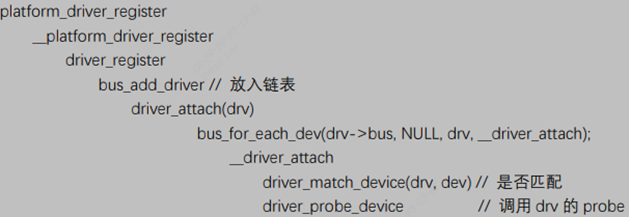
当insmod设备驱动的时候会透过module_init调用, 过程如下:
1
2
3
4
5
6
7
8
9
10
| platform_driver_register()
driver_register()
bus_add_driver
driver_attach()
bus_for_each_dev()
__driver_attach()
driver_match_device
platform_match
driver_probe_device
drv->probe(dev);
|
1.3.1 device和driver的匹配过程
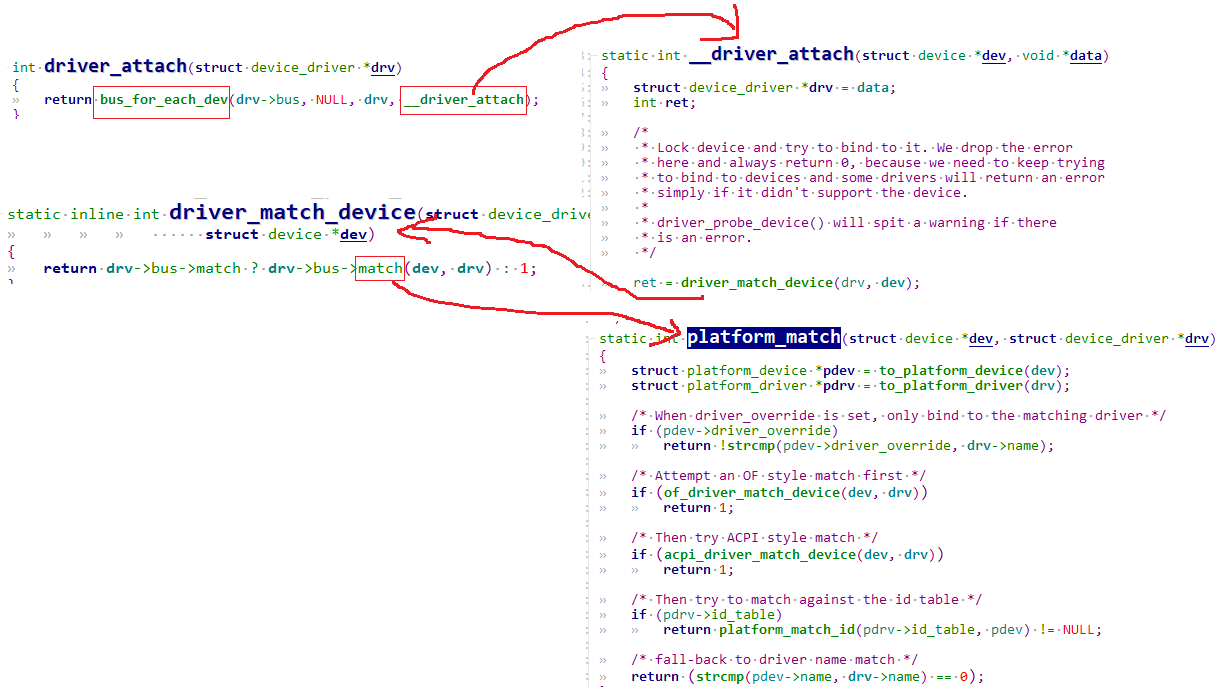
1.3.1.1 device和driver的匹配优先级顺序
一个驱动是可以匹配多个设备的,平台总线中的驱动要具有三种匹配信息的能力,基于这种需求,platform_driver中使用不同的成员来进行相应的匹配。系统为platform总线定义了一个bus_type 的实例platform_bus_type, 会不断循环呼叫platform_match函数去遍历所有设备和驱动:
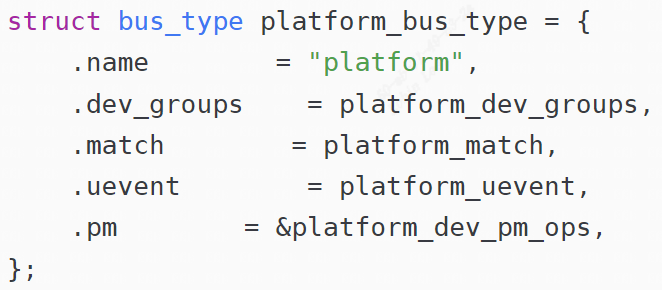
匹配优先级顺序实现位于drivers/base/platform.c的platform_match函数,下面按照优先级由高到底的匹配顺序介绍:
1.3.1.1.1 of_match_table
of_match_table就是从dts中对应node的compatible属性去匹配设备和驱动。
compatible属性也叫做“兼容性”属性,是一个字符串列表, 格式如下所示:
manufacturrer表示厂商,model表示驱动名字,该属性用于将设备和驱动绑定起来。
platform_device.dev.of_node 和 platform_driver.driver.of_match_table介绍:
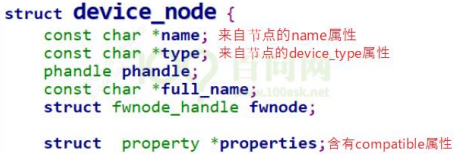
由设备树节点转换得来的 platform_device 中,含有一个结构体:of_node。 它的类型如下:
platform_driver.driver.of_match_table 类型如下:
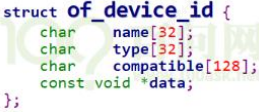
一般驱动程序都会有一个of_match_table匹配表,此of_match_table匹配表保存着一些compatible值,如果dts中的compatible属性值和of_match_table匹配表中的有一个值相等,那么就表示设备可以使用这个驱动。
如下图dts定义了一个mipi_rx: cif节点:

驱动程序中的定义如下:
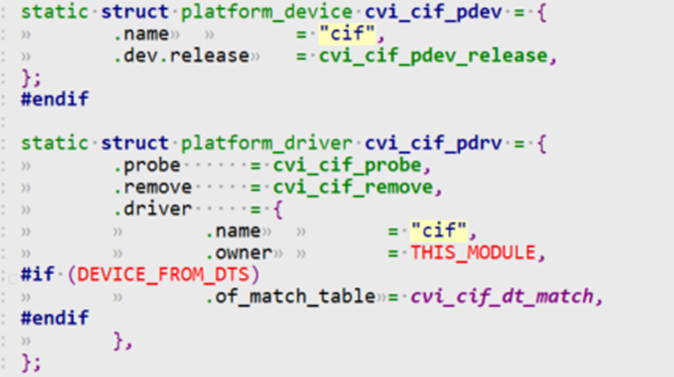

那么这里驱动程序中的.of_match_table和dts能够匹配,那么就说明match成功,匹配成功后调用platform driver的probe函数。一般在驱动程序module int的时候,也就是insmod的时候,会用platform_driver_register来进行match过程。
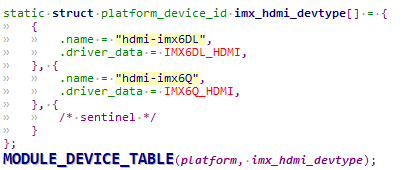
1.3.1.1.2 ID table
下面这个例子就是用一个驱动来匹配两个分别叫"demo0"和"demo1"的设备,注意,数组最后的{}是一定要的,这个是内核判断数组已经结束的标志。
1
2
3
4
5
6
| static struct platform_device_id tbl[] = {
{"demo0"},
{"demo1"},
{},
};
MODULE_DEVICE_TABLE(platform, tbl);
|
1.3.1.1.3 name
假如前面两项匹配规则都不满足,那么最后可以是用name来匹配。例如:上面的mipi_rx: cif节点:

转换后就对应一个platform_device,platform_device中.name= “cif”,利用名字也能匹配上。
1.3.2 匹配成功后执行probe
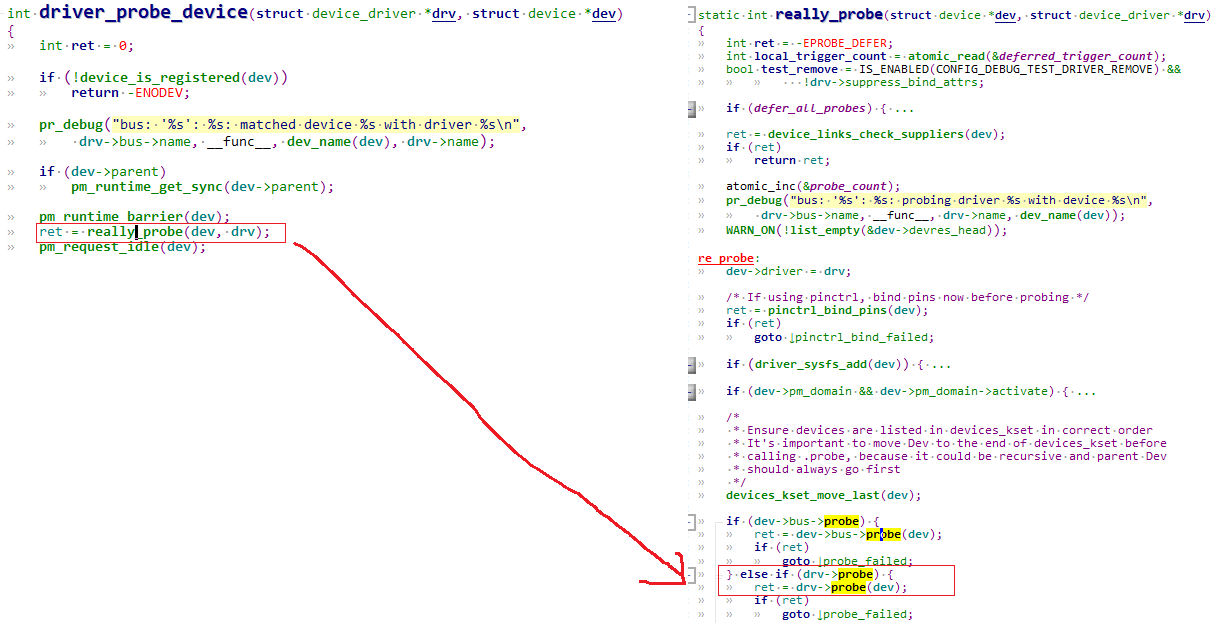
drvier匹配device成功调用driver的probe函数。一般平台设备都不需要驱动代码去定义,而是直接放入设备树作为设备树节点,内核启动后遍历设备树节点,将其转换成platform_device。
1.3.3 总结下platform_driver的注册执行过程
1.4 总结平台设备/平台驱动的注册过程
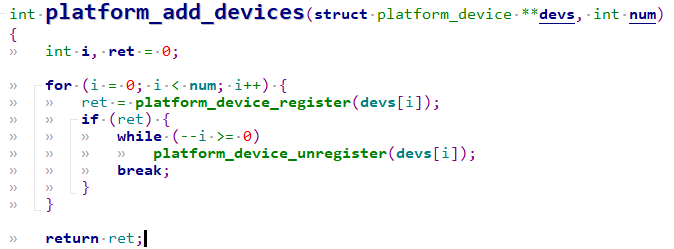
1.6 平台设备/平台驱动相关API
1.6.1 注册/反注册
1
2
3
4
5
6
|
platform_device_register/ platform_device_unregister
platform_driver_register/ platform_driver_unregister
platform_add_devices
|

1.6.2 资源获取释放
1.6.2.1 IO resource
1
| struct resource *platform_get_resource(struct platform_device *, unsigned int, unsigned int);
|
kernel\include\linux\ioport.h中有resource结构。用来描述hw设备的资源信息, include\linux\ioport.h:
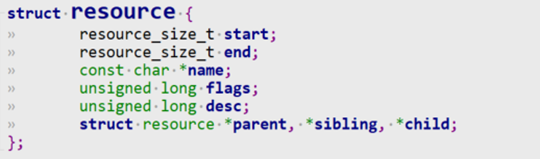
flags一般有以下几种:比如中断资源, IO端口资源, IO内存资源, DMA资源

IORESOURCE_IO:表示IO资源,cpu需要用特殊指令才能访问或需要用特殊访问方式才能访问,不能直接用指针来寻址IORESOURCE_MEM:表示IO内存,可以直接用指针引用来直接寻址操作
这里举个例子:

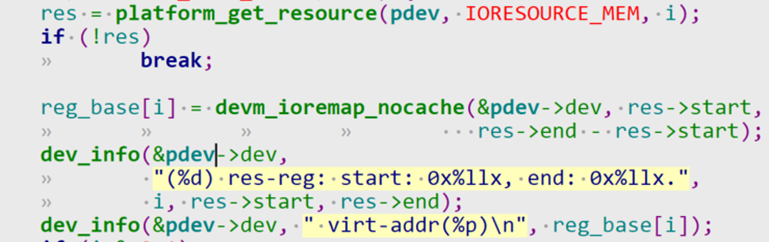
打印如下:那这里的pdev对应dts中的mipi_rx节点。platform_get_resource可以从dts node中找到io内存资源。
那这里循环获取4次,如下所示地址范围和上面的dts节点一致:

1.6.2.2 IRQ


中断触发类型:
1
2
3
4
5
|
#define IRQ_TYPE_EDGE_RISING 1
#define IRQ_TYPE_EDGE_FALLING 2
#define IRQ_TYPE_EDGE_BOTH (IRQ_TYPE_EDGE_FALLING | IRQ_TYPE_EDGE_RISING)
#define IRQ_TYPE_LEVEL_HIGH 4
|
这里又要引入新概念GIC: 设备驱动-10.中断子系统-3.中断设备树表述与解析 - fuzidage - 博客园 (cnblogs.com)
设备驱动-10.中断子系统-5 armv7 GIC架构解析 - fuzidage - 博客园 (cnblogs.com)
Dts中描述到了GIC相关基础知识。(Generic Interrupt Controller)是ARM公司提供的一个通用的中断控制器。
GIC 3要素:
- GIC的外设中断(除去SGI)类型有两类:
- SPI,共享外设中断(由GIC内部的
distributor来分发到相关CPU),中断号:32~1019
- PPI,私有外设中断(指定CPU接收),中断号:
16~31
- 外设中断号的分配规则如下:
- 所有外设中断都支持四种触发方式:
所以DTS中接在GIC的device node的interrupts属性也是用这三个要素来描述一个具体的中断。
格式如:interrupts = <interruptType interruptNumber triggerType>
| Interrrupt Types |
Interrrupt Number |
Trigger Type |
| 0 = SPI, 1 = PPI |
32… …1019 |
1 = low to high, 2 = high to low, 4 = high level, 8 = low level |
sample code如下:
打印结果如下:

那么最后dts解析的结果为:
1
2
3
4
5
6
7
8
9
| out_irq->np = interrupt-parent = gic node
out_irq->args[0] = GIC_SPI;
out_irq->args[1] = 硬件中断号 = 155
out_irq->args[2] = 中断触发类型 = IRQ_TYPE_LEVEL_HIGH
out_irq->np = interrupt-parent = gic node
out_irq->args[0] = GIC_SPI;
out_irq->args[1] = 硬件中断号 = 156
out_irq->args[2] = 中断触发类型 = IRQ_TYPE_LEVEL_HIGH
|
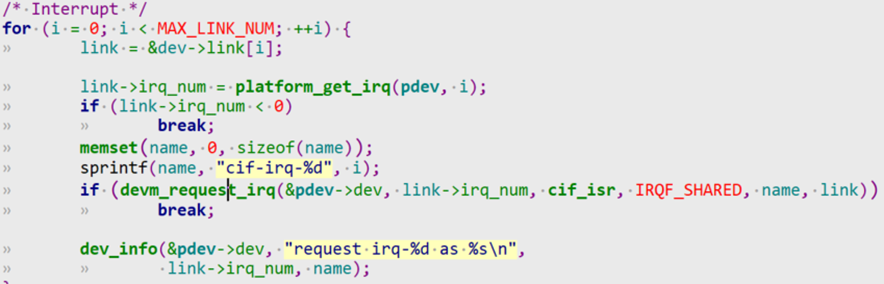
platform_get_irq返回一个虚拟中断号,这里对应的是27, 28.
devm_request_irq用来申请中断,分配isr中断处理函数。该函数可以在驱动卸载时不用主动调用free_irq显示释放中断请求。
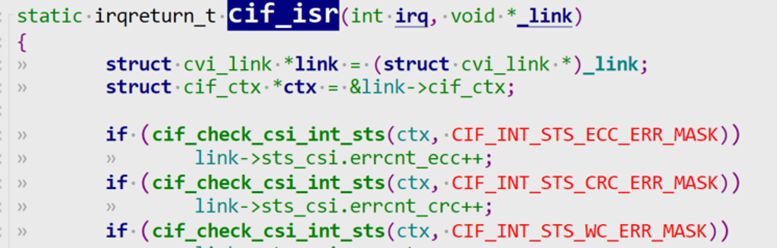
可以看到两次call devm_request_irq却是用的同一个中断服务程序cif_isr,这也是允许的,我们看一下函数原型:
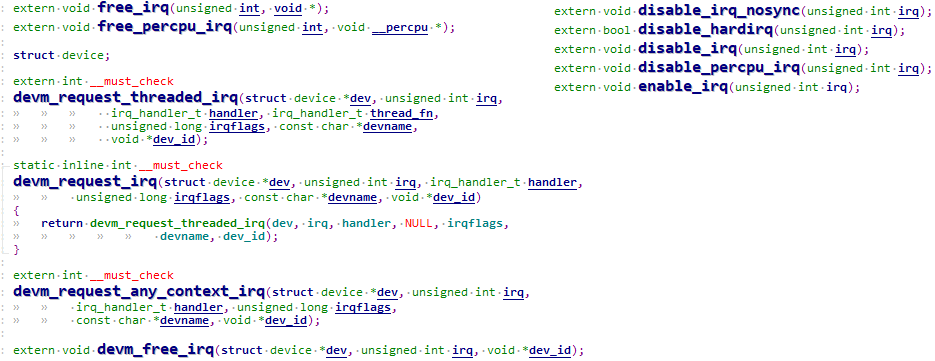
devm_request_irq会建立中断号irq_num和中断服务程序isr的绑定,最后一个参数会传给中断服务程序isr.
中断服务程序isr能够根据中断号irq_num和传进的参数进行区分中断源。
1.6.2.3 GPIO
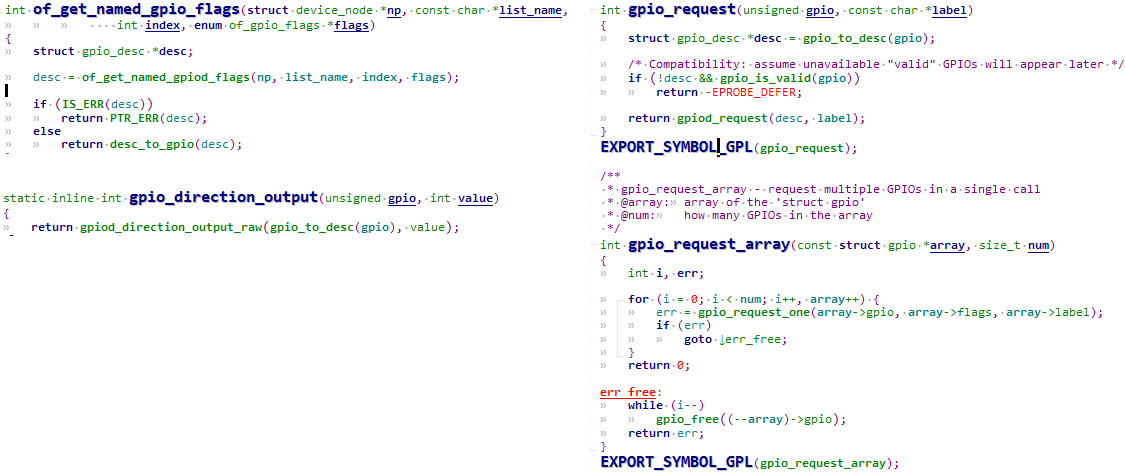
of_get_named_gpio_flags获取dts中gpio 编号,并且会找到device_node,找到of_gpio_flags。
gpio_request申请gpio
gpio_direction_output设置成output且set gpio val
1
2
3
4
5
6
| int of_get_named_gpio_flags(struct device_node *np, const char *list_name,
int index, enum of_gpio_flags *flags);
int gpio_request(unsigned gpio, const char *label);
static inline int gpio_direction_output(unsigned gpio, int value);
|
举个例子:

1
2
3
| #define GPIO_ACTIVE_HIGH 0
#define GPIO_ACTIVE_LOW 1
|
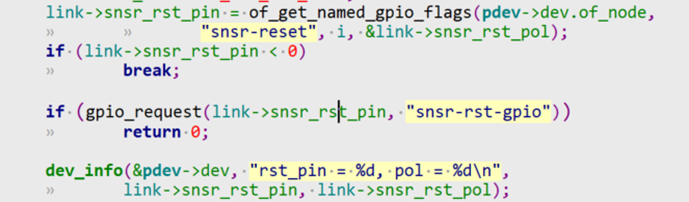
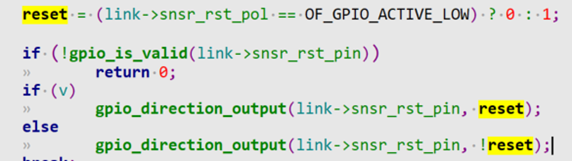

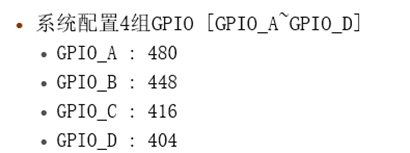
这里的gpio 编号=411 = GPIO_D + offset = 404 + 7 =411(也就是dts中配置的portd 7),这里由于是of_gpio_flags 是OF_GPIO_ACTIVE_LOW =0x01,所以snsr_rst_pol = 1.
2 平台设备驱动示例
1
2
3
4
5
6
7
8
| #ifndef _LED_OPR_H
#define _LED_OPR_H
struct led_operations {
int (*init) (int which);
int (*ctl) (int which, char status);
};
struct led_operations *get_board_led_opr(void);
#endif
|
①分配/设置/注册platform_device结构体 在里面定义所用资源,指定设备名字。-Board_A_led.c
②分配/设置/注册 platform_driver 结构体 在其中的 probe 函数里,分配/设置/注册 file_operations 结构体, 并从 platform_device 中确实所用硬件资源。 指定 platform_driver 的名字。 -Chip_demo_gpio.c
2.1 通用字符设备驱动框架
1
2
3
4
5
6
7
8
9
10
11
12
13
14
15
16
17
18
19
20
21
22
23
24
25
26
27
28
29
30
31
32
33
34
35
36
37
38
39
40
41
42
43
44
45
46
47
48
49
50
51
52
53
54
55
56
57
58
59
60
61
62
63
64
65
66
67
68
69
70
71
72
73
74
75
76
77
78
79
80
81
82
83
84
85
86
| #include <linux/module.h>
#include <linux/fs.h>
#include <linux/errno.h>
#include <linux/miscdevice.h>
#include <linux/kernel.h>
#include <linux/major.h>
#include <linux/mutex.h>
#include <linux/proc_fs.h>
#include <linux/seq_file.h>
#include <linux/stat.h>
#include <linux/init.h>
#include <linux/device.h>
#include <linux/tty.h>
#include <linux/kmod.h>
#include <linux/gfp.h>
#include "led_opr.h"
*/
static int major = 0;
static struct class *led_class;
struct led_operations *p_led_opr;
void led_class_create_device(int minor) {
device_create(led_class, NULL, MKDEV(major, minor), NULL, "100ask_led%d", minor);
}
void led_class_destroy_device(int minor) {
device_destroy(led_class, MKDEV(major, minor));
}
void register_led_operations(struct led_operations *opr) {
p_led_opr = opr;
}
EXPORT_SYMBOL(led_class_create_device);
EXPORT_SYMBOL(led_class_destroy_device);
EXPORT_SYMBOL(register_led_operations);
static ssize_t led_drv_read (struct file *file, char __user *buf, size_t size, loff_t *offset) {
return 0;
}
static ssize_t led_drv_write (struct file *file, const char __user *buf, size_t size, loff_t *offset){
int err;
char status;
struct inode *inode = file_inode(file);
int minor = iminor(inode);
err = copy_from_user(&status, buf, 1);
p_led_opr->ctl(minor, status);
return 1;
}
static int led_drv_open (struct inode *node, struct file *file){
int minor = iminor(node);
p_led_opr->init(minor);
return 0;
}
static int led_drv_close (struct inode *node, struct file *file){
return 0;
}
static struct file_operations led_drv = {
.owner = THIS_MODULE,
.open = led_drv_open,
.read = led_drv_read,
.write = led_drv_write,
.release = led_drv_close,
};
static int __init led_init(void){
int err;
major = register_chrdev(0, "100ask_led", &led_drv);
led_class = class_create(THIS_MODULE, "100ask_led_class");
err = PTR_ERR(led_class);
if (IS_ERR(led_class)) {
printk("%s %s line %d\n", __FILE__, __FUNCTION__, __LINE__);
unregister_chrdev(major, "led");
return -1;
}
return 0;
}
static void __exit led_exit(void) {
class_destroy(led_class);
unregister_chrdev(major, "100ask_led");
}
module_init(led_init);
module_exit(led_exit);
MODULE_LICENSE("GPL");
|
这里只实现一个框架, 具体的opr操作函数需要具体单板去实现。先注册字符设备驱动,确定好class和主设备号。
因为暂时还不知道具体led驱动是啥,因此需要外部去注册具体的led驱动,交给platform_driver去建立。
暂时先不建立设备节点,设备节点交给platform_device去建立,因为暂时不知道设备的led资源信息。
EXPORT_SYMBOL导出led_class_create_device,led_class_destroy_device, register_led_operations函数。
2.2 具体单板资源描述驱动(platform_device暂不使用dts)
1
2
3
4
5
6
7
8
9
| #ifndef _LED_RESOURCE_H
#define _LED_RESOURCE_H
#define GROUP(x) (x>>16)
#define PIN(x) (x&0xFFFF)
#define GROUP_PIN(g,p) ((g<<16) | (p))
#endif
|
Board_A_led.c这里实现了单板的资源定义,这里是gpio3_1,gpio5_8。
1
2
3
4
5
6
7
8
9
10
11
12
13
14
15
16
17
18
19
20
21
22
23
24
25
26
27
28
29
30
31
32
33
34
35
36
37
38
39
40
41
42
43
44
45
46
47
48
49
50
51
52
53
| #include <linux/module.h>
#include <linux/fs.h>
#include <linux/errno.h>
#include <linux/miscdevice.h>
#include <linux/kernel.h>
#include <linux/major.h>
#include <linux/mutex.h>
#include <linux/proc_fs.h>
#include <linux/seq_file.h>
#include <linux/stat.h>
#include <linux/init.h>
#include <linux/device.h>
#include <linux/tty.h>
#include <linux/kmod.h>
#include <linux/gfp.h>
#include <linux/platform_device.h>
#include "led_resource.h"
static void led_dev_release(struct device *dev)
{
}
static struct resource resources[] = {
{
.start = GROUP_PIN(3,1),
.flags = IORESOURCE_IRQ,
.name = "100ask_led_pin",
},
{
.start = GROUP_PIN(5,8),
.flags = IORESOURCE_IRQ,
.name = "100ask_led_pin",
},
};
static struct platform_device board_A_led_dev = {
.name = "100ask_led",
.num_resources = ARRAY_SIZE(resources),
.resource = resources,
.dev = {
.release = led_dev_release,
},
};
static int __init led_dev_init(void){
int err;
err = platform_device_register(&board_A_led_dev);
return 0;
}
static void __exit led_dev_exit(void){
platform_device_unregister(&board_A_led_dev);
}
module_init(led_dev_init);
module_exit(led_dev_exit);
MODULE_LICENSE("GPL");
|
注意:
如果platform_device中不提供 release 函数,如下图所示不提供红框部分的函数:
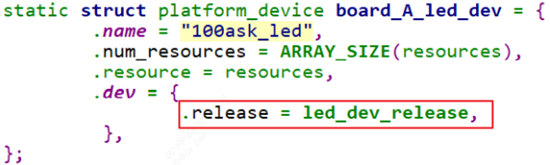
则在调用 platform_device_unregister 时会出现警告,如下图所示, 因此我们可以将release实现为空。

2.3 具体芯片驱动(platform_driver)
1
2
3
4
5
6
7
| #ifndef _LEDDRV_H
#define _LEDDRV_H
#include "led_opr.h"
void led_class_create_device(int minor);
void led_class_destroy_device(int minor);
void register_led_operations(struct led_operations *opr);
#endif
|
Chip_demo_gpio.c实现opr的gpio控制。
1
2
3
4
5
6
7
8
9
10
11
12
13
14
15
16
17
18
19
20
21
22
23
24
25
26
27
28
29
30
31
32
33
34
35
36
37
38
39
40
41
42
43
44
45
46
47
48
49
50
51
52
53
54
55
56
57
58
59
60
61
62
63
64
65
66
67
68
69
70
71
72
73
74
75
76
77
78
79
80
81
82
83
84
85
86
87
88
89
90
91
92
93
94
95
96
97
98
99
100
101
102
103
104
105
106
107
108
109
110
111
112
113
114
115
116
117
118
119
120
121
122
123
124
| #include <linux/module.h>
#include <linux/fs.h>
#include <linux/errno.h>
#include <linux/miscdevice.h>
#include <linux/kernel.h>
#include <linux/major.h>
#include <linux/mutex.h>
#include <linux/proc_fs.h>
#include <linux/seq_file.h>
#include <linux/stat.h>
#include <linux/init.h>
#include <linux/device.h>
#include <linux/tty.h>
#include <linux/kmod.h>
#include <linux/gfp.h>
#include <linux/platform_device.h>
#include "led_opr.h"
#include "leddrv.h"
#include "led_resource.h"
static int g_ledpins[100];
static int g_ledcnt = 0;
static int board_demo_led_init (int which)
{
printk("init gpio: group %d, pin %d\n", GROUP(g_ledpins[which]), PIN(g_ledpins[which]));
switch(GROUP(g_ledpins[which])){
case 0:{
printk("init pin of group 0 ...\n");
break;
}
case 1:{
printk("init pin of group 1 ...\n");
break;
}
case 2:{
printk("init pin of group 2 ...\n");
break;
}
case 3:{
printk("init pin of group 3 ...\n");
break;
}
}
return 0;
}
static int board_demo_led_ctl (int which, char status)
{
printk("set led %s: group %d, pin %d\n", status ? "on" : "off", GROUP(g_ledpins[which]), PIN(g_ledpins[which]));
switch(GROUP(g_ledpins[which])){
case 0:{
printk("set pin of group 0 ...\n");
break;
}
case 1:{
printk("set pin of group 1 ...\n");
break;
}
case 2:{
printk("set pin of group 2 ...\n");
break;
}
case 3:{
printk("set pin of group 3 ...\n");
break;
}
}
return 0;
}
static struct led_operations board_demo_led_opr = {
.init = board_demo_led_init,
.ctl = board_demo_led_ctl,
};
static int chip_demo_gpio_probe(struct platform_device *pdev){
struct resource *res;
int i = 0;
while (1){
res = platform_get_resource(pdev, IORESOURCE_IRQ, i++);
if (!res)
break;
g_ledpins[g_ledcnt] = res->start;
led_class_create_device(g_ledcnt);
g_ledcnt++;
}
return 0;
}
static int chip_demo_gpio_remove(struct platform_device *pdev) {
struct resource *res;
int i = 0;
while (1) {
res = platform_get_resource(pdev, IORESOURCE_IRQ, i);
if (!res)
break;
led_class_destroy_device(i);
i++;
g_ledcnt--;
}
return 0;
}
static struct platform_driver chip_demo_gpio_driver = {
.probe = chip_demo_gpio_probe,
.remove = chip_demo_gpio_remove,
.driver = {
.name = "100ask_led",
},
};
static int __init chip_demo_gpio_drv_init(void) {
int err;
err = platform_driver_register(&chip_demo_gpio_driver);
register_led_operations(&board_demo_led_opr);
return 0;
}
static void __exit lchip_demo_gpio_drv_exit(void){
platform_driver_unregister(&chip_demo_gpio_driver);
}
module_init(chip_demo_gpio_drv_init);
module_exit(lchip_demo_gpio_drv_exit);
MODULE_LICENSE("GPL");
|
当platform_device和platform_driver都insmod(注册)后,总线设备驱动模型会进行match匹配,匹配成功调用probe函数,这里使用name进行匹配的。
chip_demo_gpio_probe中, 获取单板定义的资源信息,依次创建设备节点。register_led_operations注册了具体chip的opr操作函数(寄存器操作不具体展开实现,opr暂定为空)。
当用户调用open/write时便可操作具体chip的led驱动方法。
2.4 测试
2.4.1 Makefile
1
2
3
4
5
6
7
8
9
10
11
12
13
14
15
16
17
18
19
20
21
22
23
24
25
|
KERN_DIR = /home/book/100ask_roc-rk3399-pc/linux-4.4
all:
make -C $(KERN_DIR) M=`pwd` modules
$(CROSS_COMPILE)gcc -o ledtest ledtest.c
clean:
make -C $(KERN_DIR) M=`pwd` modules clean
rm -rf modules.order
rm -f ledtest
obj-m += leddrv.o chip_demo_gpio.o board_A_led.o
|
编译出3个ko,依次insmod leddrv.ko chip_demo_gpio.ko board_A_led.ko
2.4.2 ledtest测试程序
1
2
3
4
5
6
7
8
9
10
11
12
13
14
15
16
17
18
19
20
21
22
23
24
25
26
27
28
29
30
31
32
| #include <sys/types.h>
#include <sys/stat.h>
#include <fcntl.h>
#include <unistd.h>
#include <stdio.h>
#include <string.h>
int main(int argc, char **argv) {
int fd;
char status;
if (argc != 3) {
printf("Usage: %s <dev> <on | off>\n", argv[0]);
return -1;
}
fd = open(argv[1], O_RDWR);
if (fd == -1){
printf("can not open file %s\n", argv[1]);
return -1;
}
if (0 == strcmp(argv[2], "on")){
status = 1;
write(fd, &status, 1);
}else{
status = 0;
write(fd, &status, 1);
}
close(fd);
return 0;
}
|

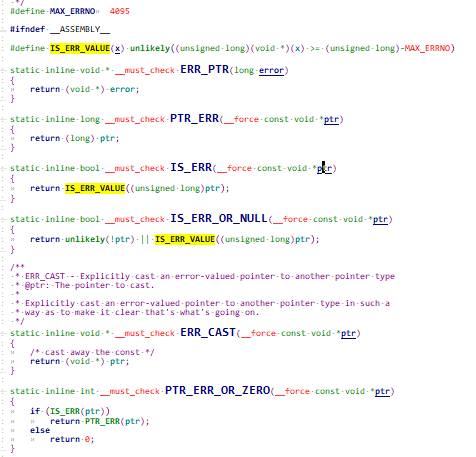
2.5 IS_ERR/ERR_PTR/PTR_ERR/NULL_PTR函数族
include\linux\err.h:
内核中的函数常常返回指针,如果出错,也希望能够通过返回的指针体现出来。那么有三种情况:合法指针,NULL指针和非法指针。
1.合法指针:内核函数返回的指针一般是4K对齐,即 ptr & 0xfff == 0,也就是0x1000的倍数。其中Linux采用分页机制管理内存,而CPU访问的是线性地址需要通过页表转化成物理地址。所以内核就约定留出最后一页4k(0xfffffffffffff000 ~ 0xffffffffffffffff)用来记录内核空间的错误指针(32位的话就是(0xfffff000 ~ 0xffffffff)).
2.非法指针:一般内核函数地址不会落在(0xfffff000,0xffffffff)之间,而一般内核的出错代码也是一个小负数,在-4095到0之间,转变成unsigned long,正好在(0xfffff000,0xffffffff)之间。因此可以用 (unsigned long)ptr > (unsigned long)-1000L
-1000L正好是0xfffff000。
3.linux内核中有一个宏MAX_ERRNO = 4095。errno见如下:
1
2
3
| include/asm-generic/errno-base.h
include\uapi\asm-generic\errno.h
include\linux\errno.h
|
2.5.1 IS_ERR
作用:判断是否无效非法指针。
实现见上面图片,例如一个地址0xfffff,ffaa,那么代入后:很明显返回1,是一个错误非法指针。
1
| 0xfffffffaa > 0xfffff000
|
2.5.2 IS_ERR_OR_NULL
和IS_ERR基本等同,会先提前判断一下是否空。
2.5.3 PTR_ERR
作用:将非法指针转成错误码返回。
实现见上面图片. 将传入的void *类型指针强转为long类型,并返回
2.5.4 ERR_PTR
将传入的long类型强转为void *类型指针,并返回
3 引入sysfs
讲到总线设备驱动模型,那不能少了sysfs。sysfs是一种虚拟文件系统,旨在提供一种访问内核数据结构的方法,从而允许用户空间程序查看和控制系统的设备和资源。
例如设备驱动-16-Linux 内核LED子系统 - fuzidage - 博客园 (cnblogs.com) 操作led:
echo 1 > /sys/class/leds/red/brightness
又例如某个驱动修改设置module_param:
echo "8" >/sys/module/my_drv/parameters/lg_lv
kobject 和 kset 是构成 /sys 目录下的目录节点和文件节点的核心,也是层次化组织总线、设备、驱动的核心数据结构,kobject、kset 数据结构都能表示一个目录或者文件节点。在这个目录下面的每一个子目录,其实都是相同类型的kobject集合。然后不同的kset组织成树状层次的结构,就构成了sysfs子系统。