GPIO: General-purpose input/output,通用输入输出接口。下面以IMX6ULL芯片的GPIO寄存器来展开介绍。
1 GPIO 寄存器的 2 种操作方法
- 直接读写:读出、修改对应位、写入。
1
2
3
4
5
6
7
8
| a) 要设置 bit n:
val = data_reg;
val = val | (1<<n);
data_reg = val;
b) 要清除 bit n:
val = data_reg;
val = val & ~(1<<n);
data_reg = val;
|
- set-and-clear protocol:(芯片不一定支持)
set_reg, clr_reg, data_reg 三个寄存器对应的是同一个物理寄存器:
a) 要设置 bit n:set_reg = (1<<n);
b) 要清除 bit n:clr_reg = (1<<n);
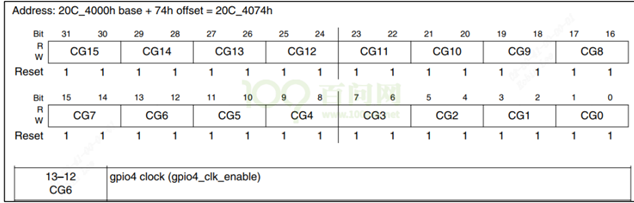
2 GPIO 寄存器配置流程
2.1 CCM时钟设置
CCM寄存器为GPIO 模块提供时钟:
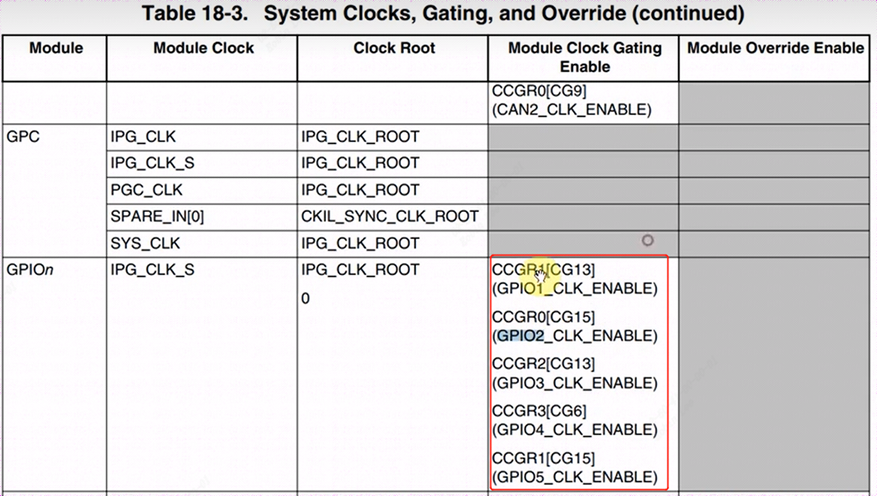
以IMX6ULL 芯片为列,GPIOn 要用 CCM_CCGRx 寄存器中的 2 位来决定该组 GPIO 是否使能。将对应的clk gating enable。

1
2
3
4
| 00:该 GPIO 模块全程被关闭
01:该 GPIO 模块在 CPU run mode 情况下是使能的;在 WAIT 或 STOP 模式下,关闭
10:保留
11:该 GPIO 模块全程使能
|
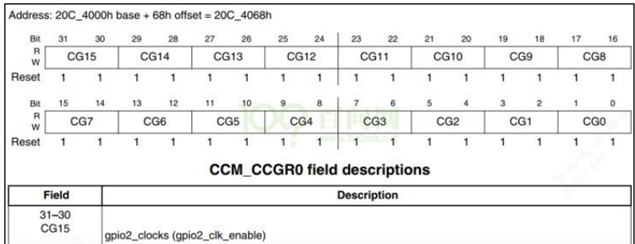
例如:用CCM_CCGR0[bit31:30]使能GPIO2 的时钟:
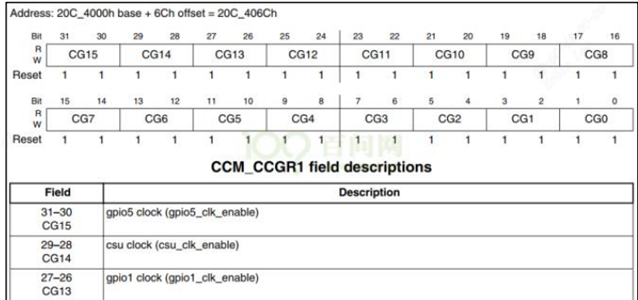
例如:用CCM_CCGR1[bit31:30]使能GPIO5 的时钟:
例如:用CCM_CCGR1[bit27:26]使能GPIO1 的时钟:
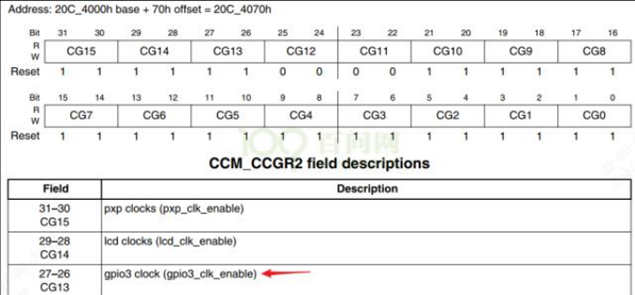
例如:用CCM_CCGR2[bit27:26]使能GPIO3的时钟:
例如:用CCM_CCGR3[bit13:12]使能GPIO4的时钟:
2.2 引脚模式电器属性设置
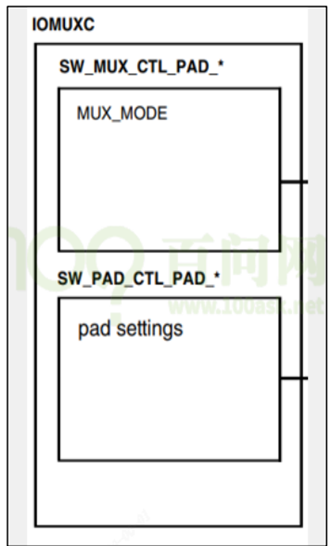
MUX seting用来配置pin的模式,比如GPIO。Pad setting用来设置GPIO的电器属性,比如电平,上下拉情况。
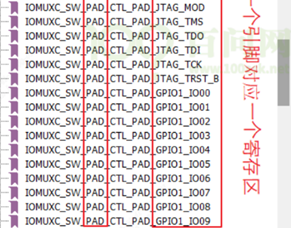
对于某个/某组引脚,IOMUXC 中有 2 个寄存器用来设置它:
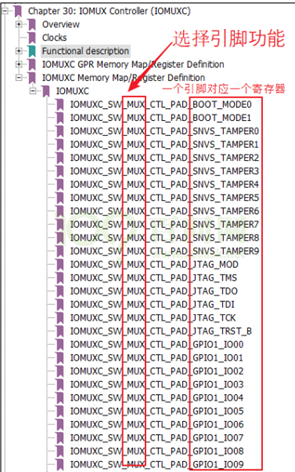
2.2.1 IOMUX功能
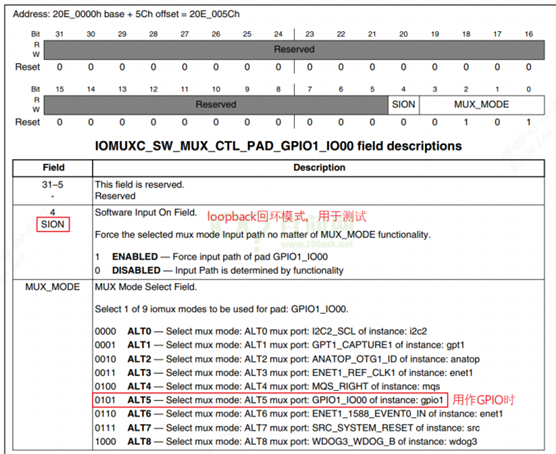
a) `IOMUXC_SW_MUX_CTL_PAD_ <PAD_NAME>`:`Mux pad xxx`,选择某个引脚的功能
b) IOMUXC_SW_MUX_CTL_GRP_<GROUP_NAME>:Mux grp xxx,选择某组引脚的功能
某个引脚,或是某组预设的引脚,都有 8 个可选的模式(alternate (ALT) MUX_MODE),设成ALT5表示选择GPIO。
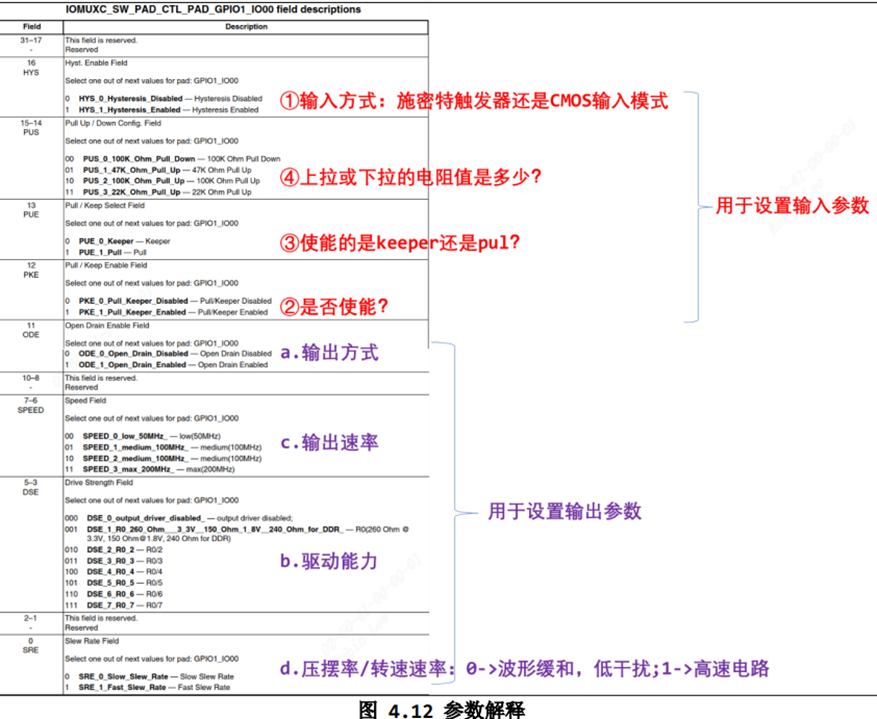
2.2.2 电器属性功能
a) IOMUXC_SW_PAD_CTL_PAD_<PAD_NAME>:pad pad xxx,设置某个引脚的电器属性
b) IOMUXC_SW_PAD_CTL_GRP_<GROUP_NAME>:pad grp xxx,设 置某组引脚的电器属性
pad参数有很多不只是上下拉,还有很多属性如IO驱动能力。
2.2.2.1 GPIO驱动LED的4种方式
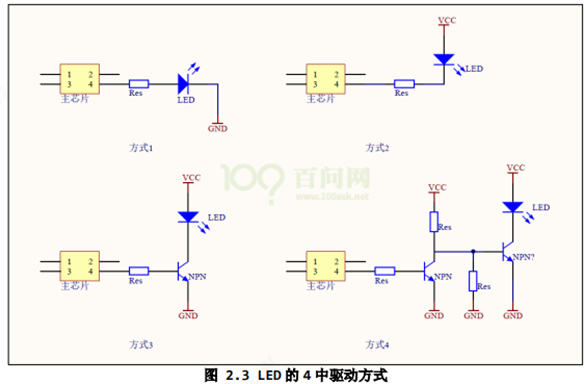
① 使用引脚输出 3.3V 点亮 LED,输出 0V 熄灭 LED。
② 使用引脚拉低到 0V 点亮 LED,输出 3.3V 熄灭 LED。
③有的芯片为了省电等原因,其引脚驱动能力不足,这时可以使用三极管驱动。 使用引脚输出 1.2V 点亮 LED,输出 0V 熄灭 LED。
④使用引脚输出 0V 点亮 LED,输出 1.2V 熄灭 LED
2.2.3 GPIO方向
当iomux成gpio模式后,就需要配置成gpio输出。
GPIOx_GDIR:设置引脚方向,每位对应一个引脚,1-output,0-input.
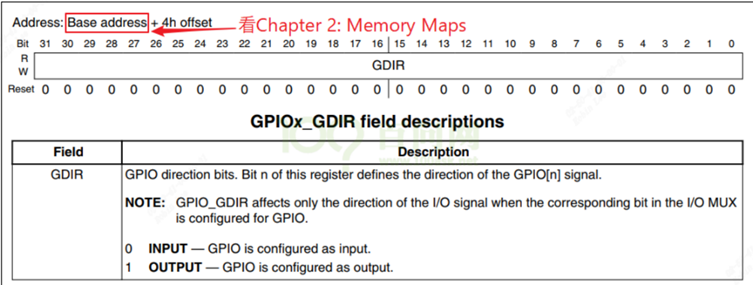
确定每组gpio基地址如下:加4就对应方向寄存器。

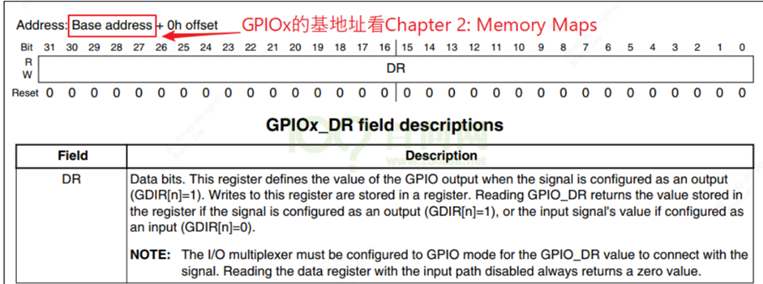
2.2.4 GPIO值
GPIOx_DR:(GPIOx的data register)。设置输出引脚的电平,每位对应一个引脚,1-高电平,0-低电平。
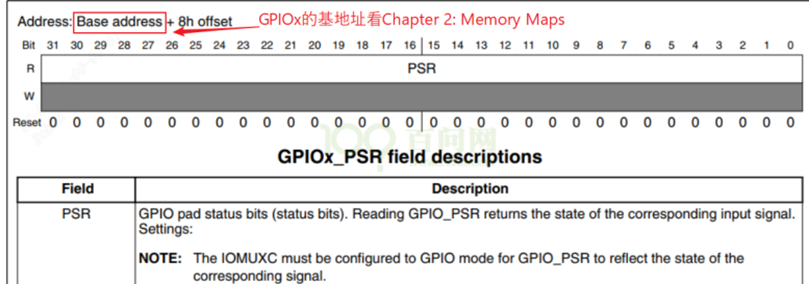
如果是配成了输入引脚,GPIOx_PSR:读取引脚的电平,每位对应一个引脚,1-高电平,0-低电平:
3 字符设备驱动程序框架
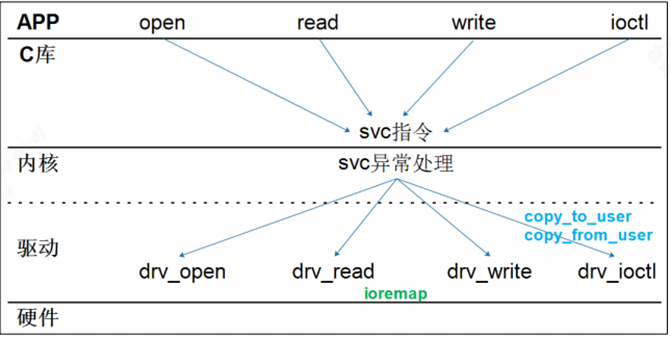

字符驱动编写流程:
1
2
3
4
5
6
7
8
9
10
11
12
13
14
15
16
17
18
19
20
21
22
23
24
25
26
27
28
29
30
31
32
33
34
35
|
if (newchrled.major) {
newchrled.devid = MKDEV(newchrled.major, 0);
register_chrdev_region(newchrled.devid, NEWCHRLED_CNT, NEWCHRLED_NAME);
} else {
alloc_chrdev_region(&newchrled.devid, 0, NEWCHRLED_CNT, NEWCHRLED_NAME);
newchrled.major = MAJOR(newchrled.devid);
newchrled.minor = MINOR(newchrled.devid);
}
printk("newcheled major=%d,minor=%d\r\n",newchrled.major, newchrled.minor);
newchrled.cdev.owner = THIS_MODULE;
cdev_init(&newchrled.cdev, &newchrled_fops);
cdev_add(&newchrled.cdev, newchrled.devid, NEWCHRLED_CNT);
newchrled.class = class_create(THIS_MODULE, NEWCHRLED_NAME);
if (IS_ERR(newchrled.class))
return PTR_ERR(newchrled.class);
newchrled.device = device_create(newchrled.class, NULL, newchrled.devid, NULL, NEWCHRLED_NAME);
if (IS_ERR(newchrled.device))
return PTR_ERR(newchrled.device);
|
3.1 实现通用性驱动模板
3.1.1 led_drv.c
1
2
3
4
5
6
7
8
9
10
11
12
13
14
15
16
17
18
19
20
21
22
23
24
25
26
27
28
29
30
31
32
33
34
35
36
37
38
39
40
41
42
43
44
45
46
47
48
49
50
51
52
53
54
55
56
57
58
59
60
61
62
63
64
65
66
67
68
69
70
71
72
73
74
75
76
77
78
79
80
81
82
83
84
85
86
87
88
89
90
91
92
93
94
95
96
97
98
99
100
101
102
103
104
105
106
107
| #include <linux/module.h>
#include <linux/fs.h>
#include <linux/errno.h>
#include <linux/miscdevice.h>
#include <linux/kernel.h>
#include <linux/major.h>
#include <linux/mutex.h>
#include <linux/proc_fs.h>
#include <linux/seq_file.h>
#include <linux/stat.h>
#include <linux/init.h>
#include <linux/device.h>
#include <linux/tty.h>
#include <linux/kmod.h>
#include <linux/gfp.h>
#include "led_opr.h"
static int major = 0;
static struct class *led_class;
struct led_operations *p_led_opr;
#define MIN(a, b) (a < b ? a : b)
static ssize_t led_drv_read(struct file *file, char __user *buf, size_t size, loff_t *offset)
{
printk("%s %s line %d\n", __FILE__, __FUNCTION__, __LINE__);
return 0;
}
static ssize_t led_drv_write(struct file *file, const char __user *buf, size_t size, loff_t *offset)
{
int err;
char status;
struct inode *inode = file_inode(file);
int minor = iminor(inode);
printk("%s %s line %d\n", __FILE__, __FUNCTION__, __LINE__);
err = copy_from_user(&status, buf, 1);
p_led_opr->ctl(minor, status);
return 1;
}
static int led_drv_open(struct inode *node, struct file *file)
{
int minor = iminor(node);
printk("%s %s line %d\n", __FILE__, __FUNCTION__, __LINE__);
p_led_opr->init(minor);
return 0;
}
static int led_drv_close (struct inode *node, struct file *file)
{
printk("%s %s line %d\n", __FILE__, __FUNCTION__, __LINE__);
return 0;
}
static struct file_operations led_drv = {
.owner = THIS_MODULE,
.open = led_drv_open,
.read = led_drv_read,
.write = led_drv_write,
.release = led_drv_close,
};
static int __init led_init(void)
{
int err;
int i;
printk("%s %s line %d\n", __FILE__, __FUNCTION__, __LINE__);
major = register_chrdev(0, "100ask_led", &led_drv);
led_class = class_create(THIS_MODULE, "100ask_led_class");
err = PTR_ERR(led_class);
if (IS_ERR(led_class)) {
printk("%s %s line %d\n", __FILE__, __FUNCTION__, __LINE__);
unregister_chrdev(major, "led");
return -1;
}
p_led_opr = get_board_led_opr();
for (i = 0; i < p_led_opr->num; i++)
device_create(led_class, NULL, MKDEV(major, i), NULL, "100ask_led%d", i);
return 0;
}
static void __exit led_exit(void)
{
int i;
printk("%s %s line %d\n", __FILE__, __FUNCTION__, __LINE__);
for (i = 0; i < p_led_opr->num; i++)
device_destroy(led_class, MKDEV(major, i));
class_destroy(led_class);
unregister_chrdev(major, "100ask_led");
}
module_init(led_init);
module_exit(led_exit);
MODULE_LICENSE("GPL");
|
register_chrdev, 如果传入主设备号,则静态注册,传入0则动态注册返回主设备号。class_create创建类/sys/class/100ask_led_class。get_board_led_opr获取具体单板的操作operation函数,后面具体单板实现。- 获取到具体单板的led数量后,
device_create为每一个led灯都建立设备节点。
再来看file_operations中的操作:
led_drv_open根据次设备号,调用具体单板的init函数,比如gpio 引脚复用,电器属性设置等。led_drv_write就可以根据次设备号, 控制具体单板的led引脚,设置高低电平,从而控制亮灭。
3.2 具体单板led驱动
3.2.1 led_opr.h
1
2
3
4
5
6
7
8
9
| #ifndef _LED_OPR_H
#define _LED_OPR_H
struct led_operations {
int num;
int (*init) (int which);
int (*ctl) (int which, char status);
};
struct led_operations *get_board_led_opr(void);
#endif
|
定义一个led_operations,num表示有几个led, init表示初始化led(drv_open的时候调用,配置pinmux,io mode, enable pin clk等)。
3.2.2 board_100ask_imx6ull-qemu.c分析
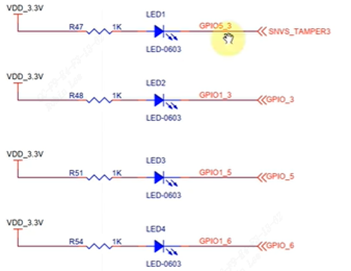
现在有一块board_100ask_imx6ull-qemu板子有4个LED,占2组GPIO,分别是GPIO5_3和GPIO1_3, GPIO1_5, GPIO1_6。
3.2.2.1 CCM时钟配置
寄存器配置参考2.1。使能时钟gpio5和gpio1的时钟,CCM_CCGR1[CG13]和CCM_CCGR1[CG15]配置成0x11。
1
2
3
4
5
6
7
8
|
*CCM_CCGR1 |= (3<<26);
*CCM_CCGR1 |= (3<<30);
|
3.2.2.2 IOMUX成gpio
iomux配置4个引脚复用成gpio功能。
3.2.2.2.1 gpio5_3 进行iomux
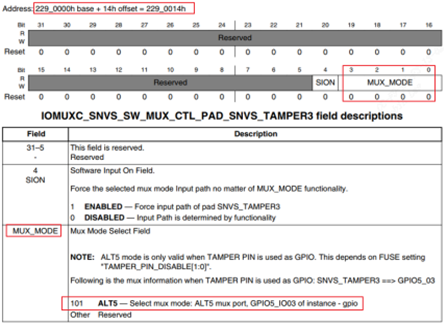
基地址为0x2290014。用ioremap进行映射到虚拟地址,就可以直接操作寄存器地址了。但是一般建议用writel, writeb等函数族。配成5表示gpio模式。
1
2
3
4
5
| IOMUXC_SNVS_SW_MUX_CTL_PAD_SNVS_TAMPER3=ioremap(0x2290014, 4);
*IOMUXC_SNVS_SW_MUX_CTL_PAD_SNVS_TAMPER3 = 5;
|
3.2.2.2.2 gpio1_3/gpio1_5/gpio1_6 进行iomux
每次映射4个字节太繁琐,干脆对整个gpio的iomux地址进行映射。
1
2
3
4
5
6
7
8
9
10
11
12
13
14
15
| struct iomux {
volatile unsigned int unnames[23];
volatile unsigned int IOMUXC_SW_MUX_CTL_PAD_GPIO1_IO00;
volatile unsigned int IOMUXC_SW_MUX_CTL_PAD_GPIO1_IO01;
volatile unsigned int IOMUXC_SW_MUX_CTL_PAD_GPIO1_IO02;
volatile unsigned int IOMUXC_SW_MUX_CTL_PAD_GPIO1_IO03;
volatile unsigned int IOMUXC_SW_MUX_CTL_PAD_GPIO1_IO04;
volatile unsigned int IOMUXC_SW_MUX_CTL_PAD_GPIO1_IO05;
volatile unsigned int IOMUXC_SW_MUX_CTL_PAD_GPIO1_IO06;
volatile unsigned int IOMUXC_SW_MUX_CTL_PAD_GPIO1_IO07;
volatile unsigned int IOMUXC_SW_MUX_CTL_PAD_GPIO1_IO08;
volatile unsigned int IOMUXC_SW_MUX_CTL_PAD_GPIO1_IO09;
};
iomux = ioremap(0x20e0000, sizeof(struct iomux));
|
这里偷懒用了一个技巧,unnames[23] 占92(0x5c)字节,刚好IOMUXC_SW_MUX_CTL_PAD_GPIO1_IO00地址就是0x20e0000+0x5c,就不用把所有寄存器都搬进来到struct iomux。
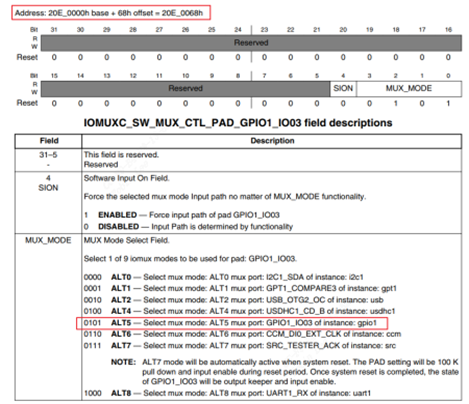
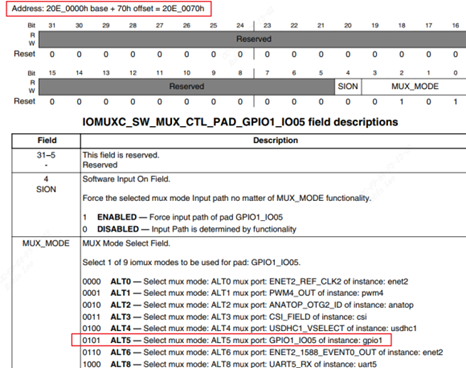
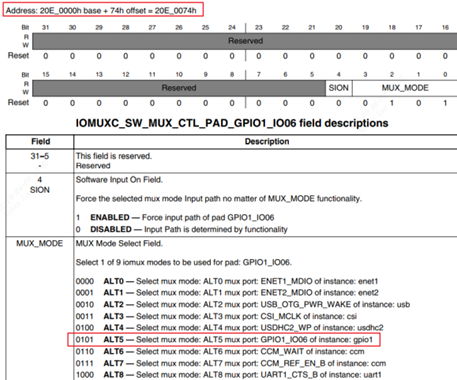
同理IOMUXC_SW_MUX_CTL_PAD_GPIO1_IO03地址就是0x20e0000+0x68, 因此:
1
2
3
4
|
iomux->IOMUXC_SW_MUX_CTL_PAD_GPIO1_IO03 = 5;
iomux->IOMUXC_SW_MUX_CTL_PAD_GPIO1_IO05 = 5;
iomux->IOMUXC_SW_MUX_CTL_PAD_GPIO1_IO06 = 5;
|
3.2.2.3 gpio配成输出

1
2
3
4
5
6
7
8
9
10
11
12
13
14
15
| struct imx6ull_gpio {
volatile unsigned int dr;
volatile unsigned int gdir;
volatile unsigned int psr;
volatile unsigned int icr1;
volatile unsigned int icr2;
volatile unsigned int imr;
volatile unsigned int isr;
volatile unsigned int edge_sel;
};
gpio1 = ioremap(0x209C000, sizeof(struct imx6ull_gpio));
gpio1->gdir |= (1<<3);
gpio1->gdir |= (1<<5);
gpio1->gdir |= (1<<6);
|
offset为0表示data register, offset为4表示方向寄存器。以gpio1_3/gpio1_5/gpio1_6举例,gdir的bit_n置1就表示哪个gpio配成输出。
3.2.2.4 gpio值设置
1
2
3
4
5
6
7
8
9
10
11
12
13
14
15
16
17
18
19
20
21
| if (which == 0) {
if (status)
gpio5->dr &= ~(1<<3);
else
gpio5->dr |= (1<<3);
} else if (which == 1) {
if (status)
gpio1->dr &= ~(1<<3);
else
gpio1->dr |= (1<<3);
} else if (which == 2) {
if (status)
gpio1->dr &= ~(1<<5);
else
gpio1->dr |= (1<<5);
} else if (which == 3) {
if (status)
gpio1->dr &= ~(1<<6);
else
gpio1->dr |= (1<<6);
}
|
同理dr就表示数据寄存器。一共4个led:
1
2
3
4
| which等于0表示gpio5_3
which等于1示gpio1_3
which等于2示gpio1_5
which等于3示gpio1_6
|
3.2.2.5 board_100ask_imx6ull-qemu.c
1
2
3
4
5
6
7
8
9
10
11
12
13
14
15
16
17
18
19
20
21
22
23
24
25
26
27
28
29
30
31
32
33
34
35
36
37
38
39
40
41
42
43
44
45
46
47
48
49
50
51
52
53
54
55
56
57
58
59
60
61
62
63
64
65
66
67
68
69
70
71
72
73
74
75
76
77
78
79
80
81
82
83
84
85
86
87
88
89
90
91
92
93
94
95
96
97
98
99
100
101
102
103
104
105
106
107
108
109
110
111
112
113
114
| #include <linux/module.h>
#include <linux/fs.h>
#include <linux/io.h>
#include <linux/errno.h>
#include <linux/miscdevice.h>
#include <linux/kernel.h>
#include <linux/major.h>
#include <linux/mutex.h>
#include <linux/proc_fs.h>
#include <linux/seq_file.h>
#include <linux/stat.h>
#include <linux/init.h>
#include <linux/device.h>
#include <linux/tty.h>
#include <linux/kmod.h>
#include <linux/gfp.h>
#include "led_opr.h"
struct iomux {
volatile unsigned int unnames[23];
volatile unsigned int IOMUXC_SW_MUX_CTL_PAD_GPIO1_IO00;
volatile unsigned int IOMUXC_SW_MUX_CTL_PAD_GPIO1_IO01;
volatile unsigned int IOMUXC_SW_MUX_CTL_PAD_GPIO1_IO02;
volatile unsigned int IOMUXC_SW_MUX_CTL_PAD_GPIO1_IO03;
volatile unsigned int IOMUXC_SW_MUX_CTL_PAD_GPIO1_IO04;
volatile unsigned int IOMUXC_SW_MUX_CTL_PAD_GPIO1_IO05;
volatile unsigned int IOMUXC_SW_MUX_CTL_PAD_GPIO1_IO06;
volatile unsigned int IOMUXC_SW_MUX_CTL_PAD_GPIO1_IO07;
volatile unsigned int IOMUXC_SW_MUX_CTL_PAD_GPIO1_IO08;
volatile unsigned int IOMUXC_SW_MUX_CTL_PAD_GPIO1_IO09;
};
struct imx6ull_gpio {
volatile unsigned int dr;
volatile unsigned int gdir;
volatile unsigned int psr;
volatile unsigned int icr1;
volatile unsigned int icr2;
volatile unsigned int imr;
volatile unsigned int isr;
volatile unsigned int edge_sel;
};
static volatile unsigned int *CCM_CCGR1;
static volatile unsigned int *IOMUXC_SNVS_SW_MUX_CTL_PAD_SNVS_TAMPER3;
static struct iomux *iomux;
static struct imx6ull_gpio *gpio1;
static struct imx6ull_gpio *gpio5;
static struct led_operations board_demo_led_opr = {
.num = 4,
.init = board_demo_led_init,
.ctl = board_demo_led_ctl,
};
static int board_demo_led_init(int which) {
if (!CCM_CCGR1) {
CCM_CCGR1 = ioremap(0x20C406C, 4);
IOMUXC_SNVS_SW_MUX_CTL_PAD_SNVS_TAMPER3 = ioremap(0x2290014, 4);
iomux = ioremap(0x20e0000, sizeof(struct iomux));
gpio1 = ioremap(0x209C000, sizeof(struct imx6ull_gpio));
gpio5 = ioremap(0x20AC000, sizeof(struct imx6ull_gpio));
}
if (which == 0) {
*CCM_CCGR1 |= (3<<30);
*IOMUXC_SNVS_SW_MUX_CTL_PAD_SNVS_TAMPER3 = 5;
gpio5->gdir |= (1<<3);
} else if(which == 1) {
*CCM_CCGR1 |= (3<<26);
iomux->IOMUXC_SW_MUX_CTL_PAD_GPIO1_IO03 = 5;
gpio1->gdir |= (1<<3);
} else if(which == 2) {
*CCM_CCGR1 |= (3<<26);
iomux->IOMUXC_SW_MUX_CTL_PAD_GPIO1_IO05 = 5;
gpio1->gdir |= (1<<5);
} else if(which == 3) {
*CCM_CCGR1 |= (3<<26);
iomux->IOMUXC_SW_MUX_CTL_PAD_GPIO1_IO06 = 5;
gpio1->gdir |= (1<<6);
}
return 0;
}
static int board_demo_led_ctl(int which, char status)
{
if (which == 0) {
if (status)
gpio5->dr &= ~(1<<3);
else
gpio5->dr |= (1<<3);
} else if (which == 1) {
if (status)
gpio1->dr &= ~(1<<3);
else
gpio1->dr |= (1<<3);
} else if (which == 2) {
if (status)
gpio1->dr &= ~(1<<5);
else
gpio1->dr |= (1<<5);
} else if (which == 3) {
if (status)
gpio1->dr &= ~(1<<6);
else
gpio1->dr |= (1<<6);
}
return 0;
}
struct led_operations *get_board_led_opr(void) {
return &board_demo_led_opr;
}
|
open的时候调用get_board_led_opr得到具体单板的操作函数集。进一步调用board_demo_led_init初始化led。
write的时候调用具体单板的操作函数集,进一步调用board_demo_led_ctl操控led。
4 字符设备驱动基础概念
4.1 EXPORT_SYMBOL
EXPORT_SYMBOL:导出函数,让别的module也能使用。

EXPORT_SYMBOL_GPL:

4.2 MODULE_INFO
MODULE_INFO(intree, "Y");的作用是将可加载内核模块标记为 in-tree。
加载树外 LKM 会导致内核打印警告:这是从module.c中的检查引起的:
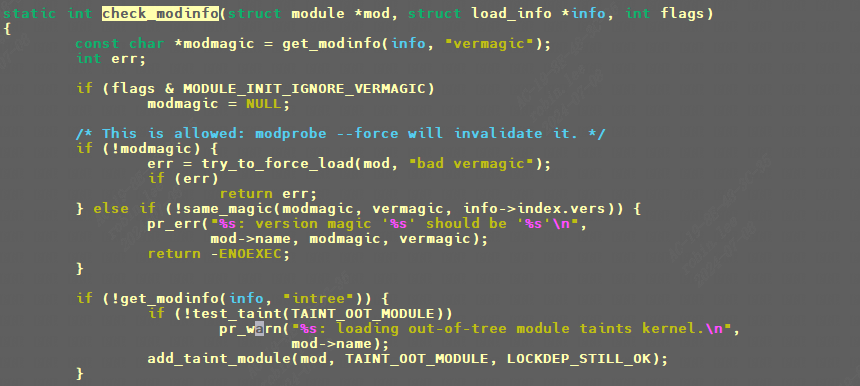
module: loading out-of-tree module taints kernel.
4.2 module_param
module_param(name,type,perm);
功能:指定模块参数,用于在加载模块时或者模块加载以后传递参数给模块。
module_param_array( name, type, nump, perm);
可用sysfs进行查看修改:

讲到module_param,把其他的也一笔带入:
1
2
3
4
| MODULE_DESCRIPTION("Freescale PM rpmsg driver");
MODULE_AUTHOR("Anson Huang <Anson.Huang@nxp.com>");
MODULE_LICENSE("GPL");
MODULE_VERSION("v2.0");
|
4.2.1 type
type: 数据类型:
1
2
3
4
5
6
7
8
9
| bool : 布尔型
inbool : 布尔反值
charp: 字符指针(相当于char *,不超过1024字节的字符串)
short: 短整型
ushort : 无符号短整型
int : 整型
uint : 无符号整型
long : 长整型
ulong: 无符号长整型
|
4.2.2 perm
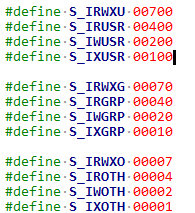
perm表示此参数在sysfs文件系统中所对应的文件节点的属性,其权限在include/linux/stat.h中有定义:
1
2
3
4
5
6
7
8
9
10
11
| #define S_IRUSR 00400
#define S_IWUSR 00200
#define S_IXUSR 00100
#define S_IRGRP 00040
#define S_IWGRP 00020
#define S_IXGRP 00010
#define S_IROTH 00004
#define S_IWOTH 00002
#define S_IXOTH 00001
|

1
2
3
4
5
6
7
8
9
10
11
12
13
14
15
| static char *alg = NULL;
static u32 type;
static u32 mask;
static int mode;
module_param(alg, charp, 0);
module_param(type, uint, 0);
module_param(mask, uint, 0);
module_param(mode, int, 0);
static int fish[10];
static int nr_fish;
module_param_array(fish, int, &nr_fish, 0664);
static char media[8];
module_param_string(media, media, sizeof(media), 0);
|
可以用sysfs设置fish数组,或者insmod时伴随设置。
4.3 设备节点
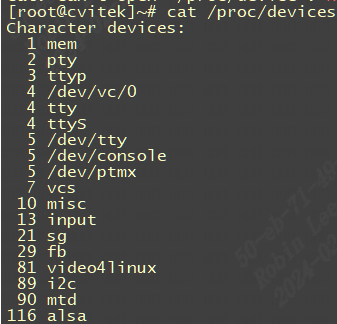
cat /proc/devices
4.3.1 手动建立设备节点
手动建立设备节点命令是mknod, 由于这里的字符设备都是用的misc杂项设备方式,因此主设备号都为10:
1
2
3
4
5
6
7
8
9
10
11
12
13
14
15
16
17
18
19
20
21
22
23
24
25
26
27
28
29
30
31
32
33
| /mnt/Athena2_FPGA_SDK_Veriry/demo/workspace/ko
brw-rw---- 1 root root 179, 1 Jan 1 00:05 /dev/mmcblk0p1
/mnt/Athena2_FPGA_SDK_Veriry/demo/workspace/ko
brw-rw---- 1 root root 179, 0 Jan 1 00:05 /dev/mmcblk0
/dev
crw-rw---- 1 root root 10, 0 Jan 1 00:05 /dev/cvi-base
crw-rw---- 1 root root 10, 61 Jan 1 00:05 /dev/cvi-dwa
crw-rw---- 1 root root 10, 58 Jan 1 00:30 /dev/cvi-ldc
crw-rw---- 1 root root 10, 60 Jan 1 00:04 /dev/cvi-stitch
crw-rw---- 1 root root 10, 62 Jan 1 00:05 /dev/cvi-sys
crw-rw---- 1 root root 10, 59 Jan 1 00:04 /dev/cvi-vpss
mknod /dev/mmcblk0 b 179 0
mknod /dev/mmcblk0p1 b 179 1
mknod /dev/cvi-base c 10 0
mknod /dev/cvi-sys c 10 62
mknod /dev/cvi-dwa c 10 61
mknod /dev/cvi-ldc c 10 58
mknod /dev/cvi-stitch c 10 60
mknod /dev/cvi-vpss c 10 59
crw-rw---- 1 root root 10, 0 Jan 1 00:08 /dev/cvi-base
crw-rw---- 1 root root 10, 61 Jan 1 00:08 /dev/cvi-dwa
crw-rw---- 1 root root 10, 59 Jan 1 00:07 /dev/cvi-ldc
crw-rw---- 1 root root 10, 60 Jan 1 00:07 /dev/cvi-stitch
crw-rw---- 1 root root 10, 62 Jan 1 00:08 /dev/cvi-sys
mknod /dev/cvi-base c 10 0
mknod /dev/cvi-sys c 10 62
mknod /dev/cvi-dwa c 10 61
mknod /dev/cvi-ldc c 10 59
mknod /dev/cvi-stitch c 10 60
|
4.3.2 自动创建设备节点
4.3.2.1 mdev机制
udev是一个用户程序,在 Linux下通过 udev来实现设备文件的创建与删除, udev可以检测系统中硬件设备状态,可以根据系统中硬件设备状态来创建或者删除设备文件。比如使用modprobe命令成功加载驱动模块以后就自动在 /dev目录下创建对应的设备节点文件 ,使用rmmod命令卸载驱动模块以后就 删除掉 /dev目录下的设备节点文件。 使用 busybox构建根文件系统的时候, busybox会创建一个 udev的简化版本 mdev,所以在嵌入式 Linux中我们使用mdev来实现设备节点文件的自动创建与删除, Linux系统中的热插拔事件也由 mdev管理:
1
| echo /sbin/mdev > /proc/sys/kernel/hotplug
|
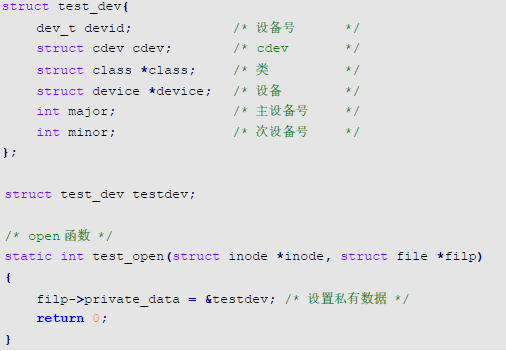
4.4 设置文件私有数据
一般open函数里面设置好私有数据以后,在 write、 read、 close等函数中直接读取 private_data即可得到设备结构体。
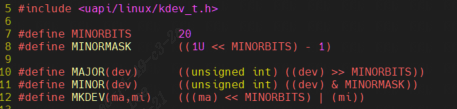
4.5 设备号
include\linux\kdev_t.h
1
2
3
4
5
| MINORBITS 表示次设备号位数,一共是 20 位;
MINORMASK 表示次设备号掩码;
MAJOR 用于从 dev_t 中获取主设备号,将 dev_t 右移 20 位即可
MINOR 用于从 dev_t 中获取次设备号,取 dev_t 的低 20 位的值即可
MKDEV 用于将给定的主设备号和次设备号的值组合成 dev_t 类型的设备号
|

定义了major主设备就用静态注册,否则动态分配设备号注册字符设备。
4.5.1 静态分配和释放一个设备号
1
2
3
| #include <linux/fs.h>
register_chrdev_region()
unregister_chrdev_region()
|
1
2
3
4
5
6
7
8
9
10
11
12
13
14
15
16
17
18
19
20
21
22
23
24
25
26
27
28
29
30
31
32
33
34
35
| #include <linux/module.h>
#include <linux/cdev.h>
#include <linux/fs.h>
#define MY_MAJOR_NUM 202
static const struct file_operations my_dev_fops = {
.owner = THIS_MODULE,
.open = my_dev_open,
.release = my_dev_close,
.unlocked_ioctl = my_dev_ioctl,
};
static int __init hello_init(void){
int ret;
dev_t dev = MKDEV(MY_MAJOR_NUM, 0);
ret = register_chrdev_region(dev, 1, "my_char_device");
if (ret < 0){
pr_info("Unable to allocate mayor number %d\n", MY_MAJOR_NUM);
return ret;
}
cdev_init(&my_dev, &my_dev_fops);
ret= cdev_add(&my_dev, dev, 1);
if (ret < 0){
unregister_chrdev_region(dev, 1);
pr_info("Unable to add cdev\n");
return ret;
}
return 0;
}
static void __exit hello_exit(void) {
cdev_del(&my_dev);
unregister_chrdev_region(MKDEV(MY_MAJOR_NUM, 0), 1);
}
|
4.5.2 动态分配和释放一个设备号
1
2
3
| #include <linux/fs.h>
alloc_chrdev_region()
unregister_chrdev_region()
|
1
2
3
4
5
6
7
8
9
10
11
12
13
14
15
16
17
18
19
20
21
22
23
24
25
26
27
28
29
30
31
32
33
34
35
36
37
38
39
40
41
42
43
44
45
| static struct class* helloClass;
static struct cdev my_dev;
dev_t dev;
static int __init hello_init(void) {
int ret;
dev_t dev_no;
int Major;
struct device* helloDevice;
ret = alloc_chrdev_region(&dev_no, 0, 1, DEVICE_NAME);
if (ret < 0){
pr_info("Unable to allocate Mayor number \n");
return ret;
}
Major = MAJOR(dev_no);
dev = MKDEV(Major,0);
cdev_init(&my_dev, &my_dev_fops);
ret = cdev_add(&my_dev, dev, 1);
if (ret < 0){
unregister_chrdev_region(dev, 1);
pr_info("Unable to add cdev\n");
return ret;
}
helloClass = class_create(THIS_MODULE, CLASS_NAME);
if (IS_ERR(helloClass)){
unregister_chrdev_region(dev, 1);
cdev_del(&my_dev);
pr_info("Failed to register device class\n");
return PTR_ERR(helloClass);
}
helloDevice = device_create(helloClass, NULL, dev, NULL, DEVICE_NAME);
if (IS_ERR(helloDevice)){
class_destroy(helloClass);
cdev_del(&my_dev);
unregister_chrdev_region(dev, 1);
pr_info("Failed to create the device\n");
return PTR_ERR(helloDevice);
}
return 0;
}
static void __exit hello_exit(void) {
device_destroy(helloClass, dev);
class_destroy(helloClass);
cdev_del(&my_dev);
unregister_chrdev_region(dev, 1);
}
|
4.6 添加设备和类
1
2
3
4
5
6
7
8
9
10
11
12
13
14
| struct class *class; /* 类 */
struct device *device; /* 设备 */
dev_t devid; /* 设备号 */
static int __init led_init(void) {
class = class_create(THIS_MODULE, "xxx");
device = device_create(class, NULL, devid, NULL, "xxx");
return 0;
}
static void __exit led_exit(void) {
device_destroy(newchrled.class, newchrled.devid);
class_destroy(newchrled.class);
}
module_init(led_init);
module_exit(led_exit);
|
5 内核源码树添加一个字符设备驱动
5.1 准备驱动源码
这里以misc device为例, 进入drivers/misc目录,新建目录hello_drv。放入驱动源码和Makefile和Kconfig。
1
2
3
4
5
6
7
8
9
10
11
12
13
14
15
16
17
18
19
20
21
22
23
24
25
26
27
28
29
30
31
32
33
34
35
36
37
38
39
40
41
42
43
44
45
46
47
48
49
50
51
52
53
54
55
56
57
58
59
60
61
62
63
64
65
66
67
68
69
70
71
72
73
74
75
76
77
78
79
80
81
82
| #include <linux/module.h>
#include <linux/fs.h>
#include <linux/errno.h>
#include <linux/miscdevice.h>
#include <linux/kernel.h>
#include <linux/major.h>
#include <linux/mutex.h>
#include <linux/proc_fs.h>
#include <linux/seq_file.h>
#include <linux/stat.h>
#include <linux/init.h>
#include <linux/device.h>
#include <linux/tty.h>
#include <linux/kmod.h>
#include <linux/gfp.h>
static int major = 0;
static struct cdev hello_cdev;
static char kernel_buf[1024];
static struct class *hello_class;
static ssize_t hello_drv_read (struct file *file, char __user *buf, size_t size, loff_t *offset){
int err;
err = copy_to_user(buf, kernel_buf, min(1024, size));
return min(1024, size);
}
static ssize_t hello_drv_write (struct file *file, const char __user *buf, size_t size, loff_t *offset){
int err;
err = copy_from_user(kernel_buf, buf, min(1024, size));
return min(1024, size);
}
static int hello_drv_open (struct inode *node, struct file *file){
return 0;
}
static int hello_drv_close (struct inode *node, struct file *file){
return 0;
}
static struct file_operations hello_drv = {
.owner = THIS_MODULE,
.open = hello_drv_open,
.read = hello_drv_read,
.write = hello_drv_write,
.release = hello_drv_close,
};
static int __init hello_init(void){
int err;
int rc;
dev_t devid;
#if 0
#else
rc = alloc_chrdev_region(&devid, 0, 1, "hello");
major = MAJOR(devid);
cdev_init(&hello_cdev, &hello_drv);
cdev_add(&hello_cdev, devid, 1);
#endif
hello_class = class_create(THIS_MODULE, "hello_class");
err = PTR_ERR(hello_class);
if (IS_ERR(hello_class)) {
printk("%s %s line %d\n", __FILE__, __FUNCTION__, __LINE__);
unregister_chrdev(major, "hello");
return -1;
}
device_create(hello_class, NULL, MKDEV(major, 0), NULL, "hello");
return 0;
}
static void __exit hello_exit(void){
device_destroy(hello_class, MKDEV(major, 0));
class_destroy(hello_class);
#if 0
#else
cdev_del(&hello_cdev);
unregister_chrdev_region(MKDEV(major,0), 1);
#endif
}
module_init(hello_init);
module_exit(hello_exit);
MODULE_LICENSE("GPL");
|
5.2 MakeFile

1
2
| userprogs-always-y += hello_test
userccflags += -I usr/include
|
这里表示用userspace方式去编译应用程序,hello_test就是用户程序。
假如我们多个文件hello1.c hello2.c, 如何得到hello.o和hello.ko呢?如下参考:

5.3 Kconfig
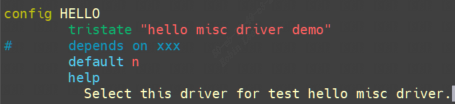
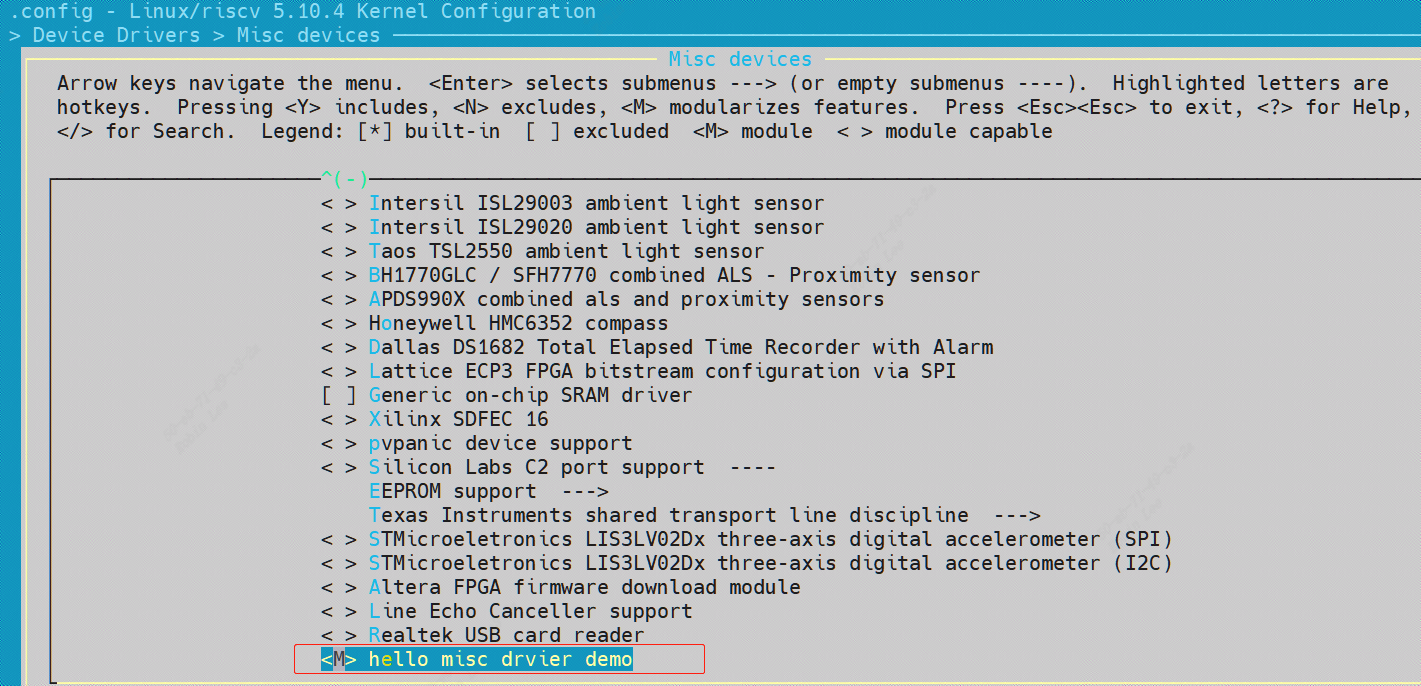
5.4 修改上一级Makefile和Kconfig
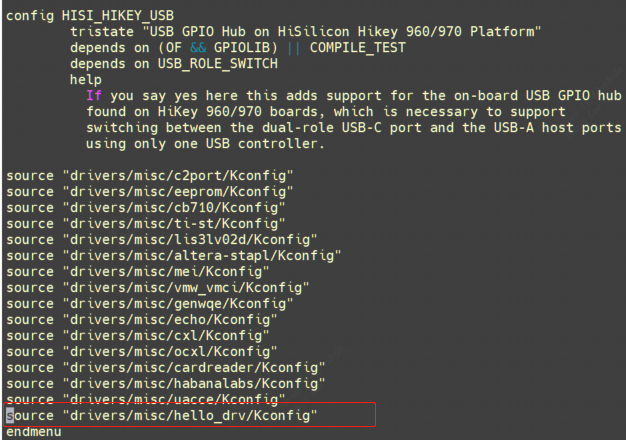

让hello_drv目录中的Kconfig也能被内核识别,输入make menuconfig,即可选择将其编译成内核模块还是直接编译进内核镜像,默认default n,也就是CONFIG_HELLO等于n, hello_drv目录是obj-n, 不编译;选择y则表示编译进内核镜像,选择m表示编译成内核模块。
编译成内核模块,则会在.config中产生CONFIG_HELLO=m的一项配置,编译产生hello.ko
编译成内核镜像,则会在.config中产生CONFIG_HELLO=y的一项配置,编译产生built-in.a,最终该 built-in.a会合入vmlinux。