1 Linux下sysfs-procfs-debugfs使用 Linux内核空间与用户空间的交互如何能透过文件系统这层关系,把需要参数写入文件中呢?
当然有办法,linux内核提供了3种 “内存文件系统”,分别是sysfs、debugfs、procfs,驱动工程师可以通过任意的一种文件系统向用户空间传递信息。
1
2
3
Sysfs的挂载点为/sys Debugfs的挂载点为/sys/kernel/debug Procfs的挂载点为/proc
内存文件系统: 一种临时文件系统,一般会利用脚本挂载到rootfs,但是这些目录都是使用RAM空间,他们中的信息只存在于内存中,下电后即消失。他们的出现旨在提供一种与用户空间交互信息的方式。
脚本如下:
1
2
3
4
5
6
7
8
9
[root@xxx]/etc /dev/root / ext2 rw,noauto 0 1 proc /proc proc defaults 0 0 devpts /dev/pts devpts defaults,gid=5,mode=620,ptmxmode=0666 0 0 tmpfs /dev/shm tmpfs mode=0777 0 0 tmpfs /tmp tmpfs mode=1777 0 0 sysfs /sys sysfs defaults 0 0 nodev /sys/kernel/debug debugfs defaults 0 0
输入mount查看挂载信息:可以看到有挂载procfs, sysfs,以及debugfs
1
2
3
4
5
6
7
8
9
[root@xxx]~ /dev/root on / type squashfs (ro,relatime) devtmpfs on /dev type devtmpfs (rw,relatime,size=1381884k,nr_inodes=345471,mode=755) proc on /proc type proc (rw,relatime) sysfs on /sys type sysfs (rw,relatime) nodev on /sys/kernel/debug type debugfs (rw,relatime) /dev/mmcblk0p6 on /mnt/cfg type ext4 (rw,sync ,relatime) /dev/mmcblk0p7 on /mnt/data type ext4 (rw,sync ,relatime) /dev/mmcblk0p7 on /var/log type ext4 (rw,sync ,relatime)
1.1 sysfs 设备驱动模型中诞生了sys这个新的虚拟文件系统。
1.1.1 sysfs举例 sysfs在linux驱动开发过程使用非常常见,比如gpio子系统 led子系统 led子系统-hexo gpio子系统-hexo
1
2
3
4
5
6
echo 256 > /sys/class/gpio/export echo 256 > /sys/class/gpio/unexportecho 255 > /sys/class/leds/led1/brightnesscat /sys/class/leds/led1/brightnesscat /sys/class/leds/led1/max_brightness
这就是利用sysfs写入文件,这个文件是用户态和内核态共享的。方便驱动动态读取用户配置和对驱动的控制。
1.1.2 sysfs使用 1 2 3 4 5 6 7 8 9 10 [root@xxx]/sys/module/soph_stitch/drivers total 0 lrwxrwxrwx 1 root root 0 Jan 1 10:00 platform:stitch -> ../../../bus/platform/drivers/stitch [root@cvitek]/sys/module/soph_stitch/parameters -rw-r--r-- 1 root root 4096 Jan 1 10:01 clk_sys_freq -rw-r--r-- 1 root root 4096 Jan 1 10:01 gStitchDumpDmaCfg -rw-r--r-- 1 root root 4096 Jan 1 10:01 gStitchDumpReg -rw-r--r-- 1 root root 4096 Jan 1 10:01 stitch_log_lv
/sys/module/xxx/parameters下定义了驱动xxx模块的模块参数。
1.1.2.0 syfs下的platform设备和驱动信息 1 2 3 4 5 6 7 8 9 10 11 12 13 14 15 16 17 18 19 20 21 [root@cvitek]/sys/bus/platform/devices ... lrwxrwxrwx 1 root root 0 Jan 1 10:06 680b8000.stitch -> ../../../devices/platform/680b8000.stitch lrwxrwxrwx 1 root root 0 Jan 1 10:06 680ba000.dpu -> ../../../devices/platform/680ba000.dpu lrwxrwxrwx 1 root root 0 Jan 1 10:06 680be000.sys -> ../../../devices/platform/680be000.sys lrwxrwxrwx 1 root root 0 Jan 1 10:06 68100000.cif -> ../../../devices/platform/68100000.cif lrwxrwxrwx 1 root root 0 Jan 1 10:06 68100000.cif_v4l2 -> ../../../devices/platform/68100000.cif_v4l2 lrwxrwxrwx 1 root root 0 Jan 1 10:06 Fixed MDIO bus.0 -> ../../../devices/platform/Fixed MDIO bus.0 lrwxrwxrwx 1 root root 0 Jan 1 10:06 base -> ../../../devices/platform/base ... [root@cvitek]/sys/bus/platform/drivers ... drwxr-xr-x 2 root root 0 Jan 1 10:15 cif drwxr-xr-x 2 root root 0 Jan 1 10:00 stitch ... [root@cvitek]/sys/bus/platform/drivers/stitch total 0 lrwxrwxrwx 1 root root 0 Jan 1 10:00 680b8000.stitch -> ../../../../devices/platform/680b8000.stitch lrwxrwxrwx 1 root root 0 Jan 1 10:00 module -> ../../../../module/soph_stitch --w------- 1 root root 4096 Jan 1 10:00 uevent
可以看到只要用platform_driver_register、platform_device_register注册的驱动和设备就会建立如上的sysfs关系链。
1.1.2.1 syfs下的misc设备信息 1 2 3 4 5 6 7 8 9 [root@cvitek]/sys/class/misc misccvitekadc_0 soph-dpu soph-stitch watchdog misccvitekadc_1 soph-ldc soph-sys misccvitekdac_0 soph-mipi-rx soph-vpss [root@cvitek]/sys/class/misc lrwxrwxrwx 1 root root 0 Jan 1 13:57 soph-stitch -> ../../devices/virtual/misc/soph-stitch [root@cvitek]/sys/class/soph-vi lrwxrwxrwx 1 root root 0 Jan 1 08:02 soph-vi -> ../../devices/platform/68000000.vi/soph-vi/soph-vi
可以看到只要是misc设备注册的字符设备,都会在/sys/class/misc下。device_create函数内部会调用到device_add函数,会在/sys/device目录下生成相应的sys文件,同时会判断device结构中的devt变量是否可用,如果可用才会调用devtmpfs_create_node(dev);在/dev目录下生成对应的设备文件。所以说device_add是否会生成设备文件需要根据device结构体中是否传入了设备号来决定的。
1 device_create(dev->vi_class, dev->dev, dev->cdev_id, NULL , "%s" , VI_DEV_NAME);
1.1.2.2 syfs API 1 2 3 4 5 6 7 8 9 10 11 12 13 14 15 16 17 18 19 20 21 22 23 24 25 26 27 28 static inline int __must_check sysfs_create_file (struct kobject *kobj, const struct attribute *attr )int __must_check sysfs_create_group (struct kobject *kobj, const struct attribute_group *grp )int __must_check sysfs_create_groups (struct kobject *kobj, const struct attribute_group **groups )struct kobject *kobject_create_and_add(const char *name, struct kobject*parent);int device_create_file ( struct device * dev, const struct device_attribute * attr )void sysfs_remove_group (struct kobject *kobj, const struct attribute_group *grp )
1.1.2.3 给驱动模块添加sysfs参数举例
使用DEVICE_ATTR声明一个sys节点, 这里是一个led_status节点,申明了led_status_show,led_status_store函数。
1 2 3 4 5 6 7 static DEVICE_ATTR (led_status, 0600 , led_status_show, led_status_store) ;
完成sys节点的读写函数,执行 cat /sys/devices/platform/leds/led_status时会调用led_status_show,把buf内容显示出来。用echo命令往sys节点写入内容时调用led_status_store。led_status_show()函数和led_status_store()函数的作用分为打印led变量的值和修改led变量的值.
1 2 3 4 5 6 7 8 9 10 11 12 static unsigned int led = 0 ;static ssize_t led_status_show (struct device *dev, struct device_attribute *attr, char *buf) { return sprintf (buf, "%s:%d.\n" , "led" , led); } static ssize_t led_status_store (struct device *dev, struct device_attribute *attr, const char *buf, size_t count) { sscanf (buf, "%d" , &led); return count; }
定义struct attribute和struct attribute_group数组
1 2 3 4 5 6 7 8 9 10 11 12 13 static struct attribute *led_attributes []= &dev_attr_led_status.attr, NULL , }; static const struct attribute_group led_attrs = .attrs = led_attributes, };
调用sysfs_create_group()注册sysfs接口, 完整驱动实例如下:1 2 3 4 5 6 7 8 9 10 11 12 13 14 15 16 17 18 19 20 21 22 23 24 25 26 27 28 29 30 31 32 33 34 35 36 37 38 39 40 41 42 43 44 45 46 47 48 49 50 static unsigned int led = 0 ; static ssize_t led_status_show (struct device *dev, struct device_attribute *attr, char *buf) return sprintf (buf, "%s:%d.\n" , "led" , led); } static ssize_t led_status_store (struct device *dev, struct device_attribute *attr, const char *buf, size_t count) sscanf (buf, "%d" , &led); return count; } static DEVICE_ATTR (led_status, 0600 , led_status_show, led_status_store) static struct attribute *led_attributes[]={ &dev_attr_led_status.attr, NULL , }; static const struct attribute_group led_attrs={ .attrs = led_attributes, }; static int xx_led_probe (struct platform_device *pdev) sysfs_create_group (&pdev->dev.kobj, &led_attrs); return 0 ; } static int xx_led_remove (struct platform_device *pdev) sysfs_remove_group (&pdev->dev.kobj, &led_attrs); return 0 ; } static const struct of_device_id xx_led_of_match[] = { {.compatible = "xx,xx-led" }, }; static struct platform_driver xx_led_driver = { .probe = xx_led_probe, .remove = xx_led_remove, .driver = { .name = "xx-led" , .owner = THIS_MODULE, .of_match_table = xx_led_of_match, }, }; static int __init xx_led_init (void ) return platform_driver_register (&xx_led_driver); } static void __exit xx_led_exit (void ) platform_driver_unregister (&xx_led_driver); } module_init (xx_led_init);module_exit (xx_led_exit);
1.1.3 DEVICE_ATTR宏 1 2 3 4 5 6 7 8 9 10 11 12 13 14 15 16 #define DEVICE_ATTR(_name, _mode, _show, _store) \ struct device_attribute dev_attr_##_name = __ATTR(_name, _mode, _show, _store) #define __ATTR(_name, _mode, _show, _store) { \ .attr = {.name = __stringify(_name), \ .mode = VERIFY_OCTAL_PERMISSIONS(_mode) }, \ .show = _show, \ .store = _store, \ } struct device_attribute { struct attribute attr; ssize_t (*show)(struct device *dev, struct device_attribute *attr, char *buf); ssize_t (*store)(struct device *dev, struct device_attribute *attr, const char *buf, size_t count); };
DEVICE_ATTR宏会定义一个struct device_attribute结构体实例dev_attr_##_name和初始化。一般用device_create_file生成sysfs属性文件。
注意:属性文件的权限mode不可以随便定义,是有限制的,mode不合理会报错:
1 error: negative width in bit-field anonymous
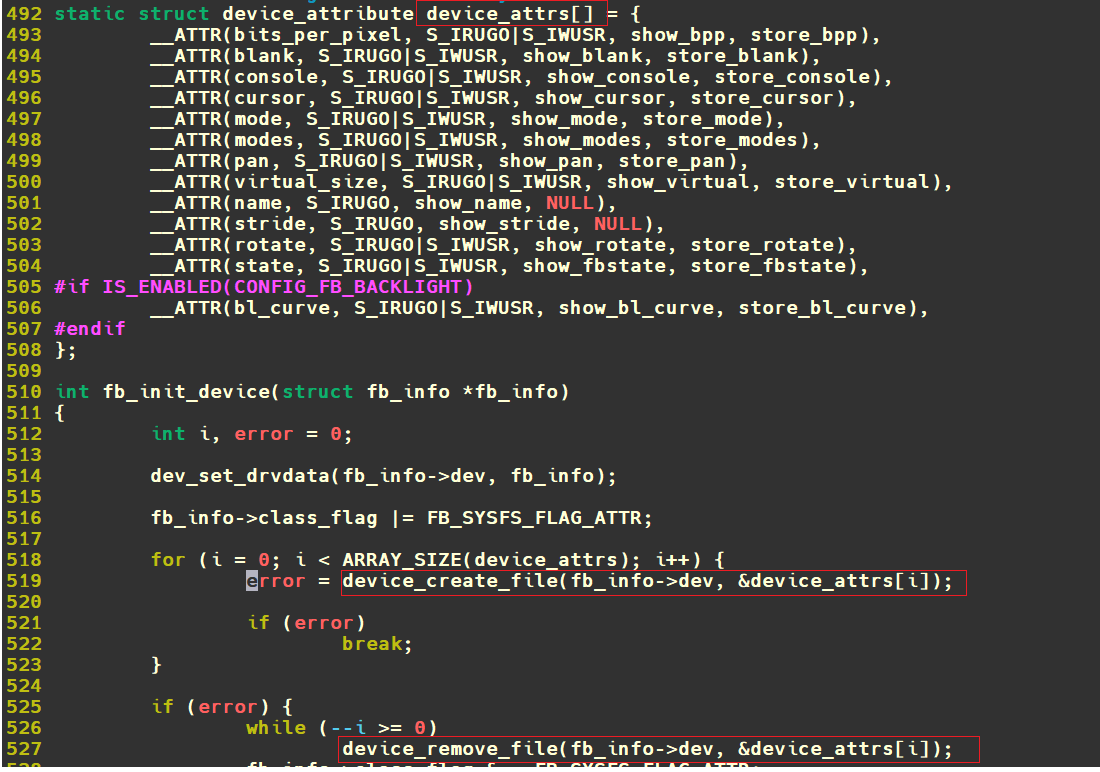
1.1.3.0 DEVICE_ATTR示例 以Linux下Framebuffer子系统(cnblogs.com-fuzidage) 字符设备驱动-Framebuffer子系统 | Hexo (fuzidage.github.io) 为例,打开linux_5.10/drivers/video/fbdev/core/fbsysfs.c:
可以看到很多属性文件,都调用device_create_file建立了sysfs属性文件。
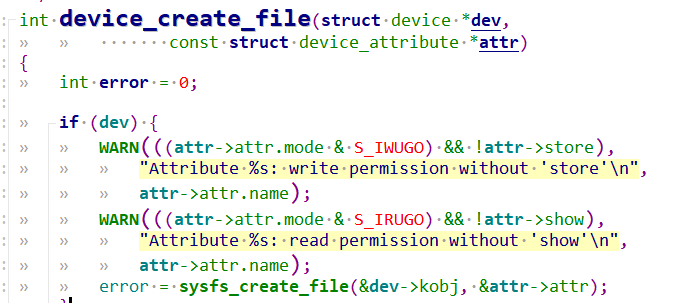
1.1.3.1 device_create_file
可以看到本质还是用sysfs_creat_file创建sysfs属性文件。
1.2 procfs procfs是用户获取进程的有用信息、系统的有用信息等。可以查看某个进程的相关信息,也可以查看系统的信息,比如/proc/meminfo 用来查看内存的管理信息,/proc/cpuinfo用来观察CPU的信息。
1 2 3 4 5 6 7 8 9 10 11 12 13 14 15 16 17 18 19 20 21 22 23 24 [root@cvitek]~ total 0 dr-xr-xr-x 8 root root 0 Jan 1 08:00 1 dr-xr-xr-x 8 root root 0 Jan 1 08:00 234 dr-xr-xr-x 8 root root 0 Jan 1 08:00 273 -r--r--r-- 1 root root 0 Jan 1 08:02 cmdline -r--r--r-- 1 root root 0 Jan 1 08:02 cpuinfo dr-xr-xr-x 3 root root 0 Jan 1 08:02 dynamic_debug -r--r--r-- 1 root root 0 Jan 1 08:02 fb -r--r--r-- 1 root root 0 Jan 1 08:02 filesystems dr-xr-xr-x 8 root root 0 Jan 1 08:02 fs -r--r--r-- 1 root root 0 Jan 1 08:02 interrupts -r--r--r-- 1 root root 0 Jan 1 08:02 iomem -r--r--r-- 1 root root 0 Jan 1 08:02 ioports dr-xr-xr-x 92 root root 0 Jan 1 08:02 irq -r--r--r-- 1 root root 0 Jan 1 08:02 meminfo -r-------- 1 root root 0 Jan 1 08:02 pagetypeinfo -r--r--r-- 1 root root 0 Jan 1 08:02 partitions -r--r--r-- 1 root root 0 Jan 1 08:02 sched_debug lrwxrwxrwx 1 root root 0 Jan 1 08:00 self -> 291 lrwxrwxrwx 1 root root 0 Jan 1 08:00 thread-self -> 291/task/291 -r-------- 1 root root 0 Jan 1 08:02 vmallocinfo -r--r--r-- 1 root root 0 Jan 1 08:02 vmstat -r--r--r-- 1 root root 0 Jan 1 08:02 zoneinfo
可以看到很多信息,我们敲的命令ps、top等很多shell命令正是从proc系统中读取信息,且更具可读性。又例如free命令就是解析/proc/meminifo。
1.2.1 procfs API procfs文件系统提供了一些常用的API,这些API函数定义在fs/proc/internal.h
1 2 3 4 5 6 7 8 9 10 11 12 13 14 15 16 17 18 19 20 21 22 23 24 25 26 struct proc_dir_entry *proc_mkdir (const char *name, struct proc_dir_entry *parent) ;#if (LINUX_VERSION_CODE >= KERNEL_VERSION(5, 10, 0)) struct proc_dir_entry *proc_create_data (const char *name, umode_t mode, struct proc_dir_entry *parent, const struct proc_ops *proc_ops, void *data) ;#else struct proc_dir_entry *proc_create_data (const char *name, umode_t mode, struct proc_dir_entry *parent, const struct file_operations *proc_fops, void *data) ;#endif struct proc_dir_entry *proc_create_data (const char *name, umode_t mode, struct proc_dir_entry *parent, const struct file_operations *proc_fops, void *data) ;void remove_proc_entry (const char *name, struct proc_dir_entry *parent) ;void proc_remove (struct proc_dir_entry *de) ;
1.2.2 使用举例 举个例子:misc杂项设备 misc杂项设备-Hexo 子系统初始化时:
1 2 3 4 5 6 7 8 9 10 11 12 13 14 15 16 17 18 19 20 21 22 static int __init misc_init (void ) { int err; #ifdef CONFIG_PROC_FS proc_create("misc" , 0 , NULL , &misc_proc_fops); #endif misc_class = class_create(THIS_MODULE, "misc" ); err = PTR_ERR(misc_class); if (IS_ERR(misc_class)) goto fail_remove; err = -EIO; if (register_chrdev(MISC_MAJOR,"misc" ,&misc_fops)) goto fail_printk; misc_class->devnode = misc_devnode; return 0 ; fail_printk: printk("unable to get major %d for misc devices\n" , MISC_MAJOR); class_destroy(misc_class); fail_remove: remove_proc_entry("misc" , NULL ); return err; }
就创建了/proc/misc条目和/sys/class/misc目录。/proc/misc条目统计了包含的misc杂项字符设备:
1 2 3 4 5 6 [root@xxxx]/proc 48 soph-stitch 49 soph-dpu 50 soph-mipi-tx1 51 soph-mipi-tx0 52 soph-rgn
再举一个例子:透过procfs进行cif驱动的状态显示到用户,以及用户配置参数,动态调用cif驱动的流程控制。
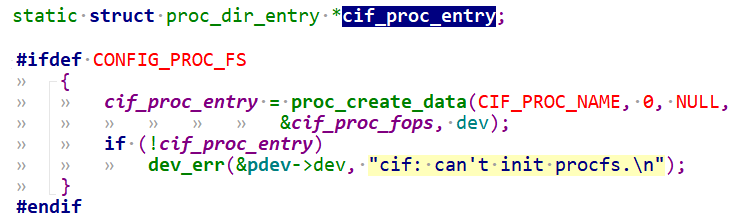
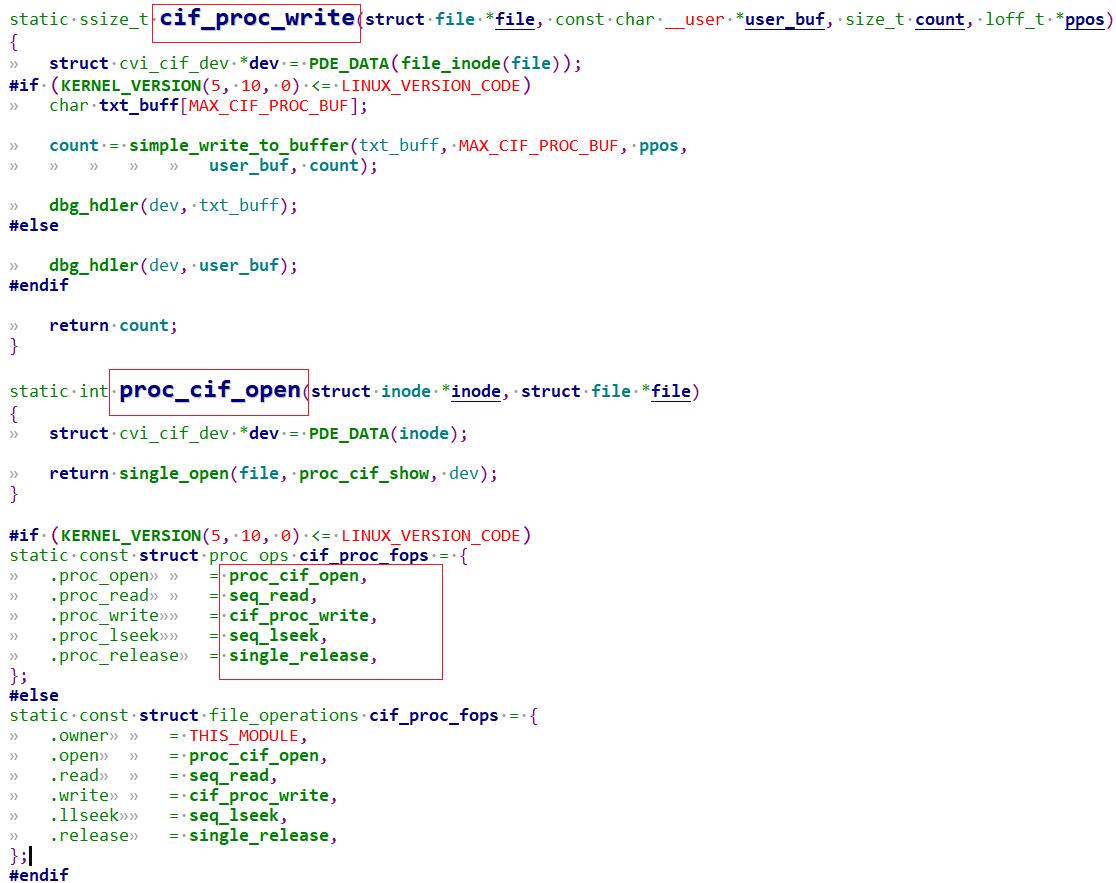
1 2 3 4 5 6 7 8 9 10 11 12 13 14 15 16 17 18 19 20 21 22 23 24 25 26 27 28 29 30 31 32 33 34 35 36 37 38 39 40 41 42 43 44 45 46 47 48 49 50 51 52 53 54 55 56 57 58 59 60 61 62 63 64 65 66 67 68 69 70 71 72 73 74 75 76 77 78 79 80 81 82 83 84 85 86 87 88 89 90 91 92 93 94 95 96 97 98 99 100 101 102 103 104 105 106 107 108 109 110 111 112 113 114 115 116 117 118 119 120 121 122 123 124 125 126 127 128 129 130 131 132 133 134 135 #define CIF_PROC_NAME "v4l2/mipi-rx" static struct proc_dir_entry *cif_proc_entry;int dbg_hdler (struct cvi_cif_dev *dev, char const *input struct cvi_link *link = &dev->link[0 ]; struct cif_ctx *ctx; u32 num; u8 str[80 ] = {0 }; u8 t = 0 ; u32 a, v, v2; u8 i, n; u8 *p; num = sscanf(input, "%s %d %d %d" , str, &a, &v, &v2); if (num > 4 ) { dbg_print_usage(link->dev); return -EINVAL; } dev_info(link->dev, "input = %s %d\n" , str, num); p = str; for (; *p; ++p) *p = tolower(*p); n = ARRAY_SIZE(dbg_type); for (i = 0 ; i < n; i++) { if (!strcmp(str, dbg_type[i])) { t = i; break ; } } if (i == n) { dev_info(link->dev, "unknown type(%s)!\n" , str); dbg_print_usage(link->dev); return -EINVAL; } switch (t) { case 0 : if (a > MAX_LINK_NUM) return -EINVAL; link = &dev->link[a]; ctx = &link->cif_ctx; if (link->is_on) { link->sts_csi.errcnt_ecc = 0 ; link->sts_csi.errcnt_crc = 0 ; link->sts_csi.errcnt_wc = 0 ; link->sts_csi.errcnt_hdr = 0 ; link->sts_csi.fifo_full = 0 ; cif_clear_csi_int_sts(ctx); cif_unmask_csi_int_sts(ctx, 0x0F ); } break ; case 1 : if (a > MAX_LINK_NUM) return -EINVAL; link = &dev->link[a]; ctx = &link->cif_ctx; cif_set_hs_settle(ctx, v); break ; } int proc_cif_show (struct seq_file *m, void *v{ struct cvi_cif_dev *dev = (struct cvi_cif_dev *)m->private ; int i; seq_printf(m, "\nModule: [MIPI_RX], Build Time[%s]\n" , UTS_VERSION); seq_puts(m, "\n------------Combo DEV ATTR--------------\n" ); for (i = 0 ; i < MAX_LINK_NUM; i++) if (dev->link[i].is_on) cif_show_dev_attr(m, &dev->link[i].attr); seq_puts(m, "\n------------MIPI info-------------------\n" ); for (i = 0 ; i < MAX_LINK_NUM; i++) if (dev->link[i].is_on && (dev->link[i].attr.input_mode == INPUT_MODE_MIPI)) { cif_show_mipi_sts(m, &dev->link[i]); cif_show_phy_sts(m, &dev->link[i]); } return 0 ; } static ssize_t cif_proc_write (struct file *file, const char __user *user_buf, size_t count, loff_t *ppos ){ struct cvi_cif_dev *dev = PDE_DATA(file_inode(file)); #if (KERNEL_VERSION(5, 10, 0) <= LINUX_VERSION_CODE) char txt_buff[MAX_CIF_PROC_BUF]; count = simple_write_to_buffer(txt_buff, MAX_CIF_PROC_BUF, ppos, user_buf, count); dbg_hdler(dev, txt_buff); #else dbg_hdler(dev, user_buf); #endif return count; } static int proc_cif_open (struct inode *inode, struct file *file{ struct cvi_cif_dev *dev = PDE_DATA(inode); return single_open(file, proc_cif_show, dev); } #if (KERNEL_VERSION(5, 10, 0) <= LINUX_VERSION_CODE) static const struct proc_ops cif_proc_fops = { .proc_open = proc_cif_open, .proc_read = seq_read, .proc_write = cif_proc_write, .proc_lseek = seq_lseek, .proc_release = single_release, }; #else static const struct file_operations cif_proc_fops = { .owner = THIS_MODULE, .open = proc_cif_open, .read = seq_read, .write = cif_proc_write, .llseek = seq_lseek, .release = single_release, }; #endif #ifdef CONFIG_PROC_FS cif_proc_entry = proc_create_data(CIF_PROC_NAME, 0 , NULL, &cif_proc_fops, dev); if (!cif_proc_entry) dev_err(&pdev->dev, "cif: can't init procfs.\n" ); #endif
1.先创建proc条目:
2.实现proc_ops中的成员函数,主要是.proc_open和.proc_write。注意这里当我们Linux内核版本超过5.10,叫做proc_ops, 否则还是叫做file_operations.
procfs通常会和seq_file接口一起使用。seq_file是一个序列文件接口,当我们创建的proc数据内容由一系列数据顺序组合而成或者是比较大的proc文件系统时,都建议使用seq_file接口,例如cat /proc/meminfo就会显示很多内容。
seq_file接口主要就是解决proc接口编程存在的问题,推荐在proc接口编程时使用seq_file接口,另外.read、.llseek、.release成员函数也可以直接用seq_read、seq_lseek和seq_release。
1.2.2.1 seq机制 当用户顺序读取proc接口时, 比如cat /proc/v4l2/mipi-rx, proc_cif_open被调用,然后调用seq_read。和应用程序一样,操作一个文件就是open, read, close操作…
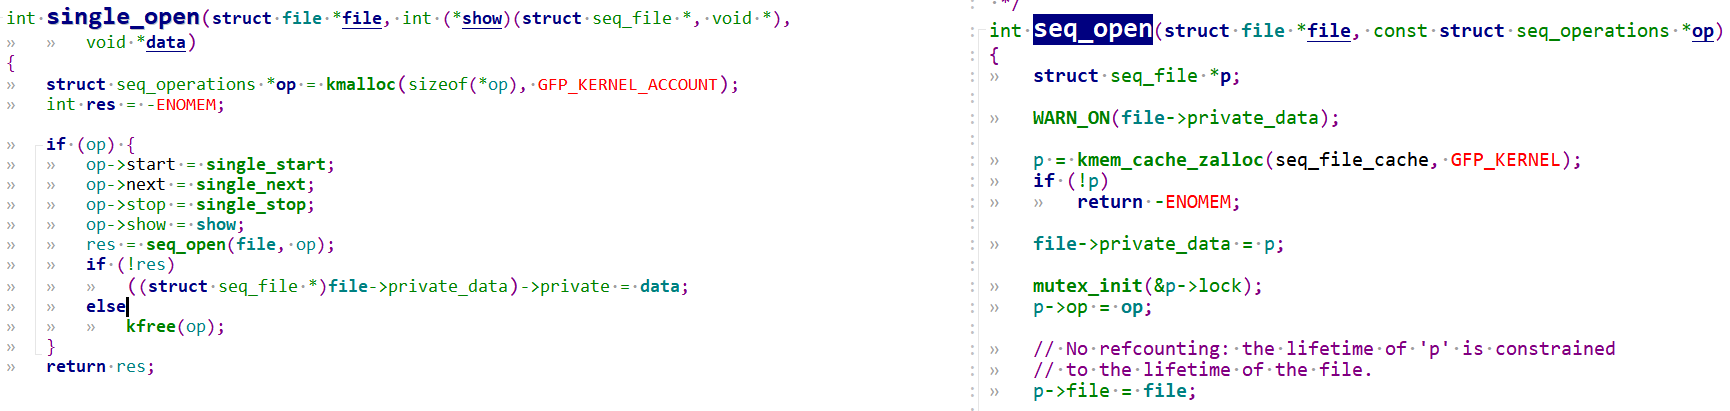
1.2.2.1.0 sigle_open proc_cif_open调用sigle_open,sigle_open直接调用了seq_open(file, op),该函数会创建个seq_file实例,并添加到file->private_data。
还会创建一个seq_operations *op, 可以看到驱动设置的show函数cif_proc_show被给到op的成员函数show,其余几个成员函数赋值为:
1 2 3 4 op->start = single_start; op->next = single_next; op->stop = single_stop; op->show = show;
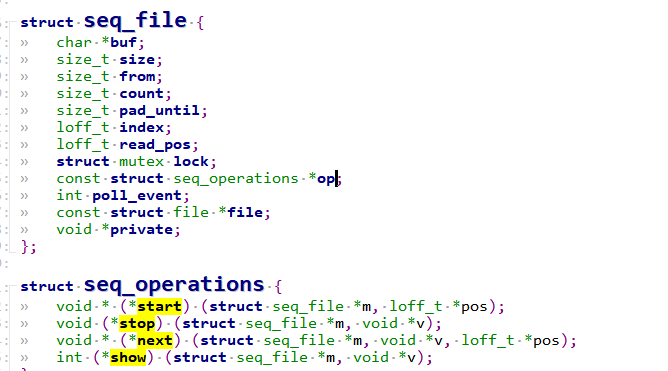
继续看seq_open,把前面的seq_operations *op实例给到seq_file *p->op。
1.2.2.1.1 seq_file基础
open完后,好接着调用seq_read。seq机制实现见:
Y:\linux_5.10\fs\seq_file.c
Y:\linux_5.10\include\linux\seq_file.h
1.2.2.1.2 seq_read
可以看到不就是调用sigle_open时注册的single_start, single_next函数嘛,包括驱动自己注册的show函数,我这里是cif_proc_show.
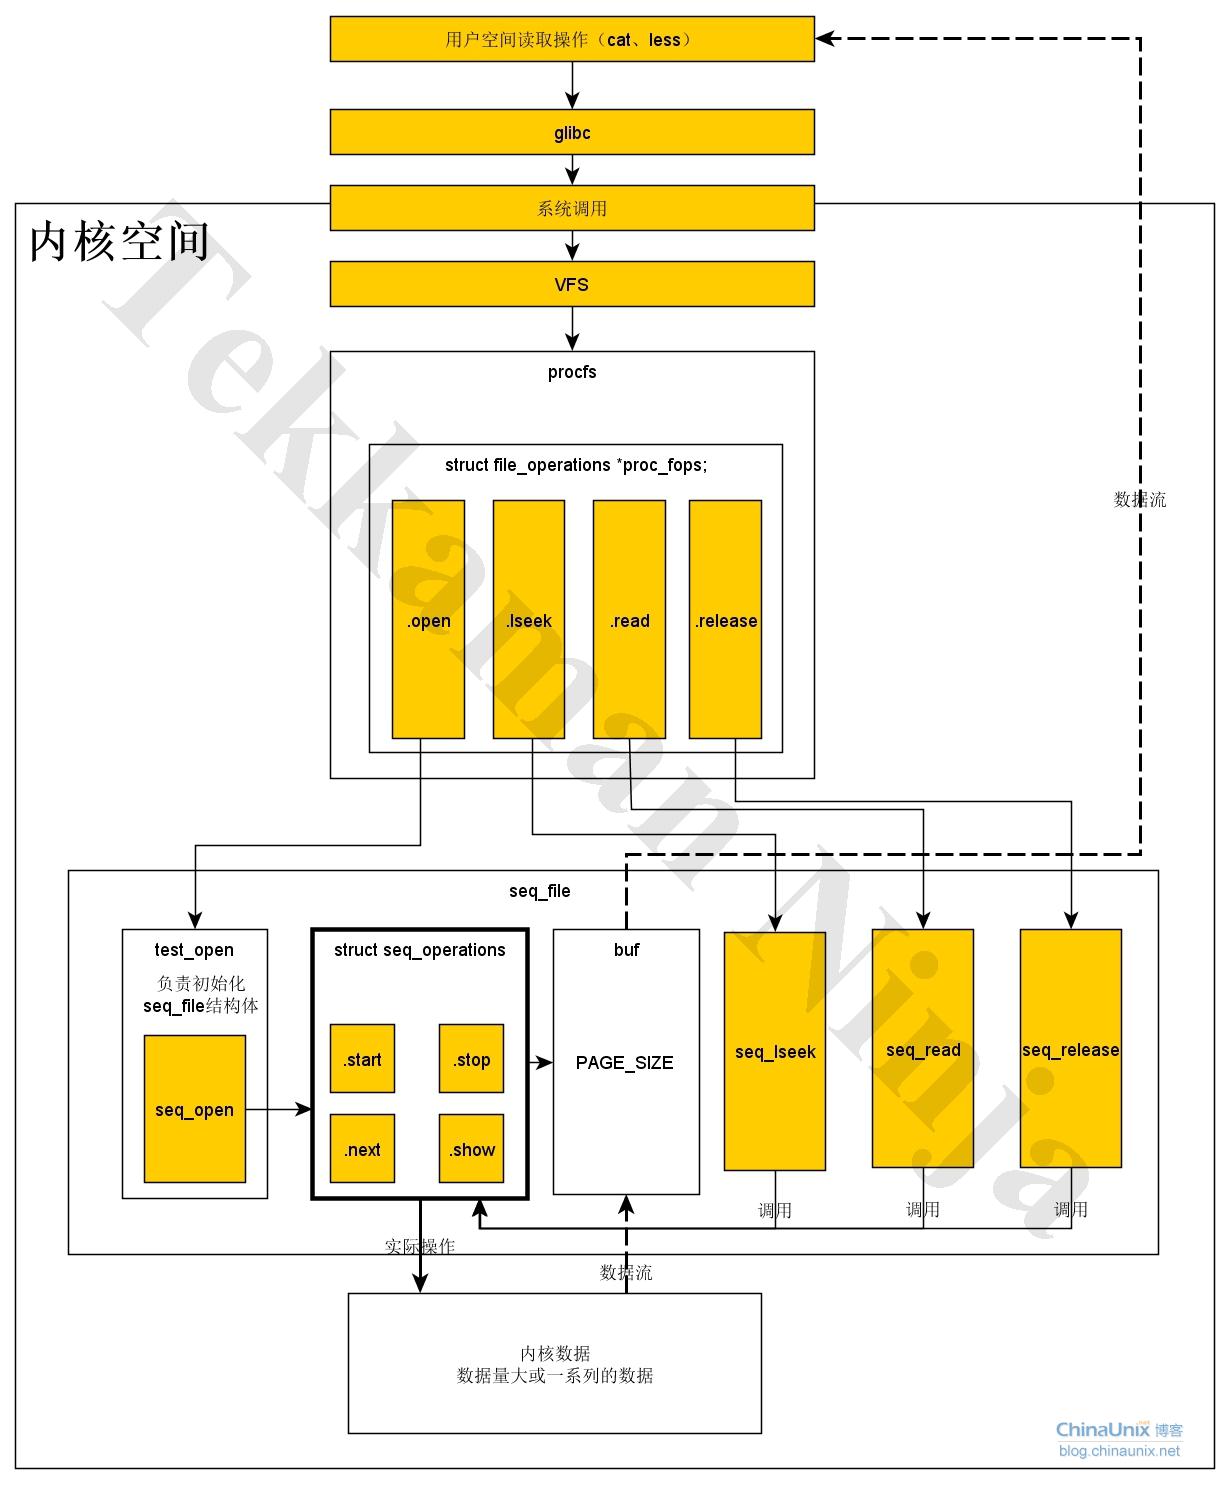
网上找了一份图总结了seq机制:
1.3 debugfs debugfs也是一种用来调试内核的内存文件系统,内核开发者可以通过debugfs和用户空间交换数据,有点类似于前文提到的procfs和sysfs。
procfs是为了反映系统以及进程的状态信息, sysfs用于Linux设备驱动模型:
把私有的调试信息加入这两个虚拟文件系统不太合适,因此内核多添加了一个虚拟文件系统,也就是debugfs。
最常见的就是linux内核的dynamic debug dynamic_debug-hexo 可以在程序运行后动态开关模块的打印,甚至是具体某个文件,某个函数的打印。
1.3.1 debugfs API debufs文件系统中有不少API函数可以使用,它们定义在include/linux/debugfs.h头文件中。
1 2 3 4 5 6 struct dentry *debugfs_create_dir (const char *name,struct dentry *parent) void debugfs_remove (struct dentry *dentry) struct dentry *debugfs_create_blob (const char *name, umode_t mode,struct dentry *parent, struct debugfs_blob_wrapper *blob) struct dentry *debugfs_create_file (const char *name, umode_t mode,struct dentry *parent, void *data,const struct file_operations *fops)
1.3.2 debugfs 示例
1 2 3 4 5 6 7 8 9 10 11 12 13 14 15 16 17 18 19 20 21 22 23 24 25 26 27 28 29 30 31 32 33 34 35 36 37 38 39 40 41 42 43 44 45 46 47 48 #ifdef CONFIG_DEBUG_FS static ssize_t vpu_debug_read (struct file *file, char __user *user_buf, size_t count, loff_t *ppos) { char buf[256 ]; unsigned int len; unsigned int running, pc, vpu_to_host, host_to_vpu, wdt; int ret; struct device *dev = struct mtk_vpu *vpu = ret = vpu_clock_enable(vpu); if (ret) { dev_err(vpu->dev, "[VPU] enable clock failed %d\n" , ret); return 0 ; } running = vpu_running(vpu); pc = vpu_cfg_readl(vpu, VPU_PC_REG); wdt = vpu_cfg_readl(vpu, VPU_WDT_REG); host_to_vpu = vpu_cfg_readl(vpu, HOST_TO_VPU); vpu_to_host = vpu_cfg_readl(vpu, VPU_TO_HOST); vpu_clock_disable(vpu); if (running) { len = snprintf (buf, sizeof (buf), "VPU is running\n\n" "FW Version: %s\n" "PC: 0x%x\n" "WDT: 0x%x\n" "Host to VPU: 0x%x\n" "VPU to Host: 0x%x\n" , vpu->run.fw_ver, pc, wdt, host_to_vpu, vpu_to_host); } else { len = snprintf (buf, sizeof (buf), "VPU not running\n" ); } return simple_read_from_buffer(user_buf, count, ppos, buf, len); } static struct dentry *vpu_debugfs ; static const struct file_operations vpu_debug_fops = .open = simple_open, .read = vpu_debug_read, }; vpu_debugfs = debugfs_create_file("mtk_vpu" , S_IRUGO, NULL , (void *)dev, &vpu_debug_fops); #endif
很简单,就是调用debugfs_create_file后会在debugfs挂载目录下也就是/sys/kernel/debug/建立一个mtk_vpu文件。
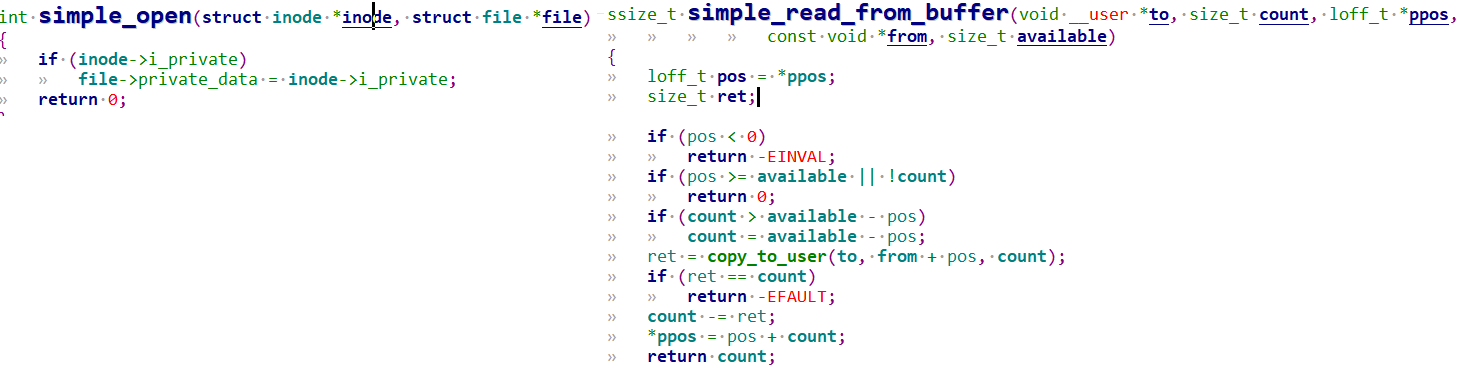
当cat /sys/kernel/debug/mtk_vpu会打开该文件,也就是调用simple_open,然后调用vpu_debug_read,进一步调用simple_read_from_buffer:
你可以规定/sys/kernel/debug/mtk_vpu文件的格式和信息,这里它是dump了一些寄存器信息:
1 2 3 4 VPU_PC_REG VPU_WDT_REG HOST_TO_VPU VPU_TO_HOST
当然你也可以不用simple_open这一套机制,那就要你自己去实现vpu_debug_fops中的成员函数,自己去调用copy_to_user。这里是利用simple_open, simple_read机制帮忙简化了,不需要去调用copy_to_user。
simple_open,simple_read机制见:Y:linux_5.10\fs\libfs.c