1 链接脚本vmlinux.lds#
先编译一下 Linux 源码,因为有很多文件是需要编译才会生成的。首先分析 Linux 内核的连接脚本文件 arch/arm/kernel/vmlinux.lds,通过链接脚本可以找到 Linux 内核的第一行程序是从哪里执行的。vmlinux.lds 中有如下代码:
1 | 492 OUTPUT_ARCH(arm) |
ENTRY 指明了了 Linux 内核入口,入口为 stext,stext 定义在文件arch/arm/kernel/head.S 中 , 因 此 要 分 析 Linux 内 核 的 启 动 流 程 , 就 得 先 从 文 件arch/arm/kernel/head.S 的 stext 处开始分析。
2 Linux 内核启动流程#
2.0 Linux kernel启动流程概述#
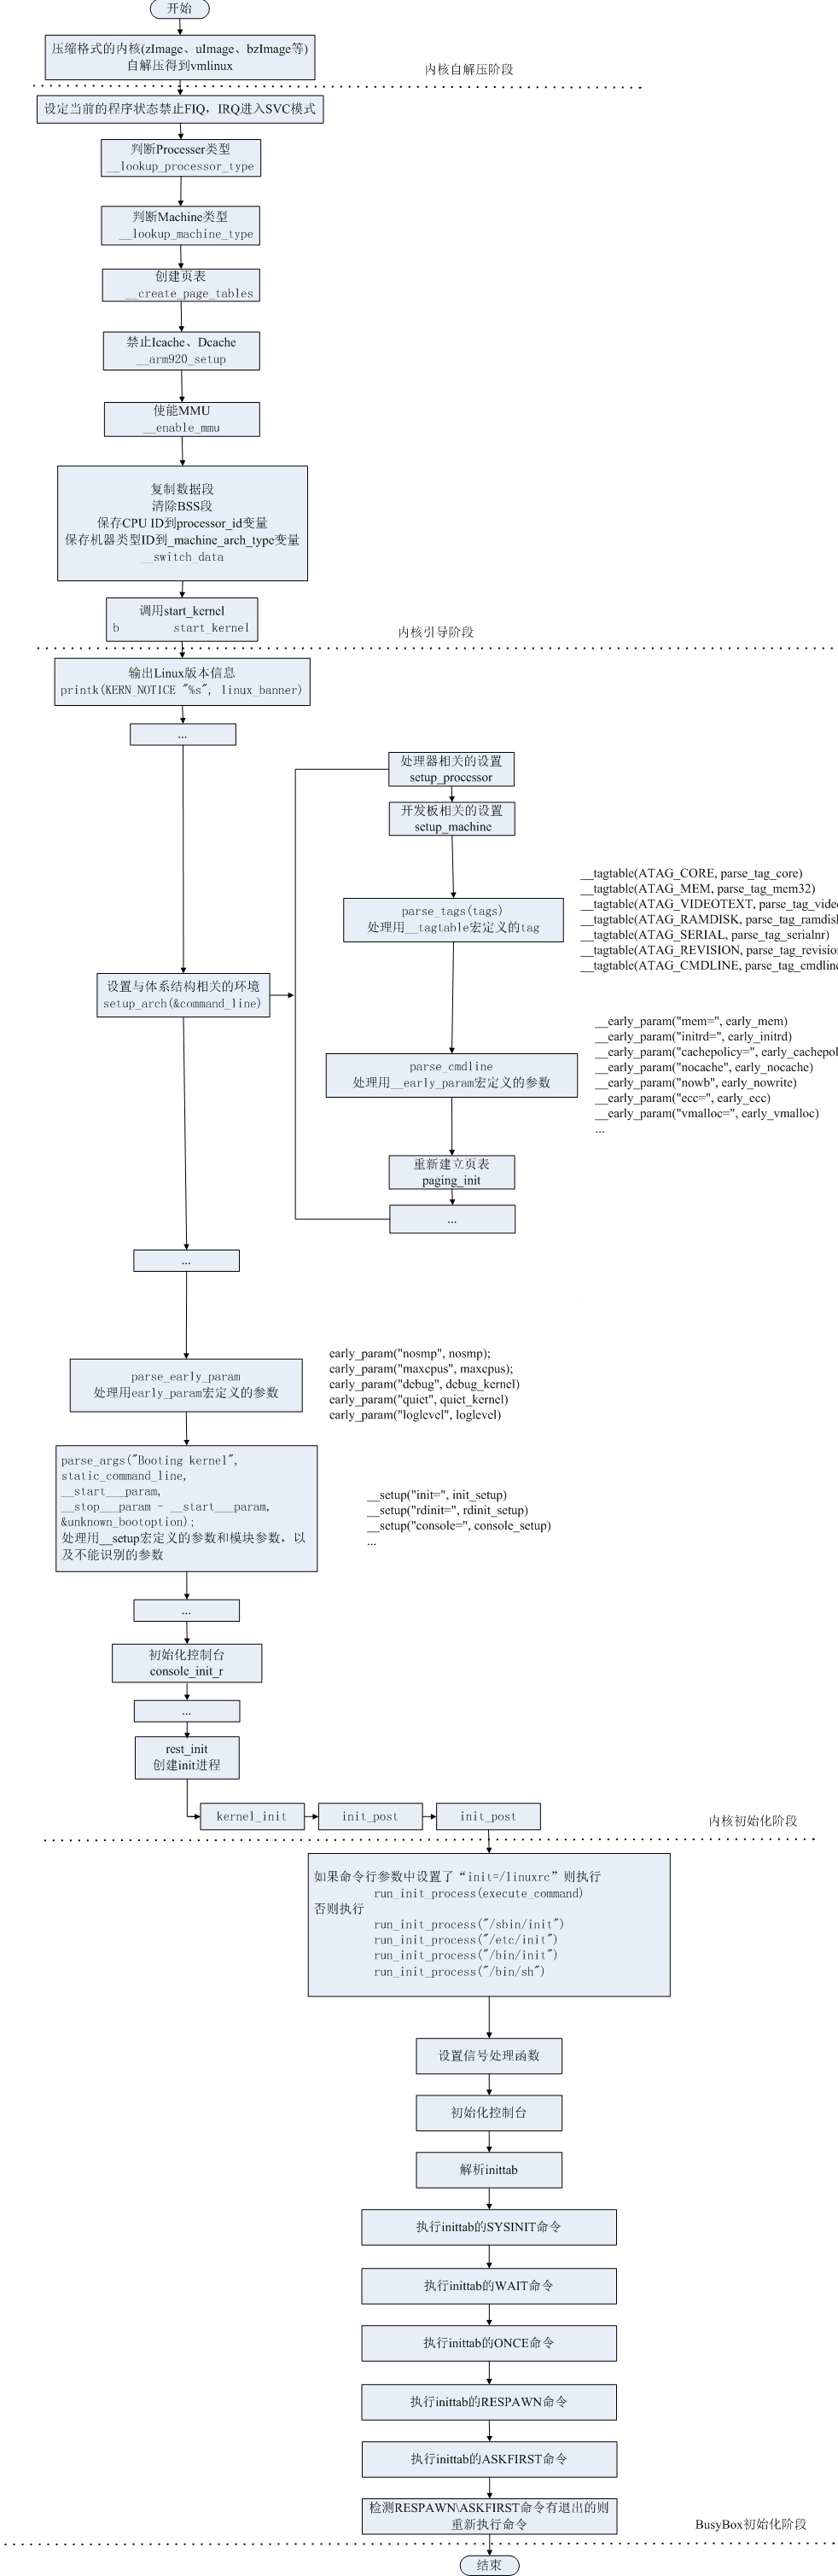
2.1pre linux内核镜像解压#
kernel/lib/inflate.c的decompress_kernel, inflate.c是从gzip 插件源代码移过来的。解压完后会看到:
1 | UncompressingLinux...done, booting the kernel. |
1 | call_kernel: bl cache_clean_flush |
r4 中已经在head.S处预置为内核镜像的地址,因此会跳转到r4去执行,就是Linux 内核入口 stext。
1 |
|
2.1 Linux 内核入口 stext#
打开arch/arm/kernel/head.S可以看到:
1 | /* |
Linux 内核的入口点 stext 其实相当于内核的入口函数,stext 函数内容如下:
依据上面的注释内容,Linux 内核启动之前要求如下:
1 | ①、关闭 MMU。 |
stext代码如下: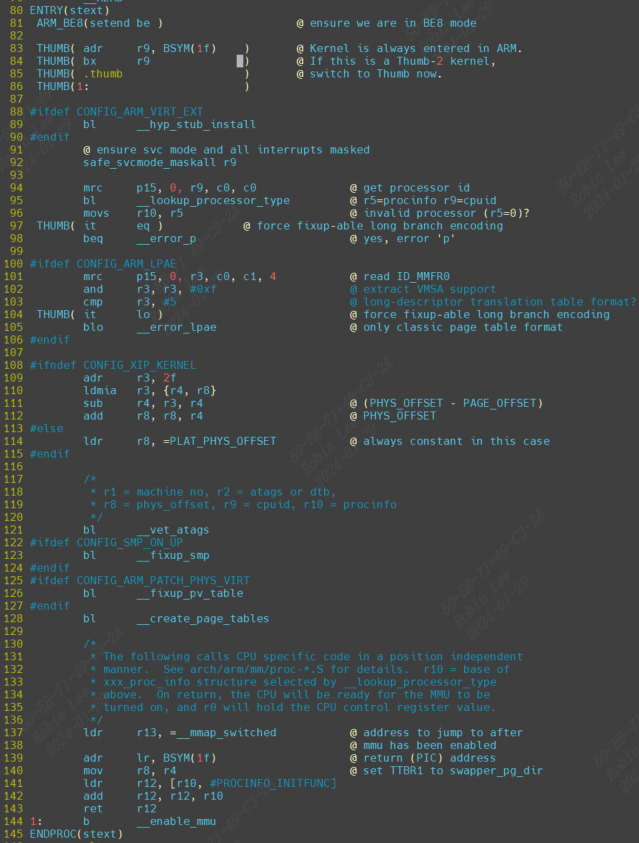
第 92 行,调用函数 safe_svcmode_maskall 确保 CPU 处于 SVC 模式,并且关闭了所有的中断。safe_svcmode_maskall 定义在文件 arch/arm/include/asm/assembler.h 中。
第 94 行,读处理器 ID,ID 值保存在 r9 寄存器中。
第 95 行,调用函数__lookup_processor_type 检查当前系统是否支持此 CPU,如果支持就获取 procinfo 信 息 。 procinfo 是 proc_info_list 类 型 的 结 构 体,proc_info_list 在 文 件arch/arm/include/asm/procinfo.h 中的定义:
1 | struct proc_info_list { |
每种处理器都抽象为一个 proc_info_list 结构体,每种处理器都对应一个procinfo。因此可以通过处理器 ID 来找到对应的 procinfo 结构,__lookup_processor_type 函数找到对应处理器的 procinfo 以后会将其保存到 r5 寄存器中。
第121行,函数__vet_atags 验证 atags 或设备树(dtb)的合法性。函数__vet_atags 定义在文件 arch/arm/kernel/head-common.S 中。
第128行,调用函数__create_page_tables 创建页表。
第 137 行,将函数__mmap_switched 的地址保存到 r13 寄存器中。__mmap_switched 定义在文件 arch/arm/kernel/head-common.S,__mmap_switched 最终会调用 start_kernel 函数。
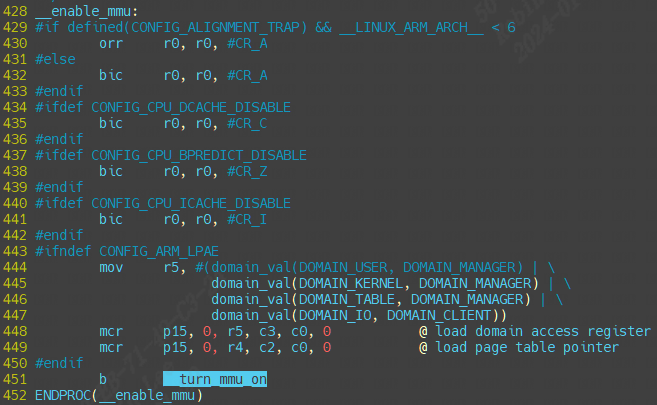
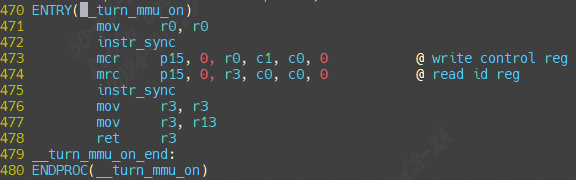
第 144 行 , 调 用 __enable_mmu 函 数 使 能 MMU ,__enable_mmu定 义 在 文 件arch/arm/kernel/head.S 中。__enable_mmu 最终会通过调用__turn_mmu_on 来打开 MMU,__turn_mmu_on 最后会执行 r13 里面保存的__mmap_switched 函数。
2.1.0 __create_page_tables#
- 内核所在物理内存块的初始地址,保存在寄存器 r8 中。
- 内核代码相对于初始地址的偏移值,是在程序编译前就确定的一个宏:
TEXT_OFFSET,arm32 中通常是 0x8000,也就是偏移地址为 32 K,前面保留的 32K 内存就是用来存放页表。
在建立页表之前,目前所处的相关寄存器环境为:r8 = phys_offset, r9 = cpuid, r10 = procinfo.
2.1.1 __enable_mmu#
2.1.1.1 __mmap_switched#
前面讲到__enable_mmu会调用__mmap_switched 函数(通过调用__turn_mmu_on 再调用r13)。现在具体分析它: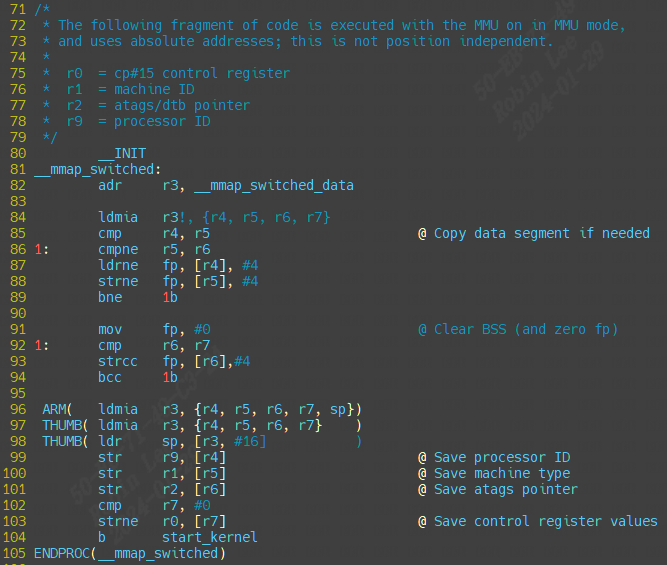
可以看到__mmap_switched主要就是做clear bss,然后保存处理器ID, 序列号,最终跳转start_kernel函数。
2.1.1.1.1 start_kernel#
start_kernel会调用大量的子函数完成linux启动前的一些初始化工作,start_kernel 函数里面调用的子函数太多,而这些子函数又很复杂。我们简单的来看一下一些重要的子函数。精简并添加注释后的 start_kernel 函数内容如下:
init/main/start_kenel函数
1 | asmlinkage __visible void __init start_kernel(void) |
如下,打上注释方便清楚每个子调用的含义:
1 | lockdep_init() //lockdep 是死锁检测模块,此函数会初始化两个 hash 表 |
start_kernel完成内核初始化工作。具体包括以下部分:
(1)内核架构 、通用配置相关初始化
(2) 内存管理相关初始化
(3)进程管理相关初始化
(4)进程调度相关初始化
(5)网络子系统管理
(6)虚拟文件系统
(7)文件系统
2.1.1.1.1.1 setup_arch#
内核架构相关的初始化函数, 包含了处理器相关参数的初始化、内核启动参数(tagged list)的获取和前期处理、内存子系统的早期初始化。
setup_arch(&command_line);
若uboot中bootargs的值为空,command_line = default_command_line,即为内核中的默认命令行参数,其值在.config文件中配置,对应CONFIG_CMDLINE配置项。
2.1.1.1.1.2 setup_command_line、parse_early_param以及parse_args#
完成命令行参数的解析、保存。譬如:
1 | cmdline = console=ttySAC2,115200 root=/dev/mmcblk0p2 rw |
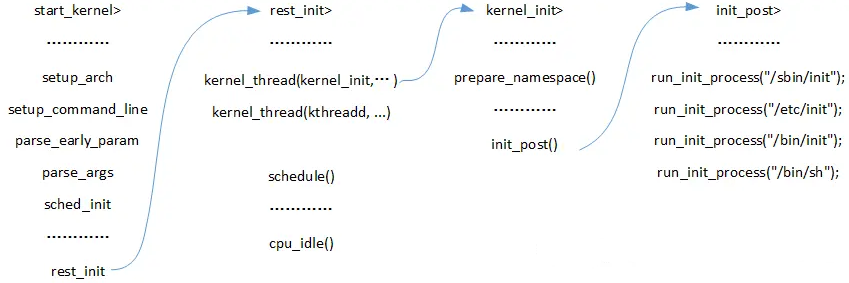
2.1.1.1.1.n reset_init#
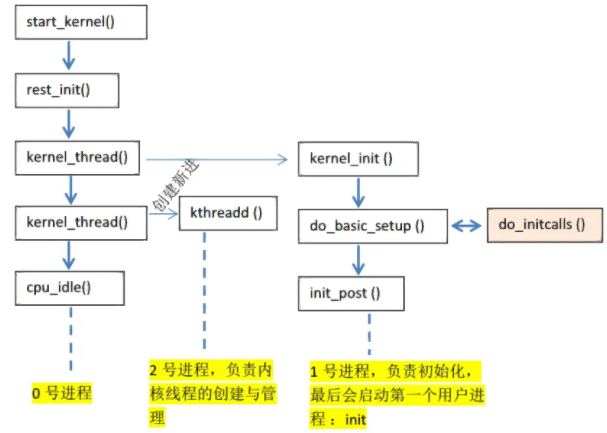
1 | 1)调用kernel_thread函数启动了2个内核线程,分别是:kernel_init和kthreadd。 |
1 | static noinline void __init_refok rest_init(void) |
调用函数 rcu_scheduler_starting,启动 RCU 锁调度器。
调用函数 kernel_thread 创建 kernel_init 进程,也就是大名鼎鼎的 init 内核进程。init 进程的 PID 为 1。init 进程一开始是内核进程(也就是运行在内核态),后面 init 进程会在根文件系统中查找名为“init”这个程序,这个“init”程序处于用户态,通过运行这个“init”程序,init 进程就会实现从内核态到用户态的转变。
调用函数 kernel_thread 创建 kthreadd 内核进程,此内核进程的 PID 为 2。kthreadd进程负责所有内核进程的调度和管理。
最后调用函数 cpu_startup_entry 来进入 idle 进程,cpu_startup_entry 会调用cpu_idle_loop,cpu_idle_loop 是个 while 循环,也就是 idle 进程代码。idle 进程的 PID 为 0,idle进程叫做空闲进程,如果学过 FreeRTOS 或者 UCOS 的话应该听说过空闲任务。idle 空闲进程就和空闲任务一样,当 CPU 没有事情做的时候就在 idle 空闲进程里面“瞎逛游”,反正就是给CPU 找点事做。当其他进程要工作的时候就会抢占 idle 进程,从而夺取 CPU 使用权。其实大家应该可以看到 idle 进程并没有使用 kernel_thread 或者 fork 函数来创建,因为它是有主进程演变而来的。
在 Linux 终端中输入“ps -A”就可以打印出当前系统中的所有进程,其中就能看到 init 进程和 kthreadd 进程: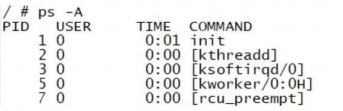
init 进程的 PID 为 1,kthreadd 进程的 PID 为 2。没有显示 PID 为 0 的 idle 进程,那是因为 idle 进程是内核进程。kernel_init 就是 init 进程的进程函数。
2.2 kernel_init(init进程详解)#
把reset_init中的kernel_init 拆出来,函数kernel_init 就是 init 进程具体做的工作,函数内容如下:
1 | static int __ref kernel_init(void *unused) |
kernel_init_freeable 函数用于完成 init 进程的一些其他初始化工作,稍后再来具体看一下此函数。ramdisk_execute_command 是一个全局的 char 指针变量,此变量值为“/init”,也就是根目录下的 init 程序。ramdisk_execute_command 也可以通过 uboot 传递,在 bootargs 中使用“rdinit=xxx”即可,xxx 为具体的 init 程序名字。
如果存在“/init”程序的话就通过函数 run_init_process 来运行此程序。
如果 ramdisk_execute_command 为空的话就看 execute_command 是否为空,反正不管如何一定要在根文件系统中找到一个可运行的 init 程序。execute_command 的值是通过uboot 传递,在 bootargs 中使用“init=xxxx”就可以了,比如“init=/linuxrc”表示根文件系统中的 linuxrc 就是要执行的用户空间 init 程序。
如果ramdisk_execute_command和 execute_command 都为空,那么就依次查找“/sbin/init”、“/etc/init”、“/bin/init”和“/bin/sh”,这四个相当于备用 init 程序,如果这四个也不存在,那么 Linux 启动失败!
如果以上步骤都没有找到用户空间的 init 程序,那么就提示错误发生!
2.2.1 kernel_init_freeable#
kernel_init_freeable 定义在文件 init/main.c 中,缩减后的函数内容如下:
1 | static noinline void __init kernel_init_freeable(void) |
2.2.1.1 driver_init#
do_basic_setup 函数用于完成 Linux 下设备驱动初始化工作!非常重要。do_basic_setup 会调用 driver_init 函数完成 Linux 下驱动模型子系统的初始化。
2.2.1.2 设置控制台#
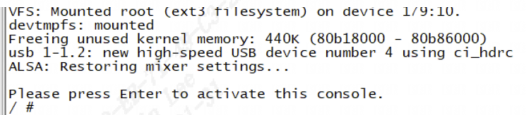
打开设备“/dev/console”,在 Linux 中一切皆为文件!因此“/dev/console”也是一个文件,此文件为控制台设备。每个文件都有一个文件描述符,此处打开的“/dev/console”文件描述符为 0,作为标准输入(0)。sys_dup 函数将标准输入(0)的文件描述符复制了 2 次,一个作为标准输出(1),一个作为标准错误(2)。这样标准输入、输出、错误都是/dev/console 了。console 通过uboot 的 bootargs 环境变量设置,“console=ttymxc0,115200”表示将/dev/ttymxc0 设置为 console,也就是 I.MX6U 的串口 1。当然,也可以设置其他的设备为 console,比如虚拟控制台 tty1,设置 tty1 为 console 就可以在 LCD 屏幕上看到系统的提示信息。
2.2.1.3 挂载根文件系统#
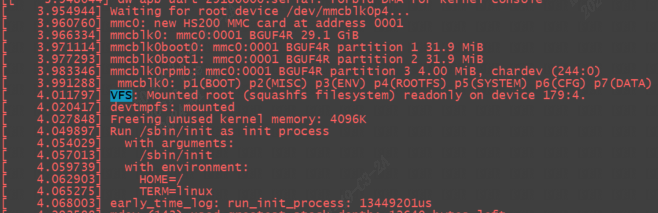
调用函数 prepare_namespace 来挂载根文件系统。根文件系统也是由命令行参数指定的,就是 uboot 的 bootargs 环境变量。比如“root=/dev/mmcblk1p2 rootwait rw”就表示根文件系统在/dev/mmcblk1p2 中,也就是 EMMC 的分区 2 中。
下面2张图都是emmc存储,分别挂载ext3格式和squashfs格式根文件系统:
如果根文件系统缺失错误,这里我们故意将:
1 | setenv bootargs 'console=ttymxc0,115200' |
这时候挂载根文件系统时,由于没有指定root=/dev/mmcblk1p2 rootwait rw,因此报错如下: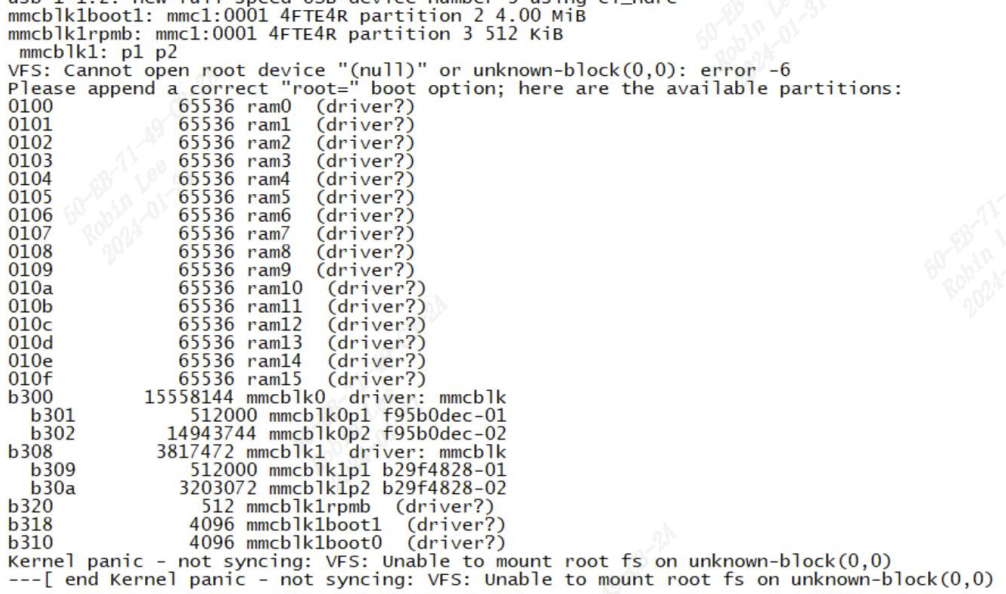
还能看到call trace如下: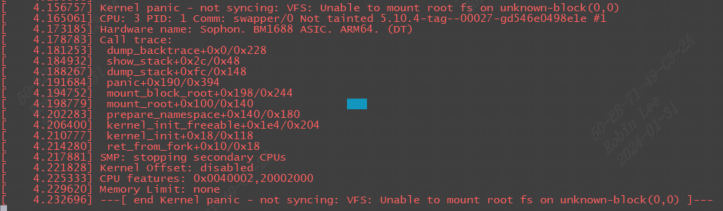
2.2.1.3.1 init 服务#
启动init服务时,init服务会读取/etc/inittab文件,/etc/inittab中设置了初始化系统环境的工作。 /etc/inittab定义 init 服务在 linux启动过程中必须依序执行以下几个Script :
1 | /etc/rc.d/rc.sysinit |
2.2.1.3.1.1 rc.sysinit#
/etc/rc.d/rc.sysinit主要的功能是设置系统的基本环境:
(1)启动udev
(2)设置内核参数:执行sysctl –p ,以便从 /etc/sysctl.conf 设置内核参数
(3)设置系统时间:将硬件时间设置为系统时间
(4)启用交换内存空间:执行 swpaon –a –e,以便根据/etc/fstab的设置启用所有的交换内存空间。
(5)检查并挂载所有文件系统:检查所有需要挂载的文件系统,以确保这些文件系统的完整性。检查完毕后以可读可写的方式挂载文件系统。
(6)初始化硬件设备:Linux除了在启动内核时以静态驱动程序驱动部分的硬件外,在执行rc.sysinit 时,也会试着驱动剩余的硬件设备
3 Linux内核initcall机制#
linux内核提供xxx_init(init_func)宏定义接口,驱动开发者只需要将驱动程序的init_func使用xxx_init()来修饰,这个函数就被自动添加到了上述的段中,开发者完全不需要关心实现细节。
3.1 xxx_initcall的源码#
在平台对应的init.h文件中,可以找到xxx_initcall的定义:
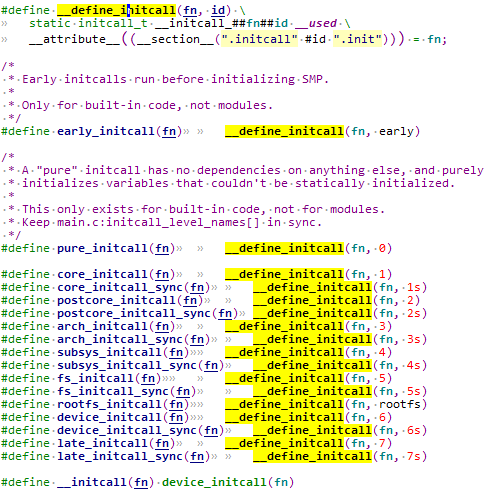
n是一个数字或者是数字+s,这个数字代表这个fn执行的优先级,数字越小,优先级越高,带s的fn优先级低于不带s的fn优先级。可以看到上面的从pure_initcall到late_initcall优先级依次变低。
这里__attribute__((__section__(".initcall" #id ".init")))表示编译时将目标符号放置在括号指定的段中。
举个例子,对pure_initcall(test_init);展开:
- 首先宏展开成:
__define_initcall(test_init, 0) - 然后接着展开:
static initcall_t __initcall_test_init0 = test_init;这就是一个简单的变量定义。 - 同时声明
__initcall_test_init0这个变量即使没被引用也保留符号,且将其放置在内核镜像的.initcall0.init段处。
在开发者添加 xxx_initcall(fn) 时,事实上是将fn放置到了 ".initcall##level##.init" 的段中。
3.2 xxx_initcall修饰的函数怎么被调用#
见Linux-4.9.88\init\main.c
3.2.1 do_initcalls#
1 | start_kernel |
这个do_initcalls()就是我们需要寻找的函数了,在这个函数中执行所有使用xxx_initcall()声明的函数。

do_initcalls() 循环调用 do_initcall_level(level),level就是 initcall 的优先级数字,由 for 循环的终止条件ARRAY_SIZE(initcall_levels) - 1可知,总共会调用8次。
而 do_initcall_level(level) 中则会遍历 initcall_levels[level] 中的每个函数指针,initcall_levels[level] 实际上是对应的__initcall##level##_start 指针变量,然后依次取出__initcall##level##_start 指向地址存储的每个函数指针,并调用 do_one_initcall(*fn),实际上就是执行当前函数。
这个__initcall##level##_start 所存储的函数指针就是开发者用 xxx_initcall() 宏添加的函数,对应".initcall_##level##.init"段。
听起来很绕,举个例子:
比如有一个core_initcall(beagle_init);展开为__define_initcall(beagle_init, 1),所以 beagle_init() 这个函数被放置在 ".initcall1.init"段处。
再比如有一个core_initcall(beagle2_init);, 在 ".initcall1.init"段就会增加一组函数。
那么do_one_initcall(*fn) 的执行:判断initcall_debug的值,如果为真,则调用 do_one_initcall_debug(fn); 如果为假,则直接调用fn。
事实上,调用do_one_initcall_debug(fn)只是在调用fn的基础上添加一些额外的打印信息,可以直接看成是调用fn。
可能有些C语言基础不太好的朋友不太理解 do_initcall_level() 函数中依次取出地址并执行的函数执行逻辑:
1 | for (fn = initcall_levels[level]; fn < initcall_levels[level+1]; fn++) |
fn为函数指针,fn++相当于函数指针+1,相当于:内存地址+sizeof(fn),sizeof(fn)根据平台不同而不同,一般来说,32位机上是4字节,64位机则是8字节.
也就是在同等level下,会从同一个".initcall_##level##.init"段中依次取出对应的函数指针。
也就是从".initcall##level##.init"段开始,每次取一个函数出来执行,并累加指针,直到取完(即到了下一个段的起始地址就表示取完了)。
3.2.1.1 __initcall##level##_start与.initcall##level##.init段的关联#
前面说了在开发者添加 xxx_initcall(fn) 时,事实上是将fn放置到了 ".initcall##level##.init" 的段中。
在do_initcall()的时候,却是从initcall_levels[level](即__initcall##level##_start指针)取出,那么
initcall_levels[level] 是怎么关联到".initcall##level##.init"段的呢?
在vmlinux.lds.h中: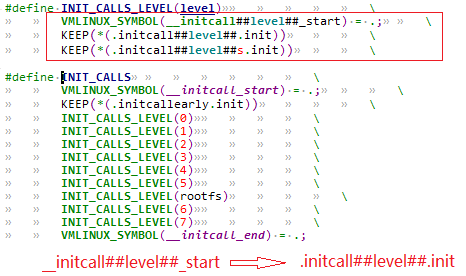
关联到".initcallearly.init"段。
然后对每个 level 定义了INIT_CALLS_LEVEL(level),将INIT_CALLS_LEVEL(level)展开之后的结果是定义 __initcall##level##_start,并将__initcall##level##_start关联到 ".initcall##level##.init" 段和".initcall##level##s.init"段。
到这里,__initcall##level##_start 和".initcall##level##.init"段的对应就比较清晰了,所以,从 initcall_levels[level] 部分一个个取出函数指针并执行函数就是执行xxx_init_call()定义的函数。